")

共计 4979 个字符,预计需要花费 13 分钟才能阅读完成。
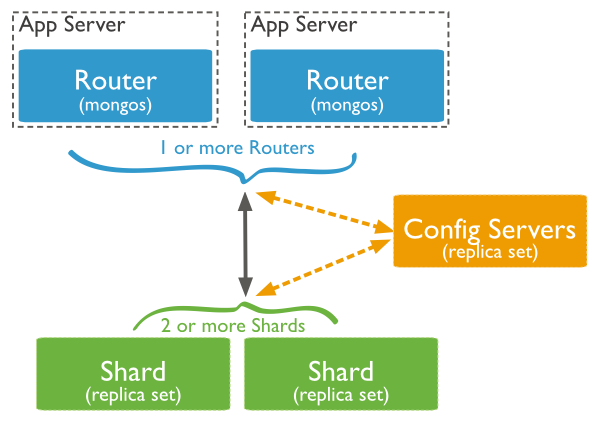
构建一个 sharded cluster 需要至少三个组件:
〇 shard: 每一个 shard 包括了切片数据的子集,也可以被部署为“副本集”
〇 mongos: 作为一个“查询路由”,在客户端和 shard cluster 之间作为一个中间接口,类似于 MySQL 的一些中间 proxy。
可以通过 mongo shell 或者 mongodb driver 直连 mongos
〇 config server: 一个存储了 sharded cluster 的元数据和配置信息的 server,同样也可以被部署为“副本集”(mongodb 3.2)
此处用了四台服务器实践,资源分配如下:

config server(186):
- mkdir –p /data/config/data
- mkdir –p /data/config/log
- mongod ––dbpath=/data/config/data ––logpath=/data/config/log/config.log ––port=30000 ––fork ––configsvr
mongos(185):
- mkdir –p /data/mongos/log
- mongos ––logpath=/data/mongos/log/mongos.log ––port=27017 ––fork ––configdb=192.168.1.186:30000
此处先给两个 shard 节点做副本集,此处将通过端口区分不同实例:
shard1(187):
- mkdir –p /data/shard1/data/set1
- mkdir –p /data/shard1/data/set2
- mkdir –p /data/shard1/data/set3
- mkdir –p /data/shard1/logs
- mongod ––dbpath=/data/shard1/data/set1 ––logpath=/data/shard1/logs/set1.log ––port=27017 ––fork ––shardsvr ––replSet=shard1
- mongod ––dbpath=/data/shard1/data/set2 ––logpath=/data/shard1/logs/set2.log ––port=27018 ––fork ––shardsvr ––replSet=shard1
- mongod ––dbpath=/data/shard1/data/set3 ––logpath=/data/shard1/logs/set3.log ––port=27019 ––fork ––shardsvr ––replSet=shard1
通过 mongo shell 进入任意一个实例,此处选择的是 27017 实例,配置副本集并初始化
- # mongo 127.0.0.1:27017/admin
以下为 mongo shell 操作:
- > cnf = {_id:“shard1”, members:[
- {_id:1, host:“192.168.1.187:27017”},
- {_id:2, host:“192.168.1.187:27018”},
- {_id:3, host:“192.168.1.187:27019”},
- ]
- }
- > rs.initiate(cnf);
- {“ok” : 1 }
可以检查一下副本集状态
- > rs.status()
再给 shard2 做三个副本集
shard2(188):
- mkdir –p /data/shard2/data/set1
- mkdir –p /data/shard2/data/set2
- mkdir –p /data/shard2/data/set3
- mkdir –p /data/shard2/logs
- mongod ––dbpath=/data/shard2/data/set1 ––logpath=/data/shard2/logs/set1.log ––port=27017 ––fork ––shardsvr ––replSet=shard2
- mongod ––dbpath=/data/shard2/data/set2 ––logpath=/data/shard2/logs/set2.log ––port=27018 ––fork ––shardsvr ––replSet=shard2
- mongod ––dbpath=/data/shard2/data/set3 ––logpath=/data/shard2/logs/set3.log ––port=27019 ––fork ––shardsvr ––replSet=shard2
和 shard1 一样,通过 mongo shell 进入任意一个实例,此处选择的是 27017 实例,配置副本集并初始化
- > cnf = {_id:“shard2”, members:[
- {_id:1, host:“192.168.1.188:27017”},
- {_id:2, host:“192.168.1.188:27018”},
- {_id:3, host:“192.168.1.188:27019”},
- ]
- }
- > rs.initiate(cnf);
- {“ok” : 1 }
最后在 mongos(185) 的机器上添加 shard 节点:
- # mongo 127.0.0.1:27017/admin
进入 mongo shell,通过 addshard 来加入 shard 节点,多个副本集用逗号分隔:
- mongos> db.runCommand( {addshard : “shard1/192.168.1.187:27017,192.168.1.187:27018,192.168.1.187:27019”});
- {“shardAdded” : “shard1”, “ok” : 1 }
- mongos> db.runCommand( {addshard : “shard2/192.168.1.188:27017,192.168.1.188:27018,192.168.1.188:27019”});
- {“shardAdded” : “shard2”, “ok” : 1 }
- mongos> db.runCommand( {listshards : 1 } );
- {
- “shards” : [
- {
- “_id” : “shard1”,
- “host” : “shard1/192.168.1.187:27017,192.168.1.187:27018,192.168.1.187:27019”
- },
- {
- “_id” : “shard2”,
- “host” : “shard2/192.168.1.188:27017,192.168.1.188:27018,192.168.1.188:27019”
- }
- ],
- “ok” : 1
- }
此处对 sano1y 库的 testtb 使用 hash 策略:
- mongos> use admin
- switched to db admin
- mongos> db.runCommand({“enablesharding”:“sano1y”})
- {“ok” : 1 }
- mongos> db.runCommand({“shardcollection”:“sano1y.testtb”,“key”:{“_id”:“hashed”}})
- {“collectionsharded” : “sano1y.testtb”, “ok” : 1 }
目前为止,已经对 sano1y 库的 testtb 集合进行了 shard 配置。
测试:
- mongos> use sano1y
- switched to db sano1y
- mongos> for(i=0;i<100000;i++) {db.testtb.insert({“id”:i,“name”:“test_hash”});}
稍等片刻,等待插入完毕:
- WriteResult({ “nInserted” : 1 })
进入 shard1(187)的 PRIMARY 实例检查
- shard1:PRIMARY> use sano1y
- switched to db sano1y
- shard1:PRIMARY> db.testtb.find().count()
- 49983
- shard1:PRIMARY> db.testtb.find()
- {“_id” : ObjectId(“5837ef1dea1fd54fb38d845c”), “id” : 0, “name” : “test_hash” }
- {“_id” : ObjectId(“5837ef1dea1fd54fb38d845d”), “id” : 1, “name” : “test_hash” }
- {“_id” : ObjectId(“5837ef1dea1fd54fb38d845e”), “id” : 2, “name” : “test_hash” }
- {“_id” : ObjectId(“5837ef1dea1fd54fb38d8460”), “id” : 4, “name” : “test_hash” }
- {“_id” : ObjectId(“5837ef1dea1fd54fb38d8461”), “id” : 5, “name” : “test_hash” }
- {“_id” : ObjectId(“5837ef1dea1fd54fb38d8465”), “id” : 9, “name” : “test_hash” }
- {“_id” : ObjectId(“5837ef1dea1fd54fb38d8468”), “id” : 12, “name” : “test_hash” }
- {“_id” : ObjectId(“5837ef1dea1fd54fb38d846f”), “id” : 19, “name” : “test_hash” }
- {“_id” : ObjectId(“5837ef1dea1fd54fb38d8471”), “id” : 21, “name” : “test_hash” }
- {“_id” : ObjectId(“5837ef1dea1fd54fb38d8475”), “id” : 25, “name” : “test_hash” }
- {“_id” : ObjectId(“5837ef1dea1fd54fb38d8476”), “id” : 26, “name” : “test_hash” }
- {“_id” : ObjectId(“5837ef1dea1fd54fb38d8479”), “id” : 29, “name” : “test_hash” }
- {“_id” : ObjectId(“5837ef1dea1fd54fb38d847d”), “id” : 33, “name” : “test_hash” }
- {“_id” : ObjectId(“5837ef1dea1fd54fb38d847e”), “id” : 34, “name” : “test_hash” }
- {“_id” : ObjectId(“5837ef1dea1fd54fb38d8480”), “id” : 36, “name” : “test_hash” }
- {“_id” : ObjectId(“5837ef1dea1fd54fb38d8481”), “id” : 37, “name” : “test_hash” }
- {“_id” : ObjectId(“5837ef1dea1fd54fb38d8483”), “id” : 39, “name” : “test_hash” }
- {“_id” : ObjectId(“5837ef1dea1fd54fb38d8486”), “id” : 42, “name” : “test_hash” }
- {“_id” : ObjectId(“5837ef1dea1fd54fb38d848b”), “id” : 47, “name” : “test_hash” }
- {“_id” : ObjectId(“5837ef1dea1fd54fb38d848d”), “id” : 49, “name” : “test_hash” }
另外如果到 shard2 可以看到 shard1 这些不连续的 id。
可发现 shard1 和 2 中的 document 数量,还是比较均匀的。
shard1: 49983
shard2: 50017
至此,分片集群搭建基本完成。
当然,config server 现在存在着单点的问题,同样也可以将 config server 配置成一组 replSet,其本质是 mongod 服务器。
本文永久更新链接地址:http://www.linuxidc.com/Linux/2017-03/142382.htm