共计 5716 个字符,预计需要花费 15 分钟才能阅读完成。
Replicat Set 比起传统的 Master – Slave 结构而言,应用场景更加多,也有了自动 failover 的能力。
在 mongo3.2 的文档中明确写道:
- Replica sets replace master–slave replication for most use cases.
- If possible, use replica sets rather than master–slave replication for all new production deployments.
本文将简单 介绍 mongodb 副本集搭建。
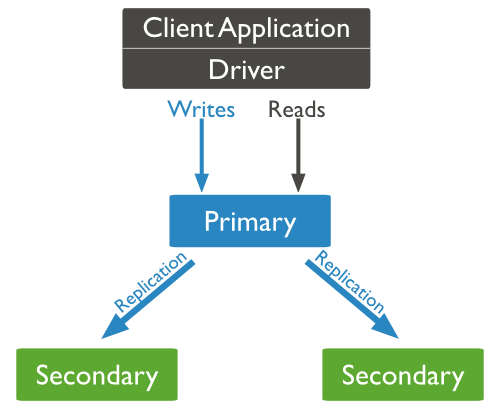
〇 副本集结构图
我在此处大致理解为“MySQL 中 1 主 2 从 +mha_manager” 的结构。
Replication 通过 Oplog 实现语句复现。

〇 副本集成员的属性:
分别为 Primary、Secondary(Secondaries)
Primary 负责处理所有的 write 请求,并记录到 oplog(operation log)中。
Secondary 负责复制 oplog 并应用这些 write 请求到他们自己的数据集中。(有一些类似于 MySQL Replication)
所有的副本集都可以处理读操作,但是需要设置。
最小化的副本集配置建议有三个成员:
1 个 Primary + 2 个 Secondary
或者
1 个 Primary + 1 个 Secondary + 1 个 Arbiter( 仲裁者)
〇 Arbiter 和选举机制:
Arbiter 可以作为副本集的一部分,但它不是一个数据副本,故它不会成为 Primary。
Arbiter 在 Primary 不可用的时候,作为一个选举的角色存在。
如果Arbiter 不存在,Primary 挂掉的情况下,剩下的两个Secondary 则也会进行选举。
在 1 个 Primary + 2 个 Secondary 的情况下,failover 如下:

〇 搭建
实验结构:
185(Arbiter)(后文用到)
186\187\188(1 个 Primary、2 个 Secondary)
在三台机器上分别创建对应目录然后启动 mongodb:
- mkdir –p /data/mongo_replset
- mongod ––dbpath=/data/mongo_replset ––logpath=/data/mongo_replset/mongo.log ––fork ––replSet=first_replset
登录任意一台副本集的 mongo shell
此处用的是 192.168.1.187
- > use admin
输入:
- > cnf = {_id:“first_replset”, members:[
- {_id:1, host:“192.168.1.186:27017”},
- {_id:2, host:“192.168.1.187:27017”},
- {_id:3, host:“192.168.1.188:27017”},
- ]
- }
- 输出结果:
- > {
- “_id” : “first_replset”,
- “members” : [
- {
- “_id” : 1,
- “host” : “192.168.1.186:27017”
- },
- {
- “_id” : 2,
- “host” : “192.168.1.187:27017”
- },
- {
- “_id” : 3,
- “host” : “192.168.1.188:27017”
- }
- ]
- }
初始化配置:
- > rs.initiate(cnf);
- {“ok” : 1 }
- first_replset:OTHER>
- first_replset:PRIMARY>
- first_replset:PRIMARY>
此时可以发现该 mongodb 实例已经成为 PRIMARY 了。
可以看一下这个副本集的各个成员的状态:
- first_replset:PRIMARY> rs.status();
- {
- “set” : “first_replset”,
- “date” : ISODate(“2016-11-15T08:22:10.316Z”),
- “myState” : 2,
- “term” : NumberLong(0),
- “heartbeatIntervalMillis” : NumberLong(2000),
- “members” : [
- {
- “_id” : 1,
- “name” : “192.168.1.186:27017”,
- “health” : 1,
- “state” : 2,
- “stateStr” : “SECONDARY”,
- ……………………
- },
- {
- “_id” : 2,
- “name” : “192.168.1.187:27017”,
- “health” : 1,
- “state” : 2,
- “stateStr” : “PRIMARY”,
- ……………………
- },
- {
- “_id” : 3,
- “name” : “192.168.1.188:27017”,
- “health” : 1,
- “state” : 2,
- “stateStr” : “SECONDARY”,
- ……………………
- }
- ],
- “ok” : 1
- }
〇 副本集复制状态测试
在PRIMARY上 insert:
- [root@192.168.1.187]# mongo 127.0.0.1/test
- MongoDB shell version: 3.2.10
- connecting to: 127.0.0.1/test
- first_replset:PRIMARY> db.test_table.insert({“id”: 1})
- WriteResult({ “nInserted” : 1 })
- first_replset:PRIMARY> db.test_table.find()
- {“_id” : ObjectId(“582abba066fdf9fae28a1ba7”), “id” : 1 }
在 186、188 任意 SECONDARY 上查询:
同 master – slave 结构一样,默认 SECONDARY 是不可 读的,需要执行 rs.slaveOk()。
- first_replset:SECONDARY> rs.slaveOk()
- first_replset:SECONDARY> db.test_table.find()
- {“_id” : ObjectId(“582abba066fdf9fae28a1ba7”), “id” : 1 }
〇 failover 测试
此时情况:
187:PRIAMRY
186、188:SECONDARY
停掉 PRIAMRY:
- first_replset:PRIMARY> use admin
- switched to db admin
- first_replset:PRIMARY> db.shutdownServer()
- server should be down...
- 2016–11–15T16:31:25.921+0800 I NETWORK [thread1] trying reconnect to 127.0.0.1:27017 (127.0.0.1) failed
- 2016–11–15T16:31:27.299+0800 I NETWORK [thread1] Socket recv() errno:104 Connection reset by peer 127.0.0.1:27017
- 2016–11–15T16:31:27.299+0800 I NETWORK [thread1] SocketException: remote: (NONE):0 error: 9001 socket exception [RECV_ERROR] server [127.0.0.1:27017]
- 2016–11–15T16:31:27.299+0800 I NETWORK [thread1] reconnect 127.0.0.1:27017 (127.0.0.1) failed failed
- 2016–11–15T16:31:27.302+0800 I NETWORK [thread1] trying reconnect to 127.0.0.1:27017 (127.0.0.1) failed
- 2016–11–15T16:31:27.302+0800 W NETWORK [thread1] Failed to connect to 127.0.0.1:27017, reason: errno:111 Connection refused
- 2016–11–15T16:31:27.302+0800 I NETWORK [thread1] reconnect 127.0.0.1:27017 (127.0.0.1) failed failed
- >
(原 SECONDARY)188 上查到,此时 188 已经为 PRIMARY 了。
- first_replset:PRIMARY> rs.status()
- {
- “set” : “first_replset”,
- “date” : ISODate(“2016-11-15T16:31:45.773Z”),
- “myState” : 1,
- “term” : NumberLong(2),
- “heartbeatIntervalMillis” : NumberLong(2000),
- “members” : [
- {
- “_id” : 1,
- “name” : “192.168.1.186:27017”,
- “health” : 1,
- “state” : 2,
- “stateStr” : “SECONDARY”,
- ……………………
- },
- {
- “_id” : 2,
- “name” : “192.168.1.187:27017”,
- “health” : 0,
- “state” : 8,
- “stateStr” : “(not reachable/healthy)”,
- ……………………
- },
- {
- “_id” : 3,
- “name” : “192.168.1.188:27017”,
- “health” : 1,
- “state” : 1,
- “stateStr” : “PRIMARY”,
- ……………………
- }
- ],
- “ok” : 1
- }
〇 在副本集中添加一个属性为 Arbiter 的成员
当然此处只 做添加实践,实际上并不建议在 Secondary-Primary-Secondary 的结构上再多一个 Arbiter 成员形成偶数个节点。
文档写到:
- Only add an arbiter to sets with even numbers of voting members.
- If you add an arbiter to a set with an odd number of voting members, the set may suffer from tied elections.
在 192.168.1.185(另一台) 上启动一个 mongod 实例:
- mkdir –p /data/arb
- mongod ––dbpath=/data/arb/ ––logpath=/data/arb/mongo.log ––fork ––replSet=first_replset
在 failover 后的 PRIMARY 节点添加 Arbiter
- first_replset:PRIMARY> rs.addArb(“192.168.1.185:27017”)
- {“ok” : 1 }
- first_replset:PRIMARY> rs.status()
- ……………………
- {
- “_id” : 4,
- “name” : “192.168.1.185:27017”,
- “health” : 1,
- “state” : 7,
- “stateStr” : “ARBITER”,
- ……………………
- }
- ……………………
此时回到 arbiter 的 mongo shell,发现正如文档所说,arbiter 是不会存有副本集中数据的。
- first_replset:ARBITER> rs.slaveOk()
- first_replset:ARBITER> use test;
- switched to db test
- first_replset:ARBITER> show tables;
- first_replset:ARBITER> db.test_table.find();
- Error: error: {“ok” : 0, “errmsg” : “node is recovering”, “code” : 13436 }
〇 参 考文档:
Replication > Replica Set Tutorials > Replica Set Deployment Tutorials
Reference > mongo Shell Methods > Replication Methods
本文永久更新链接地址:http://www.linuxidc.com/Linux/2017-03/142379.htm


