共计 11880 个字符,预计需要花费 30 分钟才能阅读完成。
Linux 中安装配置 Nginx 及参数详解
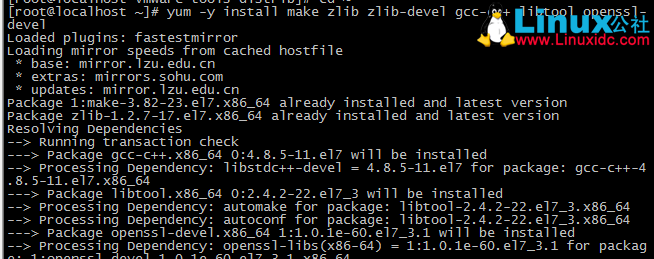
1、安装编译文件及库文件
yum –y install make zlib zlib–devel gcc–c++ libtool openssl openssl–devel

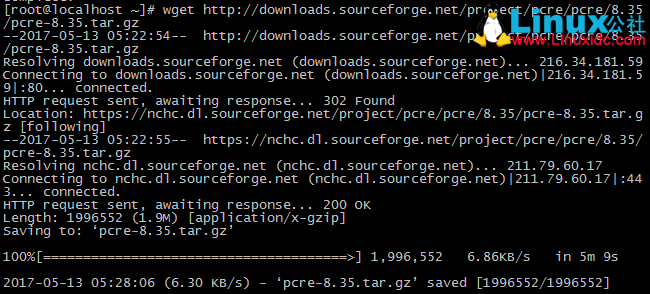
2、安装 PCRE,Nginx 的 rewrite 的伪静态匹配规则需要用到正则表达式,PCRE 就是起到这个作用。
下载地址:wget http://downloads.sourceforge.net/project/pcre/pcre/8.35/pcre-8.35.tar.gz
如果 wget 没有安装的话,需要先安装 wget,yum -y install wget. wget 是 Linux 环境下的下载工具。wget 命令的使用见此文章:http://www.cnblogs.com/cindy-cindy/p/6847502.html

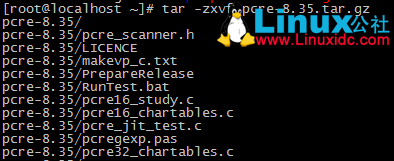
3、解压 pcre 安装包:tar -zxvf pcre-8.35.tar.gz

4、进入安装目录,编译安装
cd pcre-8.35
./configure
make && make install
5、查看 pcre 版本
pcre–config —version

6、下载 Nginx
wget http://nginx.org/download/nginx-1.6.2.tar.gz

7、解压并进入安装包

8、编译安装
./configure —prefix=/usr/local/webserver/nginx —with–http_stub_status_module —with–http_ssl_module —with–pcre=/usr/local/src/pcre–8.35
make
make install
9、查看 Nginx 版本

10、Nginx 配置
1、创建 Nginx 运行使用的用户
/usr/sbin/groupadd www
/usr/sbin/useradd –g www www
2、配置 nginx.conf,将 /usr/local/webserver/nginx/conf/nginx.conf 替换为以下内容
user www www;
worker_processes 2; #设置值和 CPU 核心数一致
error_log /usr/local/webserver/nginx/logs/nginx_error.log crit; #日志位置和日志级别
pid /usr/local/webserver/nginx/nginx.pid;
#Specifies the value for maximum file descriptors that can be opened by this process.
worker_rlimit_nofile 65535;
events
{
  use epoll;
  worker_connections 65535;
}
http
{
  include mime.types;
  default_type application/octet-stream;
  log_format main  '$remote_addr - $remote_user [$time_local]"$request"''$status $body_bytes_sent "$http_referer" ''"$http_user_agent"$http_x_forwarded_for';

#charset gb2312;

  server_names_hash_bucket_size 128;
  client_header_buffer_size 32k;
  large_client_header_buffers 4 32k;
  client_max_body_size 8m;

  sendfile on;
  tcp_nopush on;
  keepalive_timeout 60;
  tcp_nodelay on;
  fastcgi_connect_timeout 300;
  fastcgi_send_timeout 300;
  fastcgi_read_timeout 300;
  fastcgi_buffer_size 64k;
  fastcgi_buffers 4 64k;
  fastcgi_busy_buffers_size 128k;
  fastcgi_temp_file_write_size 128k;
  gzip on;
  gzip_min_length 1k;
  gzip_buffers 4 16k;
  gzip_http_version 1.0;
  gzip_comp_level 2;
  gzip_types text/plain application/x-Javascript text/css application/xml;
  gzip_vary on;

  #limit_zone crawler $binary_remote_addr 10m;
 #下面是 server 虚拟主机的配置
 server
  {
    listen 80;# 监听端口
    server_name localhost;# 域名
    index index.html index.htm index.php;
    root /usr/local/webserver/nginx/html;# 站点目录
      location ~ .*\.(php|php5)?$
    {
      #fastcgi_pass unix:/tmp/php-cgi.sock;
      fastcgi_pass 127.0.0.1:9000;
      fastcgi_index index.php;
      include fastcgi.conf;
    }
    location ~ .*\.(gif|jpg|jpeg|png|bmp|swf|ico)$
    {
      expires 30d;
  # access_log off;
    }
    location ~ .*\.(js|css)?$
    {
      expires 15d;
   # access_log off;
    }
    access_log off;
  }

}
3、检查 nginx.conf 配置文件的正确性
/usr/local/webserver/nginx/sbin/nginx –t

更多详情见请继续阅读下一页的精彩内容 :http://www.linuxidc.com/Linux/2017-05/143853p2.htm
Nginx 主配置参数详解与 Nginx 配置网站
a.Linux 中安装 Nginx 见上一页
b. 当 Nginx 安装完毕后,会有相应的安装目录,安装目录里的 Nginx.confg 为 Nginx 的主配置文件,Nginx 主配置文件分为 4 部分,main(全局配置)、server(主机配置)、upstream(负载均衡服务器设置) 以及 location(URL 匹配特定位置的设置), 这四者的关系是:server 继承 main,location 继承 server,upstream 既不会继承其它设置也不会被继承。
c.Nginx 是一个代理服务器,一般情况下,网站是不能部署在 Nginx 下的,比如用 Java 开发的 JavaWeb 程序,我们部署在 tomcat 下,然后使用 Nginx 代理将网址指向 tomcat 即可。
2.Nginx.conf 配置文件详细说明 (附备注)
# kencery 注释说明 Nginx 文件
# 时间:2016-1-19
# 学习内容,只是来自互联网,有版权问题请联系我删除。
######## Nginx 的 main(全局配置) 文件
# 指定 nginx 运行的用户及用户组, 默认为 nobody
#user nobody;
# 开启的线程数,一般跟逻辑 CPU 核数一致
worker_processes 1;
# 定位全局错误日志文件,级别以 notice 显示,还有 debug,info,warn,error,crit 模式,debug 输出最多,crir 输出最少,根据实际环境而定
#error_log logs/error.log;
#error_log logs/error.log notice;
#error_log logs/error.log info;
# 指定进程 id 的存储文件位置
#pid logs/nginx.pid;
# 指定一个 nginx 进程打开的最多文件描述符数目,受系统进程的最大打开文件数量限制
#worker_rlimit_nofile 65535
events {
#设置工作模式为 epoll, 除此之外还有 select,poll,kqueue,rtsig 和 /dev/poll 模式
#use epoll;
#定义每个进程的最大连接数, 受系统进程的最大打开文件数量限制。
worker_connections 1024;
}
#######Nginx 的 Http 服务器配置,Gzip 配置
http {
#主模块指令,实现对配置文件所包含的文件的设定,可以减少主配置文件的复杂度,DNS 主配置文件中的 zonerfc1912,acl 基本上都是用 include 语句。
include mime.types;
#核心模块指令,智力默认设置为二进制流,也就是当文件类型未定义时使用这种方式
default_type application/octet-stream;
#下面代码为日志格式的设定,main 为日志格式的名称,可自行设置,后面引用
#log_format main ‘$remote_addr – $remote_user [$time_local] “$request” ‘
# ‘$status $body_bytes_sent “$http_referer” ‘
# ‘”$http_user_agent” “$http_x_forwarded_for”‘;
#引用日志 main
#access_log logs/access.log main;
#设置允许客户端请求的最大的单个文件字节数
#client_max_body_size 20M;
#指定来自客户端请求头的 headebuffer 大小
#client_header_buffer_size 32k;
#指定连接请求试图写入缓存文件的目录路径
#client_body_temp_path /dev/shm/client_body_temp;
#指定客户端请求中较大的消息头的缓存最大数量和大小,目前设置为 4 个 32KB
#large client_header_buffers 4 32k;
#开启高效文件传输模式
sendfile on;
#开启防止网络阻塞
#tcp_nopush on;
#开启防止网络阻塞
#tcp_nodelay on;
#设置客户端连接保存活动的超时时间
#keepalive_timeout 0;
keepalive_timeout 65;
#设置客户端请求读取超时时间
#client_header_timeout 10;
#设置客户端请求主体读取超时时间
#client_body_timeout 10;
#用于设置相应客户端的超时时间
#send_timeout
####HttpGZip 模块配置
#httpGzip modules
#开启 gzip 压缩
#gzip on;
#设置允许压缩的页面最小字节数
#gzip_min_length 1k;
#申请 4 个单位为 16K 的内存作为压缩结果流缓存
#gzip_buffers 4 16k;
#设置识别 http 协议的版本,默认为 1.1
#gzip_http_version 1.1;
#指定 gzip 压缩比,1- 9 数字越小,压缩比越小,速度越快
#gzip_comp_level 2;
#指定压缩的类型
#gzip_types text/plain application/x-javascript text/css application/xml;
#让前端的缓存服务器进过 gzip 压缩的页面
#gzip_vary on;
#########Nginx 的 server 虚拟主机配置
server {
#监听端口为 80
listen 80;
#设置主机域名
server_name localhost;
#设置访问的语言编码
#charset koi8-r;
#设置虚拟主机访问日志的存放路径及日志的格式为 main
#access_log logs/host.access.log main;
#设置虚拟主机的基本信息
location / {
#设置虚拟主机的网站根目录
root html;
#设置虚拟主机默认访问的网页
index index.html index.htm;
}
#error_page 404 /404.html;
# redirect server error pages to the static page /50x.html
#
error_page 500 502 503 504 /50x.html;
location = /50x.html {
root html;
}
# proxy the PHP scripts to Apache listening on 127.0.0.1:80
#
#location ~ \.php$ {
# proxy_pass http://127.0.0.1;
#}
# pass the PHP scripts to FastCGI server listening on 127.0.0.1:9000
#
#location ~ \.php$ {
# root html;
# fastcgi_pass 127.0.0.1:9000;
# fastcgi_index index.php;
# fastcgi_param SCRIPT_FILENAME /scripts$fastcgi_script_name;
# include fastcgi_params;
#}
# deny access to .htaccess files, if Apache’s document root
# concurs with nginx’s one
#
#location ~ /\.ht {
# deny all;
#}
}
# another virtual host using mix of IP-, name-, and port-based configuration
#
#server {
# listen 8000;
# listen somename:8080;
# server_name somename alias another.alias;
# location / {
# root html;
# index index.html index.htm;
# }
#}
# HTTPS server
#
#server {
# listen 443 ssl;
# server_name localhost;
# ssl_certificate cert.pem;
# ssl_certificate_key cert.key;
# ssl_session_cache shared:SSL:1m;
# ssl_session_timeout 5m;
# ssl_ciphers HIGH:!aNULL:!MD5;
# ssl_prefer_server_ciphers on;
# location / {
# root html;
# index index.html index.htm;
# }
#}
}
3.Nginx 代理网站
a. 我在 tomcat 下部署了一个 javaweb 项目,tomcat 安装的服务器 IP 为:192.168.37.136,部署的项目在 tomcat 下的访问地址为:http://192.168.37.136:8080/lywh/
b. 我在 IP 为 192.168.37.133 的服务器下面安装成功了 Nginx。
c. 那怎么样将 tomcat 下部署的网站使用 Nginx 代理呢?,修改 Nginx 的配置文件,修改命令:vim /usr/local/nginx/conf/nginx.conf
#user nobody;
worker_processes 1;
#error_log logs/error.log;
#error_log logs/error.log notice;
#error_log logs/error.log info;
#pid logs/nginx.pid;
events {
worker_connections 1024;
}
http {
include mime.types;
default_type application/octet-stream;
#log_format main ‘$remote_addr – $remote_user [$time_local] “$request” ‘
# ‘$status $body_bytes_sent “$http_referer” ‘
# ‘”$http_user_agent” “$http_x_forwarded_for”‘;
#access_log logs/access.log main;
sendfile on;
#tcp_nopush on;
#keepalive_timeout 0;
keepalive_timeout 65;
#gzip on;
#配置 tomcat 的 IP 地址和访问端口
upstream gw {
server 192.168.37.136:8080 weight=1;
}
server {
listen 80;
server_name localhost;
#charset koi8-r;
#access_log logs/host.access.log main;
location / {
root html;
index index.html index.htm;
}
#Nginx 代理配置
location /lywh {
proxy_pass http://gw/lywh;
}
location /sapi {
proxy_pass http://gw/shopappapi;
}
location /cas{
proxy_pass http://gw/cas-server-webapp-4.0.0/login;
}
location /doc{
proxy_pass http://gw/docs;
}
#error_page 404 /404.html;
# redirect server error pages to the static page /50x.html
#
error_page 500 502 503 504 /50x.html;
location = /50x.html {
root html;
}
# proxy the PHP scripts to Apache listening on 127.0.0.1:80
#
#location ~ \.php$ {
# proxy_pass http://127.0.0.1;
#}
# pass the PHP scripts to FastCGI server listening on 127.0.0.1:9000
#
#location ~ \.php$ {
# root html;
# fastcgi_pass 127.0.0.1:9000;
# fastcgi_index index.php;
# fastcgi_param SCRIPT_FILENAME /scripts$fastcgi_script_name;
# include fastcgi_params;
#}
# deny access to .htaccess files, if Apache’s document root
# concurs with nginx’s one
#
#location ~ /\.ht {
# deny all;
#}
}
# another virtual host using mix of IP-, name-, and port-based configuration
#
#server {
# listen 8000;
# listen somename:8080;
# server_name somename alias another.alias;
# location / {
# root html;
# index index.html index.htm;
# }
#}
# HTTPS server
#
#server {
# listen 443 ssl;
# server_name localhost;
# ssl_certificate cert.pem;
# ssl_certificate_key cert.key;
# ssl_session_cache shared:SSL:1m;
# ssl_session_timeout 5m;
# ssl_ciphers HIGH:!aNULL:!MD5;
# ssl_prefer_server_ciphers on;
# location / {
# root html;
# index index.html index.htm;
# }
#}
}
d. 当配置完 Nginx.conf 之后,关闭文件,执行命令检查配置的文件是否有问题,如果如图所示则说明没有问题,否则需要检查配置是否出现问题

e. 检查如果返回 ok,则说明修改文件没有出现任何错误,这时候重启 Nginx,命令为:/usr/local/nginx/sbin/nginx -s reload
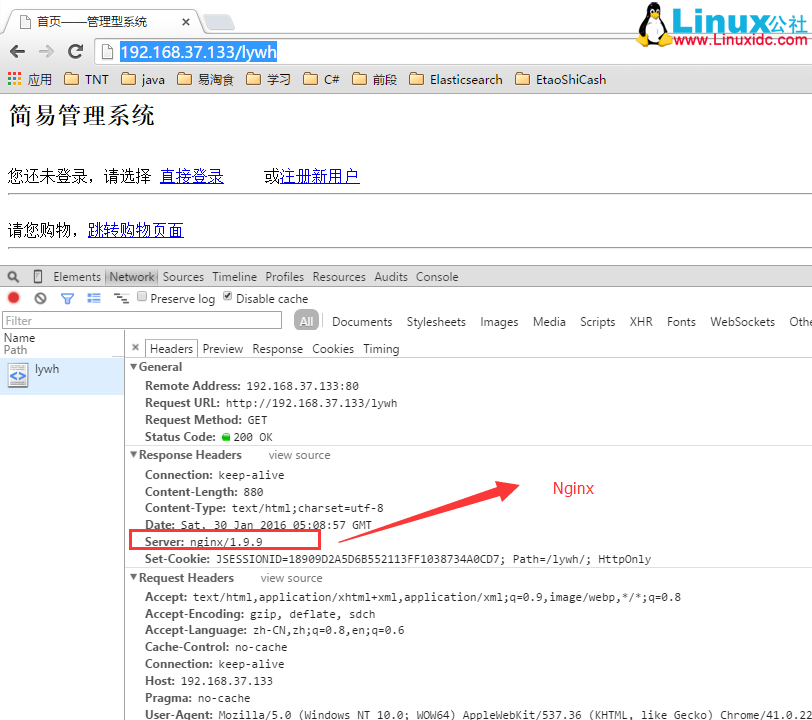
f. 最后访问代理后的网站,http://192.168.37.133/lywh,如图所示:则说明已经代理访问:

这篇笔记已写完,如果大家有什么疑问可以和我探讨。
本文永久更新链接地址 :http://www.linuxidc.com/Linux/2017-05/143853.htm
Linux 中安装配置 Nginx 及参数详解
1、安装编译文件及库文件
yum –y install make zlib zlib–devel gcc–c++ libtool openssl openssl–devel

2、安装 PCRE,Nginx 的 rewrite 的伪静态匹配规则需要用到正则表达式,PCRE 就是起到这个作用。
下载地址:wget http://downloads.sourceforge.net/project/pcre/pcre/8.35/pcre-8.35.tar.gz
如果 wget 没有安装的话,需要先安装 wget,yum -y install wget. wget 是 Linux 环境下的下载工具。wget 命令的使用见此文章:http://www.cnblogs.com/cindy-cindy/p/6847502.html

3、解压 pcre 安装包:tar -zxvf pcre-8.35.tar.gz

4、进入安装目录,编译安装
cd pcre-8.35
./configure
make && make install
5、查看 pcre 版本
pcre–config —version

6、下载 Nginx
wget http://nginx.org/download/nginx-1.6.2.tar.gz

7、解压并进入安装包

8、编译安装
./configure —prefix=/usr/local/webserver/nginx —with–http_stub_status_module —with–http_ssl_module —with–pcre=/usr/local/src/pcre–8.35
make
make install
9、查看 Nginx 版本

10、Nginx 配置
1、创建 Nginx 运行使用的用户
/usr/sbin/groupadd www
/usr/sbin/useradd –g www www
2、配置 nginx.conf,将 /usr/local/webserver/nginx/conf/nginx.conf 替换为以下内容
user www www;
worker_processes 2; #设置值和 CPU 核心数一致
error_log /usr/local/webserver/nginx/logs/nginx_error.log crit; #日志位置和日志级别
pid /usr/local/webserver/nginx/nginx.pid;
#Specifies the value for maximum file descriptors that can be opened by this process.
worker_rlimit_nofile 65535;
events
{
  use epoll;
  worker_connections 65535;
}
http
{
  include mime.types;
  default_type application/octet-stream;
  log_format main  '$remote_addr - $remote_user [$time_local]"$request"''$status $body_bytes_sent "$http_referer" ''"$http_user_agent"$http_x_forwarded_for';

#charset gb2312;

  server_names_hash_bucket_size 128;
  client_header_buffer_size 32k;
  large_client_header_buffers 4 32k;
  client_max_body_size 8m;

  sendfile on;
  tcp_nopush on;
  keepalive_timeout 60;
  tcp_nodelay on;
  fastcgi_connect_timeout 300;
  fastcgi_send_timeout 300;
  fastcgi_read_timeout 300;
  fastcgi_buffer_size 64k;
  fastcgi_buffers 4 64k;
  fastcgi_busy_buffers_size 128k;
  fastcgi_temp_file_write_size 128k;
  gzip on;
  gzip_min_length 1k;
  gzip_buffers 4 16k;
  gzip_http_version 1.0;
  gzip_comp_level 2;
  gzip_types text/plain application/x-Javascript text/css application/xml;
  gzip_vary on;

  #limit_zone crawler $binary_remote_addr 10m;
 #下面是 server 虚拟主机的配置
 server
  {
    listen 80;# 监听端口
    server_name localhost;# 域名
    index index.html index.htm index.php;
    root /usr/local/webserver/nginx/html;# 站点目录
      location ~ .*\.(php|php5)?$
    {
      #fastcgi_pass unix:/tmp/php-cgi.sock;
      fastcgi_pass 127.0.0.1:9000;
      fastcgi_index index.php;
      include fastcgi.conf;
    }
    location ~ .*\.(gif|jpg|jpeg|png|bmp|swf|ico)$
    {
      expires 30d;
  # access_log off;
    }
    location ~ .*\.(js|css)?$
    {
      expires 15d;
   # access_log off;
    }
    access_log off;
  }

}
3、检查 nginx.conf 配置文件的正确性
/usr/local/webserver/nginx/sbin/nginx –t

更多详情见请继续阅读下一页的精彩内容 :http://www.linuxidc.com/Linux/2017-05/143853p2.htm


