")

共计 25651 个字符,预计需要花费 65 分钟才能阅读完成。
安装环境:
操作系统:Oracle Linux 4.8 64 位
集群软件:10201_clusterware_linux_x86_64.cpio.gz
数据库:10201_database_linux_x86_64.cpio.gz
cpu:1 颗
内存: 必须 1.5G 以上(一般是 2G)
本地磁盘:20G(根分区 17G,swap 是 4G,boot 分区是 512M)
asm 下载地址:http://www.oracle.com/technetwork/server-storage/linux/downloads/rhel4-092650.html#oracleasm_rhel4_amd64
asm 软件:oracleasm-support-2.1.7-1.el4.x86_64.rpm
oracleasmlib-2.0.4-1.el4.x86_64.rpm
oracleasm-2.6.9-89.35.1.EL-2.0.5-1.el4.x86_64.rpm
IP 地址划分:
192.168.3.30 rac10g01 eth0
192.168.3.40 rac10g01 eth0
192.168.3.50 rac10g01-vip eth0:1
192.168.3.60 rac10g02-vip eth0:1
10.0.0.1 rac10g01-priv eth1
10.0.0.2 rac10g02-priv eth1
IP 说明:
每台服务器必须两块网卡, public ip 和 priv ip 不能在同一网段.public 和 priv 必须在网卡中写明地址,vip 在地址是数据库自己添加的.
1. 安装操作系统, 图形化安装
安装系统时将 iptable 和 selinux 全部禁用
2. 配置虚拟机的网卡
rac10g01 节点:
[root@rac10g01 ~]# vim /etc/sysconfig/network-scripts/ifcfg-eth0
DEVICE=eth0
BOOTPROTO=static
HWADDR=00:0C:29:54:80:1D
ONBOOT=yes
TYPE=Ethernet
IPADDR=192.168.3.30
NETMASK=255.255.255.0
[root@rac10g01 ~]# vim /etc/sysconfig/network-scripts/ifcfg-eth1
DEVICE=eth1
BOOTPROTO=static
HWADDR=00:0C:29:54:80:27
ONBOOT=yes
TYPE=Ethernet
IPADDR=10.0.0.1
NETMASK=255.255.255.0
[root@rac10g01 ~]# /etc/init.d/network restart
Shutting down interface eth0: [OK]
Shutting down loopback interface: [OK]
Setting network parameters: [OK]
Bringing up loopback interface: [OK]
Bringing up interface eth0: [OK]
Bringing up interface eth1: [OK]
[root@rac10g01 ~]#
rac10g02 节点:
[root@rac10g02 ~]# vim /etc/sysconfig/network-scripts/ifcfg-eth0
DEVICE=eth0
BOOTPROTO=static
HWADDR=00:0C:29:25:63:D2
ONBOOT=yes
TYPE=Ethernet
IPADDR=192.168.3.40
NETMASK=255.255.255.0
[root@rac10g02 ~]# vim /etc/sysconfig/network-scripts/ifcfg-eth1
DEVICE=eth1
BOOTPROTO=static
HWADDR=00:0C:29:25:63:DC
ONBOOT=yes
TYPE=Ethernet
IPADDR=10.0.0.2
NETMASK=255.255.255.0
[root@rac10g02 ~]# /etc/init.d/network restart
Shutting down interface eth0: [OK]
Shutting down loopback interface: [OK]
Setting network parameters: [OK]
Bringing up loopback interface: [OK]
Bringing up interface eth0: [OK]
Bringing up interface eth1: [OK]
[root@rac10g01 ~]#
3. 配置 hosts 文件, 主机名与 IP 地址解析(两个节点都是一样的)
[root@rac10g01 ~]# vim /etc/hosts
192.168.3.30 localhost.localdomain localhost – 在两个节点分别写入这行,IP 地址是本机的
192.168.3.30 rac10g01
192.168.3.40 rac10g02
192.168.3.50 rac10g01-vip
192.168.3.60 rac10g02-vip
10.0.0.1 rac10g01-priv
10.0.0.2 rac10g02-priv
[root@rac10g01 ~]# ping rac10g01 – 所有的地址都 ping 一下, 检查是否有问题
4. 光盘镜像挂载, 安装软件依赖包(两个节点是一样的)
[root@rac10g01 ~]# mount /dev/hdc /mnt/cdrom/
mount: block device /dev/hdc is write-protected, mounting read-only
[root@rac10g01 ~]# vim /etc/yum.repos.d/tong.repo
[tong]
name=tong
baseurl=file:///mnt
gpgkey=file:///mnt/cdrom/RPM-GPG-KEY-oracle
gpgcheck=1
enabled=1
[root@rac10g01 ~]# yum list
[root@rac10g01 ~]# yum install binutils compat-db compat-libstdc++-296 control-center gcc gcc-c++ glibc glibc-common libstdc++ libstdc++-devel make sysstat setarch glibc-devel libaio ksh glibc-headers libgnome libgcc libgnomeui libgomp openmotif libXp -y
[root@rac10g01 ~]#
5. 修改内核参数(两个节点必须一至)
[root@rac10g01 ~]# vim /etc/sysctl.conf
kernel.shmall = 2097152
kernel.shmmax = 2147483648
kernel.shmmni = 4096
kernel.sem = 250 32000 100 128
fs.file-max = 65536
net.ipv4.ip_local_port_range = 1024 65000
net.core.rmem_default = 262144
net.core.rmem_max = 262144
net.core.wmem_default = 262144
net.core.wmem_max = 262144
[root@rac10g01 ~]# sysctl -p
6. 创建用户,用户组, 用户设置密码(两个节点必须一至)
[root@rac10g01 ~]# groupadd -g 500 oinstall
[root@rac10g01 ~]# groupadd -g 501 dba
[root@rac10g01 ~]# groupadd -g 502 oper
[root@rac10g01 ~]# groupadd -g 503 asmadmin
[root@rac10g01 ~]# groupadd -g 504 asmdba
[root@rac10g01 ~]# groupadd -g 505 asmoper
[root@rac10g01 ~]# useradd -u 1000 -g oinstall -G dba,oper,asmdba -d /home/oracle oracle
[root@rac10g01 ~]# passwd oracle
Changing password for user oracle.
New UNIX password:
BAD PASSWORD: it is based on a dictionary word
Retype new UNIX password:
passwd: all authentication tokens updated successfully.
[root@rac10g01 ~]#
7. 创建 oracle 与 grid 存放的目录(两个节点必须一至)
[root@rac10g01 ~]# mkdir -p /u01/oracle/product/10.2.0.1/db_1
[root@rac10g01 ~]# mkdir -p /u01/oracle/product/10.2.0.1/crs_1
[root@rac10g01 ~]# chown -R oracle:oinstall /u01/
8. 修改用户对文件打开的限制(两个节点一至)
[root@rac10g01 ~]# vim /etc/security/limits.conf
oracle soft nproc 2047
oracle hard nproc 16384
oracle soft nofile 1024
oracle hard nofile 65536
oracle soft memlock 5242880
oracle hard memlock 524280
[root@rac10g01 ~]#
9. 添加 oracle 用户的环境变量(两个节点一至)
[root@rac10g01 ~]# vim /home/oracle/.bash_profile
export ORACLE_BASE=/u01/oracle
export ORACLE_HOME=$ORACLE_BASE/product/10.2.0.1/db_1
export CRS_HOME=$ORACLE_BASE/product/10.2.0.1/crs_1
export ORA_CRS_HOME=$CRS_HOME
export ORACLE_SID=rac10g1
export PATH=$PATH:$ORA_CRS_HOME/bin:$ORACLE_HOME/bin
[root@rac10g01 ~]# . /home/oracle/.bash_profile
10.oracle 用户的 ssh 互相信任(两个节点一至)
rac10g01 节点:
[root@rac10g01 ~]# su – oracle
[oracle@rac10g01 ~]$ ssh-keygen -t rsa
Generating public/private rsa key pair.
Enter file in which to save the key (/home/oracle/.ssh/id_rsa):
Created directory ‘/home/oracle/.ssh’.
Enter passphrase (empty for no passphrase):
Enter same passphrase again:
Your identification has been saved in /home/oracle/.ssh/id_rsa.
Your public key has been saved in /home/oracle/.ssh/id_rsa.pub.
The key fingerprint is:
cb:63:66:59:9d:7a:68:8f:4c:de:83:c4:f3:f4:19:97 oracle@rac10g01
[oracle@rac10g01 ~]$ cd .ssh/
[oracle@rac10g01 .ssh]$ scp id_rsa.pub oracle@rac10g02:/home/oracle/
The authenticity of host ‘rac10g02 (192.168.3.40)’ can’t be established.
RSA key fingerprint is 43:20:d8:f6:01:f1:e0:c0:9a:5f:6c:e2:f8:76:3e:3a.
Are you sure you want to continue connecting (yes/no)? yes
Warning: Permanently added ‘rac10g02,192.168.3.40’ (RSA) to the list of known hosts.
oracle@rac10g02’s password:
id_rsa.pub 100% 225 0.2KB/s 00:00
[oracle@rac10g01 .ssh]$
rac10g02 节点:
[oracle@rac10g02 ~]$ ssh-keygen -t rsa
Generating public/private rsa key pair.
Enter file in which to save the key (/home/oracle/.ssh/id_rsa):
Created directory ‘/home/oracle/.ssh’.
Enter passphrase (empty for no passphrase):
Enter same passphrase again:
Your identification has been saved in /home/oracle/.ssh/id_rsa.
Your public key has been saved in /home/oracle/.ssh/id_rsa.pub.2
The key fingerprint is:
cb:63:66:59:9d:7a:68:8f:4c:de:83:c4:f3:f4:19:97 oracle@rac10g02
[oracle@rac10g02 ~]$ cat id_rsa.pub >> ./ssh/id_rsa.pub
[oracle@rac10g02 ~]$ mv ./ssh/id_rsa.pub ./ssh/authorized_keys
[oracle@rac10g02 ~]$ scp ./ssh/authorized_keys oracle@rac10g01:/home/oracle/.ssh/
[oracle@rac10g01 .ssh]$ ssh rac10g01 date – 两边节点都要测试, 必须通过
Sat Nov 12 22:39:54 CST 2016
[oracle@rac10g01 .ssh]$ ssh rac10g02 date
Sat Nov 12 22:40:03 CST 2016
[oracle@rac10g01 .ssh]$ ssh rac10g02-priv date
Sat Nov 12 22:40:07 CST 2016
[oracle@rac10g01 .ssh]$ ssh rac10g01-priv date
Sat Nov 12 22:40:04 CST 2016
[oracle@rac10g01 .ssh]$
11. 添加本地磁盘, 安装 oracleasm 软件, 设置 asm 自动存储管理
[root@rac10g01 Desktop]# rpm -ivh oracleasm-support-2.1.7-1.el4.x86_64.rpm
Preparing… ########################################### [100%]
1:oracleasm-support ########################################### [100%]
[root@rac10g01 Desktop]# rpm -ivh oracleasm-2.6.9-89.35.1.EL-2.0.5-1.el4.x86_64.rpm
Preparing… ########################################### [100%]
1:oracleasm-2.6.9-89.35.1########################################### [100%]
[root@rac10g01 Desktop]# rpm -ivh oracleasmlib-2.0.4-1.el4.x86_64.rpm
Preparing… ########################################### [100%]
1:oracleasmlib ########################################### [100%]
[root@rac10g01 Desktop]# /etc/init.d/oracleasm configure
Configuring the Oracle ASM library driver.
This will configure the on-boot properties of the Oracle ASM library
driver. The following questions will determine whether the driver is
loaded on boot and what permissions it will have. The current values
will be shown in brackets (‘[]’). Hitting <ENTER> without typing an
answer will keep that current value. Ctrl-C will abort.
Default user to own the driver interface [oracle]: oracle
Default group to own the driver interface [dba]: dba
Start Oracle ASM library driver on boot (y/n) [y]: y
Scan for Oracle ASM disks on boot (y/n) [y]: y
Writing Oracle ASM library driver configuration: done
Initializing the Oracle ASMLib driver: [OK]
Scanning the system for Oracle ASMLib disks: [OK]
[root@rac10g01 Desktop]# fdisk /dev/sdb – 磁盘分区
Device contains neither a valid DOS partition table, nor Sun, SGI or OSF disklabel
Building a new DOS disklabel. Changes will remain in memory only,
until you decide to write them. After that, of course, the previous
content won’t be recoverable.
Warning: invalid flag 0x0000 of partition table 4 will be corrected by w(rite)
Command (m for help): n
Command action
e extended
p primary partition (1-4)
p
Partition number (1-4): 1
First cylinder (1-130, default 1):
Using default value 1
Last cylinder or +size or +sizeM or +sizeK (1-130, default 130):
Using default value 130
Command (m for help): p
Disk /dev/sdb: 1073 MB, 1073741824 bytes
255 heads, 63 sectors/track, 130 cylinders
Units = cylinders of 16065 * 512 = 8225280 bytes
Device Boot Start End Blocks Id System
/dev/sdb1 1 130 1044193+ 83 Linux
Command (m for help): w
The partition table has been altered!
Calling ioctl() to re-read partition table.
Syncing disks.
[root@rac10g01 ~]# raw /dev/raw/raw1 /dev/sdb1 –vote disk 和 crs 磁盘使用的
/dev/raw/raw1: bound to major 8, minor 17
[root@rac10g01 ~]# raw /dev/raw/raw2 /dev/sdc1
/dev/raw/raw2: bound to major 8, minor 33
[root@rac10g01 ~]# raw /dev/raw/raw3 /dev/sdd1
/dev/raw/raw3: bound to major 8, minor 49
[root@rac10g01 ~]# raw /dev/raw/raw4 /dev/sde1
/dev/raw/raw4: bound to major 8, minor 65
[root@rac10g01 ~]# vim /etc/sysconfig/rawdevices
/dev/raw/raw1 /dev/sdb1
/dev/raw/raw2 /dev/sdc1
/dev/raw/raw3 /dev/sdd1
/dev/raw/raw4 /dev/sde1
[root@rac10g01 ~]# chown -R oracle:oinstall /dev/raw
[root@rac10g01 ~]# ll /dev/raw/raw*
crw-rw—- 1 oracle oinstall 162, 1 Nov 13 00:49 /dev/raw/raw1
crw-rw—- 1 oracle oinstall 162, 2 Nov 13 00:50 /dev/raw/raw2
crw-rw—- 1 oracle oinstall 162, 3 Nov 13 00:50 /dev/raw/raw3
crw-rw—- 1 oracle oinstall 162, 4 Nov 13 00:50 /dev/raw/raw4
[root@rac10g01 ~]# udevstart
[root@rac10g01 Desktop]# /etc/init.d/oracleasm createdisk VOL05 /dev/sdf1 – 其它盘都是一样的
Marking disk “VOL05” as an ASM disk: [OK]
[root@rac10g01 Desktop]# /etc/init.d/oracleasm createdisk VOL06 /dev/sdg1
Marking disk “VOL06” as an ASM disk: [OK]
[root@rac10g01 Desktop]# /etc/init.d/oracleasm listdisks
VOL05
VOL06
[root@rac10g01 Desktop]#
rac10g02 节点:
[root@rac10g02 Desktop]# /etc/init.d/oracleasm scandisks
Scanning the system for Oracle ASMLib disks:
[root@rac10g02 Desktop]# /etc/init.d/oracleasm listdisks
VOL05
VOL06
[root@rac10g02 Desktop]#
更多详情见请继续阅读下一页的精彩内容:http://www.linuxidc.com/Linux/2017-04/142939p2.htm
12.cluster 集群软件安装(安装之前检查下条件)
[Oracle@rac10g01 ~]$ cd clusterware/cluvfy/
[oracle@rac10g01 cluvfy]$ ./runcluvfy.sh stage -pre crsinst -n rac10g01,rac10g02 -verbose


安装环境:
操作系统:Oracle Linux 4.8 64 位
集群软件:10201_clusterware_linux_x86_64.cpio.gz
数据库:10201_database_linux_x86_64.cpio.gz
cpu:1 颗
内存: 必须 1.5G 以上(一般是 2G)
本地磁盘:20G(根分区 17G,swap 是 4G,boot 分区是 512M)
asm 下载地址:http://www.oracle.com/technetwork/server-storage/linux/downloads/rhel4-092650.html#oracleasm_rhel4_amd64
asm 软件:oracleasm-support-2.1.7-1.el4.x86_64.rpm
oracleasmlib-2.0.4-1.el4.x86_64.rpm
oracleasm-2.6.9-89.35.1.EL-2.0.5-1.el4.x86_64.rpm
IP 地址划分:
192.168.3.30 rac10g01 eth0
192.168.3.40 rac10g01 eth0
192.168.3.50 rac10g01-vip eth0:1
192.168.3.60 rac10g02-vip eth0:1
10.0.0.1 rac10g01-priv eth1
10.0.0.2 rac10g02-priv eth1
IP 说明:
每台服务器必须两块网卡, public ip 和 priv ip 不能在同一网段.public 和 priv 必须在网卡中写明地址,vip 在地址是数据库自己添加的.
1. 安装操作系统, 图形化安装
安装系统时将 iptable 和 selinux 全部禁用
2. 配置虚拟机的网卡
rac10g01 节点:
[root@rac10g01 ~]# vim /etc/sysconfig/network-scripts/ifcfg-eth0
DEVICE=eth0
BOOTPROTO=static
HWADDR=00:0C:29:54:80:1D
ONBOOT=yes
TYPE=Ethernet
IPADDR=192.168.3.30
NETMASK=255.255.255.0
[root@rac10g01 ~]# vim /etc/sysconfig/network-scripts/ifcfg-eth1
DEVICE=eth1
BOOTPROTO=static
HWADDR=00:0C:29:54:80:27
ONBOOT=yes
TYPE=Ethernet
IPADDR=10.0.0.1
NETMASK=255.255.255.0
[root@rac10g01 ~]# /etc/init.d/network restart
Shutting down interface eth0: [OK]
Shutting down loopback interface: [OK]
Setting network parameters: [OK]
Bringing up loopback interface: [OK]
Bringing up interface eth0: [OK]
Bringing up interface eth1: [OK]
[root@rac10g01 ~]#
rac10g02 节点:
[root@rac10g02 ~]# vim /etc/sysconfig/network-scripts/ifcfg-eth0
DEVICE=eth0
BOOTPROTO=static
HWADDR=00:0C:29:25:63:D2
ONBOOT=yes
TYPE=Ethernet
IPADDR=192.168.3.40
NETMASK=255.255.255.0
[root@rac10g02 ~]# vim /etc/sysconfig/network-scripts/ifcfg-eth1
DEVICE=eth1
BOOTPROTO=static
HWADDR=00:0C:29:25:63:DC
ONBOOT=yes
TYPE=Ethernet
IPADDR=10.0.0.2
NETMASK=255.255.255.0
[root@rac10g02 ~]# /etc/init.d/network restart
Shutting down interface eth0: [OK]
Shutting down loopback interface: [OK]
Setting network parameters: [OK]
Bringing up loopback interface: [OK]
Bringing up interface eth0: [OK]
Bringing up interface eth1: [OK]
[root@rac10g01 ~]#
3. 配置 hosts 文件, 主机名与 IP 地址解析(两个节点都是一样的)
[root@rac10g01 ~]# vim /etc/hosts
192.168.3.30 localhost.localdomain localhost – 在两个节点分别写入这行,IP 地址是本机的
192.168.3.30 rac10g01
192.168.3.40 rac10g02
192.168.3.50 rac10g01-vip
192.168.3.60 rac10g02-vip
10.0.0.1 rac10g01-priv
10.0.0.2 rac10g02-priv
[root@rac10g01 ~]# ping rac10g01 – 所有的地址都 ping 一下, 检查是否有问题
4. 光盘镜像挂载, 安装软件依赖包(两个节点是一样的)
[root@rac10g01 ~]# mount /dev/hdc /mnt/cdrom/
mount: block device /dev/hdc is write-protected, mounting read-only
[root@rac10g01 ~]# vim /etc/yum.repos.d/tong.repo
[tong]
name=tong
baseurl=file:///mnt
gpgkey=file:///mnt/cdrom/RPM-GPG-KEY-oracle
gpgcheck=1
enabled=1
[root@rac10g01 ~]# yum list
[root@rac10g01 ~]# yum install binutils compat-db compat-libstdc++-296 control-center gcc gcc-c++ glibc glibc-common libstdc++ libstdc++-devel make sysstat setarch glibc-devel libaio ksh glibc-headers libgnome libgcc libgnomeui libgomp openmotif libXp -y
[root@rac10g01 ~]#
5. 修改内核参数(两个节点必须一至)
[root@rac10g01 ~]# vim /etc/sysctl.conf
kernel.shmall = 2097152
kernel.shmmax = 2147483648
kernel.shmmni = 4096
kernel.sem = 250 32000 100 128
fs.file-max = 65536
net.ipv4.ip_local_port_range = 1024 65000
net.core.rmem_default = 262144
net.core.rmem_max = 262144
net.core.wmem_default = 262144
net.core.wmem_max = 262144
[root@rac10g01 ~]# sysctl -p
6. 创建用户,用户组, 用户设置密码(两个节点必须一至)
[root@rac10g01 ~]# groupadd -g 500 oinstall
[root@rac10g01 ~]# groupadd -g 501 dba
[root@rac10g01 ~]# groupadd -g 502 oper
[root@rac10g01 ~]# groupadd -g 503 asmadmin
[root@rac10g01 ~]# groupadd -g 504 asmdba
[root@rac10g01 ~]# groupadd -g 505 asmoper
[root@rac10g01 ~]# useradd -u 1000 -g oinstall -G dba,oper,asmdba -d /home/oracle oracle
[root@rac10g01 ~]# passwd oracle
Changing password for user oracle.
New UNIX password:
BAD PASSWORD: it is based on a dictionary word
Retype new UNIX password:
passwd: all authentication tokens updated successfully.
[root@rac10g01 ~]#
7. 创建 oracle 与 grid 存放的目录(两个节点必须一至)
[root@rac10g01 ~]# mkdir -p /u01/oracle/product/10.2.0.1/db_1
[root@rac10g01 ~]# mkdir -p /u01/oracle/product/10.2.0.1/crs_1
[root@rac10g01 ~]# chown -R oracle:oinstall /u01/
8. 修改用户对文件打开的限制(两个节点一至)
[root@rac10g01 ~]# vim /etc/security/limits.conf
oracle soft nproc 2047
oracle hard nproc 16384
oracle soft nofile 1024
oracle hard nofile 65536
oracle soft memlock 5242880
oracle hard memlock 524280
[root@rac10g01 ~]#
9. 添加 oracle 用户的环境变量(两个节点一至)
[root@rac10g01 ~]# vim /home/oracle/.bash_profile
export ORACLE_BASE=/u01/oracle
export ORACLE_HOME=$ORACLE_BASE/product/10.2.0.1/db_1
export CRS_HOME=$ORACLE_BASE/product/10.2.0.1/crs_1
export ORA_CRS_HOME=$CRS_HOME
export ORACLE_SID=rac10g1
export PATH=$PATH:$ORA_CRS_HOME/bin:$ORACLE_HOME/bin
[root@rac10g01 ~]# . /home/oracle/.bash_profile
10.oracle 用户的 ssh 互相信任(两个节点一至)
rac10g01 节点:
[root@rac10g01 ~]# su – oracle
[oracle@rac10g01 ~]$ ssh-keygen -t rsa
Generating public/private rsa key pair.
Enter file in which to save the key (/home/oracle/.ssh/id_rsa):
Created directory ‘/home/oracle/.ssh’.
Enter passphrase (empty for no passphrase):
Enter same passphrase again:
Your identification has been saved in /home/oracle/.ssh/id_rsa.
Your public key has been saved in /home/oracle/.ssh/id_rsa.pub.
The key fingerprint is:
cb:63:66:59:9d:7a:68:8f:4c:de:83:c4:f3:f4:19:97 oracle@rac10g01
[oracle@rac10g01 ~]$ cd .ssh/
[oracle@rac10g01 .ssh]$ scp id_rsa.pub oracle@rac10g02:/home/oracle/
The authenticity of host ‘rac10g02 (192.168.3.40)’ can’t be established.
RSA key fingerprint is 43:20:d8:f6:01:f1:e0:c0:9a:5f:6c:e2:f8:76:3e:3a.
Are you sure you want to continue connecting (yes/no)? yes
Warning: Permanently added ‘rac10g02,192.168.3.40’ (RSA) to the list of known hosts.
oracle@rac10g02’s password:
id_rsa.pub 100% 225 0.2KB/s 00:00
[oracle@rac10g01 .ssh]$
rac10g02 节点:
[oracle@rac10g02 ~]$ ssh-keygen -t rsa
Generating public/private rsa key pair.
Enter file in which to save the key (/home/oracle/.ssh/id_rsa):
Created directory ‘/home/oracle/.ssh’.
Enter passphrase (empty for no passphrase):
Enter same passphrase again:
Your identification has been saved in /home/oracle/.ssh/id_rsa.
Your public key has been saved in /home/oracle/.ssh/id_rsa.pub.2
The key fingerprint is:
cb:63:66:59:9d:7a:68:8f:4c:de:83:c4:f3:f4:19:97 oracle@rac10g02
[oracle@rac10g02 ~]$ cat id_rsa.pub >> ./ssh/id_rsa.pub
[oracle@rac10g02 ~]$ mv ./ssh/id_rsa.pub ./ssh/authorized_keys
[oracle@rac10g02 ~]$ scp ./ssh/authorized_keys oracle@rac10g01:/home/oracle/.ssh/
[oracle@rac10g01 .ssh]$ ssh rac10g01 date – 两边节点都要测试, 必须通过
Sat Nov 12 22:39:54 CST 2016
[oracle@rac10g01 .ssh]$ ssh rac10g02 date
Sat Nov 12 22:40:03 CST 2016
[oracle@rac10g01 .ssh]$ ssh rac10g02-priv date
Sat Nov 12 22:40:07 CST 2016
[oracle@rac10g01 .ssh]$ ssh rac10g01-priv date
Sat Nov 12 22:40:04 CST 2016
[oracle@rac10g01 .ssh]$
11. 添加本地磁盘, 安装 oracleasm 软件, 设置 asm 自动存储管理
[root@rac10g01 Desktop]# rpm -ivh oracleasm-support-2.1.7-1.el4.x86_64.rpm
Preparing… ########################################### [100%]
1:oracleasm-support ########################################### [100%]
[root@rac10g01 Desktop]# rpm -ivh oracleasm-2.6.9-89.35.1.EL-2.0.5-1.el4.x86_64.rpm
Preparing… ########################################### [100%]
1:oracleasm-2.6.9-89.35.1########################################### [100%]
[root@rac10g01 Desktop]# rpm -ivh oracleasmlib-2.0.4-1.el4.x86_64.rpm
Preparing… ########################################### [100%]
1:oracleasmlib ########################################### [100%]
[root@rac10g01 Desktop]# /etc/init.d/oracleasm configure
Configuring the Oracle ASM library driver.
This will configure the on-boot properties of the Oracle ASM library
driver. The following questions will determine whether the driver is
loaded on boot and what permissions it will have. The current values
will be shown in brackets (‘[]’). Hitting <ENTER> without typing an
answer will keep that current value. Ctrl-C will abort.
Default user to own the driver interface [oracle]: oracle
Default group to own the driver interface [dba]: dba
Start Oracle ASM library driver on boot (y/n) [y]: y
Scan for Oracle ASM disks on boot (y/n) [y]: y
Writing Oracle ASM library driver configuration: done
Initializing the Oracle ASMLib driver: [OK]
Scanning the system for Oracle ASMLib disks: [OK]
[root@rac10g01 Desktop]# fdisk /dev/sdb – 磁盘分区
Device contains neither a valid DOS partition table, nor Sun, SGI or OSF disklabel
Building a new DOS disklabel. Changes will remain in memory only,
until you decide to write them. After that, of course, the previous
content won’t be recoverable.
Warning: invalid flag 0x0000 of partition table 4 will be corrected by w(rite)
Command (m for help): n
Command action
e extended
p primary partition (1-4)
p
Partition number (1-4): 1
First cylinder (1-130, default 1):
Using default value 1
Last cylinder or +size or +sizeM or +sizeK (1-130, default 130):
Using default value 130
Command (m for help): p
Disk /dev/sdb: 1073 MB, 1073741824 bytes
255 heads, 63 sectors/track, 130 cylinders
Units = cylinders of 16065 * 512 = 8225280 bytes
Device Boot Start End Blocks Id System
/dev/sdb1 1 130 1044193+ 83 Linux
Command (m for help): w
The partition table has been altered!
Calling ioctl() to re-read partition table.
Syncing disks.
[root@rac10g01 ~]# raw /dev/raw/raw1 /dev/sdb1 –vote disk 和 crs 磁盘使用的
/dev/raw/raw1: bound to major 8, minor 17
[root@rac10g01 ~]# raw /dev/raw/raw2 /dev/sdc1
/dev/raw/raw2: bound to major 8, minor 33
[root@rac10g01 ~]# raw /dev/raw/raw3 /dev/sdd1
/dev/raw/raw3: bound to major 8, minor 49
[root@rac10g01 ~]# raw /dev/raw/raw4 /dev/sde1
/dev/raw/raw4: bound to major 8, minor 65
[root@rac10g01 ~]# vim /etc/sysconfig/rawdevices
/dev/raw/raw1 /dev/sdb1
/dev/raw/raw2 /dev/sdc1
/dev/raw/raw3 /dev/sdd1
/dev/raw/raw4 /dev/sde1
[root@rac10g01 ~]# chown -R oracle:oinstall /dev/raw
[root@rac10g01 ~]# ll /dev/raw/raw*
crw-rw—- 1 oracle oinstall 162, 1 Nov 13 00:49 /dev/raw/raw1
crw-rw—- 1 oracle oinstall 162, 2 Nov 13 00:50 /dev/raw/raw2
crw-rw—- 1 oracle oinstall 162, 3 Nov 13 00:50 /dev/raw/raw3
crw-rw—- 1 oracle oinstall 162, 4 Nov 13 00:50 /dev/raw/raw4
[root@rac10g01 ~]# udevstart
[root@rac10g01 Desktop]# /etc/init.d/oracleasm createdisk VOL05 /dev/sdf1 – 其它盘都是一样的
Marking disk “VOL05” as an ASM disk: [OK]
[root@rac10g01 Desktop]# /etc/init.d/oracleasm createdisk VOL06 /dev/sdg1
Marking disk “VOL06” as an ASM disk: [OK]
[root@rac10g01 Desktop]# /etc/init.d/oracleasm listdisks
VOL05
VOL06
[root@rac10g01 Desktop]#
rac10g02 节点:
[root@rac10g02 Desktop]# /etc/init.d/oracleasm scandisks
Scanning the system for Oracle ASMLib disks:
[root@rac10g02 Desktop]# /etc/init.d/oracleasm listdisks
VOL05
VOL06
[root@rac10g02 Desktop]#
更多详情见请继续阅读下一页的精彩内容:http://www.linuxidc.com/Linux/2017-04/142939p2.htm
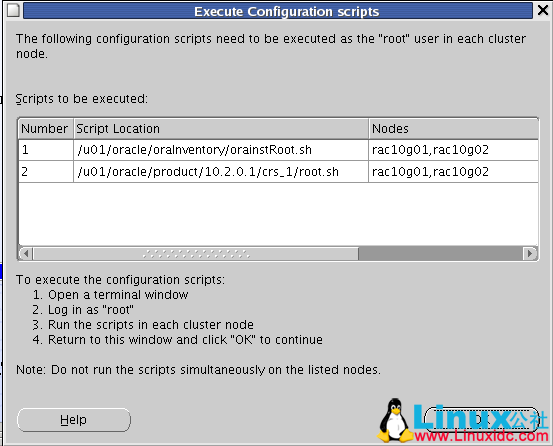
rac10g01 节点:
[root@rac10g01 ~]# sh /u01/Oracle/oraInventory/orainstRoot.sh
Changing permissions of /u01/oracle/oraInventory to 770.
Changing groupname of /u01/oracle/oraInventory to oinstall.
The execution of the script is complete
[root@rac10g01 ~]# sh /u01/oracle/product/10.2.0.1/
crs_1/ db_1/
[root@rac10g01 ~]# sh /u01/oracle/product/10.2.0.1/crs_1/root.sh
WARNING: directory ‘/u01/oracle/product/10.2.0.1’ is not owned by root
WARNING: directory ‘/u01/oracle/product’ is not owned by root
WARNING: directory ‘/u01/oracle’ is not owned by root
WARNING: directory ‘/u01’ is not owned by root
Checking to see if Oracle CRS stack is already configured
/etc/oracle does not exist. Creating it now.
Setting the permissions on OCR backup directory
Setting up NS directories
Oracle Cluster Registry configuration upgraded successfully
WARNING: directory ‘/u01/oracle/product/10.2.0.1’ is not owned by root
WARNING: directory ‘/u01/oracle/product’ is not owned by root
WARNING: directory ‘/u01/oracle’ is not owned by root
WARNING: directory ‘/u01’ is not owned by root
Successfully accumulated necessary OCR keys.
Using ports: CSS=49895 CRS=49896 EVMC=49898 and EVMR=49897.
node <nodenumber>: <nodename> <private interconnect name> <hostname>
node 1: rac10g01 rac10g01-priv rac10g01
node 2: rac10g02 rac10g02-priv rac10g02
Creating OCR keys for user ‘root’, privgrp ‘root’..
Operation successful.
Now formatting voting device: /dev/raw/raw3
Format of 1 voting devices complete.
Startup will be queued to init within 90 seconds.
Adding daemons to inittab
Expecting the CRS daemons to be up within 600 seconds.
CSS is active on these nodes.
rac10g01
CSS is inactive on these nodes.
rac10g02
Local node checking complete.
Run root.sh on remaining nodes to start CRS daemons.
[root@rac10g01 ~]#
rac10g02 节点:
[root@rac10g02 ~]# sh /u01/oracle/oraInventory/orainstRoot.sh
Changing permissions of /u01/oracle/oraInventory to 770.
Changing groupname of /u01/oracle/oraInventory to oinstall.
The execution of the script is complete
[root@rac10g02 ~]#
在 rac10g02 节点执行 root.sh 之前要修改 vipca 和 srvctl 文件的内容(两个节点都要修改)
[oracle@rac10g02 ~]$ vim /u01/oracle/product/10.2.0.1/crs_1/bin/vipca
LD_ASSUME_KERNEL=2.4.19
export LD_ASSUME_KERNEL – 在下面添加红色的内容
unset LD_ASSUME_KERNEL
[oracle@rac10g02 ~]$ vim /u01/oracle/product/10.2.0.1/crs_1/bin/srvctl
LD_ASSUME_KERNEL=2.4.19
export LD_ASSUME_KERNEL – 在下面添加红色的内容
unset LD_ASSUME_KERNEL
[root@rac10g02 ~]# sh /u01/oracle/product/10.2.0.1/crs_1/root.sh
WARNING: directory ‘/u01/oracle/product/10.2.0.1’ is not owned by root
WARNING: directory ‘/u01/oracle/product’ is not owned by root
WARNING: directory ‘/u01/oracle’ is not owned by root
WARNING: directory ‘/u01’ is not owned by root
Checking to see if Oracle CRS stack is already configured
/etc/oracle does not exist. Creating it now.
Setting the permissions on OCR backup directory
Setting up NS directories
Oracle Cluster Registry configuration upgraded successfully
WARNING: directory ‘/u01/oracle/product/10.2.0.1’ is not owned by root
WARNING: directory ‘/u01/oracle/product’ is not owned by root
WARNING: directory ‘/u01/oracle’ is not owned by root
WARNING: directory ‘/u01’ is not owned by root
Successfully accumulated necessary OCR keys.
Using ports: CSS=49895 CRS=49896 EVMC=49898 and EVMR=49897.
node <nodenumber>: <nodename> <private interconnect name> <hostname>
node 1: rac10g01 rac10g01-priv rac10g01
node 2: rac10g02 rac10g02-priv rac10g02
Creating OCR keys for user ‘root’, privgrp ‘root’..
Operation successful.
Now formatting voting device: /dev/raw/raw3
Format of 1 voting devices complete.
Startup will be queued to init within 90 seconds.
/etc/profile: line 61: ulimit: open files: cannot modify limit: Operation not permitted
Adding daemons to inittab
Expecting the CRS daemons to be up within 600 seconds.
CSS is active on these nodes.
rac10g01
rac10g02
CSS is active on all nodes.
Waiting for the Oracle CRSD and EVMD to start
Waiting for the Oracle CRSD and EVMD to start
Oracle CRS stack installed and running under init(1M)
Running vipca(silent) for configuring nodeapps
The given interface(s), “eth0” is not public. Public interfaces should be used to configure virtual IPs.
[root@rac10g02 ~]#
如果出现以下错误, 请手动修改 public IP 和 cluster IP 地址
Error 0(Native: listNetInterfaces:[3])
[Error 0(Native: listNetInterfaces:[3])]
[root@rac10g02 ~]# /u01/oracle/product/10.2.0.1/crs_1/bin/oifcfg setif -global eth0/192.168.3.0:public
[root@rac10g02 ~]# /u01/oracle/product/10.2.0.1/crs_1/bin/oifcfg setif -global eth0/10.0.0.0:cluster_interconnect
[root@rac10g02 ~]# /u01/oracle/product/10.2.0.1/crs_1/bin/oifcfg getif
eth0 192.168.3.0 global public
eth0 10.0.0.0 global cluster_interconnect
[root@rac10g02 ~]#
然后在 rac10g01 节点执行 vipca, 创建虚拟 IP 地址
[root@rac10g01 ~]# /u01/oracle/product/10.2.0.1/crs_1/bin/vipca


退出 vipca 窗口, 继续安装 cluster 软件


13. 验证 cluster 安装成功
rac10g01 节点:
[oracle@rac10g01 ~]$ crs_stat -t
Name Type Target State Host
————————————————————
ora….g01.gsd application ONLINE ONLINE rac10g01
ora….g01.ons application ONLINE ONLINE rac10g01
ora….g01.vip application ONLINE ONLINE rac10g01
ora….g02.gsd application ONLINE ONLINE rac10g02
ora….g02.ons application ONLINE ONLINE rac10g02
ora….g02.vip application ONLINE ONLINE rac10g02
[oracle@rac10g01 ~]$
rac10g02 节点:
[oracle@rac10g02 ~]$ crs_stat -t
Name Type Target State Host
————————————————————
ora….g01.gsd application ONLINE ONLINE rac10g01
ora….g01.ons application ONLINE ONLINE rac10g01
ora….g01.vip application ONLINE ONLINE rac10g01
ora….g02.gsd application ONLINE ONLINE rac10g02
ora….g02.ons application ONLINE ONLINE rac10g02
ora….g02.vip application ONLINE ONLINE rac10g02
[oracle@rac10g02 ~]$
Oracle DataBase 安装地址: http://www.linuxidc.com/Linux/2017-04/142940.htm
更多 Oracle 相关信息见Oracle 专题页面 http://www.linuxidc.com/topicnews.aspx?tid=12
本文永久更新链接地址:http://www.linuxidc.com/Linux/2017-04/142939.htm