")

共计 9055 个字符,预计需要花费 23 分钟才能阅读完成。
前言:
openstack 中,controller 节点的单点故障一直是影响整个云计算平台稳定性的重大问题,因此对 controller 节点的各个组件实现 HA 显得至关重要,由于 controller 节点上部署的服务组件众多,MySQL,rabbitmq,keystone,glance,nova 等等,每种组件对于 HA 的实现都有着不同点和共同点,因此必须分开讨论,本文即时在参照之前国内一篇网文的基础之上,对其进行更新与修正,构建里一个基本的 Mysql ha 环境,广大爱好者可以借鉴本文的思路,最终将 mysql 的 HA 应用在两台 controller 节点上。
系统环境:
Ubuntu 12.04.2 LTS
节点 1:192.168.1.143(eth0)ha1
节点 2:192.168.1.144(eth0)ha2
Mysql virtual ip:192.168.1.10(这个稍后会用到)
以两天集群的集群环境为例,开始我们的 Mysql HA 部署
(1)所有节点,编辑 /etc/hosts 文件
vim /etc/hosts
添加以下内容
192.168.1.143 ha1
192.168.1.144 ha2
(2)安装 pacemaker 和 corosync
apt-get install pacemaker corosync
要对 corosync 进行设置,将如下内容复制粘贴到所有节点的 /etc/corosync/corosync.conf 内:
# Please read the openais.conf.5 manual page
totem {
version: 2
# How long before declaring a token lost (ms)
token: 3000
# How many token retransmits before forming a new configuration
token_retransmits_before_loss_const: 10
# How long to wait for join messages in the membership protocol (ms)
join: 60
# How long to wait for consensus to be achieved before starting a new round of membership configuration (ms)
consensus: 3600
# Turn off the virtual synchrony filter
vsftype: none
# Number of messages that may be sent by one processor on receipt of the token
max_messages: 20
# Limit generated nodeids to 31-bits (positive signed integers)
clear_node_high_bit: yes
# Disable encryption
secauth: off
# How many threads to use for encryption/decryption
threads: 0
# Optionally assign a fixed node id (integer)
# nodeid: 1234
# This specifies the mode of redundant ring, which may be none, active, or passive.
rrp_mode: none
interface {
# The following values need to be set based on your environment
ringnumber: 0
bindnetaddr: 192.168.1.0
mcastaddr: 226.94.1.1
mcastport: 5405
}
}
amf {
mode: disabled
}
service {
# Load the Pacemaker Cluster Resource Manager
ver: 1
name: pacemaker
}
quorum {
provider:corosync_votequorum
expected_votes:2
}
aisexec {
user: root
group: root
}
logging {
fileline: off
to_stderr: yes
to_logfile: no
to_syslog: yes
syslog_facility: daemon
debug: off
timestamp: on
logger_subsys {
subsys: AMF
debug: off
tags: enter|leave|trace1|trace2|trace3|trace4|trace6
}
}
更多详情见请继续阅读下一页的精彩内容:http://www.linuxidc.com/Linux/2013-11/92641p2.htm
相关阅读:
在 Ubuntu 12.10 上安装部署 Openstack http://www.linuxidc.com/Linux/2013-08/88184.htm
Ubuntu 12.04 OpenStack Swift 单节点部署手册 http://www.linuxidc.com/Linux/2013-08/88182.htm
MySQL 服务器的 HA 集群之 Corosync+DRBD+Pacemaker 实现 http://www.linuxidc.com/Linux/2012-08/68101.htm
MySQL 服务器的 HA 集群之 Corosync+DRBD+Pacemaker 实现 - 上篇 http://www.linuxidc.com/Linux/2012-06/61963.htm
MySQL 服务器的 HA 集群之 Corosync+DRBD+Pacemaker 实现 - 下篇 http://www.linuxidc.com/Linux/2012-06/61964.htm
(3)手动创建 /var/log/cluster 目录,避免产生 parse error in config: parse error in config: . 的错误:
mkdir /var/log/cluster
(4)我们还需要在启动时候开启两个服务,因此使用如下命令(直接复制粘贴,注意包括标点,运行):
update-rc.d pacemaker start 50 1 2 3 4 5 . stop 01 0 6 .
(5)编辑 /etc/default/corosync:
修改:
START=yes
(6)开启 corosync 服务
service corosync start
检查是否一切正常:
#corosync-cfgtool -s

还要检查集群节点和人数:

(7)在确认 Corosync 工作正常后,让我们来配置 Pacemaker,首先,开启服务:
#service pacemaker start
现在检查它是否识别出我们的集群
利用 crm status 命令或者 crm_mon -1, 看到以下输出
#crm_mon -1
============
Last updated: Mon Jul 16 15:01:57 2012
Last change: Mon Jul 16 14:52:34 2012 via cibadmin on ha1
Stack: openais
Current DC: ha11 – partition with quorum
Version: 1.1.6-9971ebba4494012a93c03b40a2c58ec0eb60f50c
2 Nodes configured, 2 expected votes
0 Resources configured.
============
Online: [ha1 ha2]
(8)因为这是两个主机的安装,你还需要禁用人数,由于 split brain,因此要禁用人数检查:
#crm configure property no-quorum-policy=ignore
在这之后还可以禁用 STONITH,如果不需要的话:
#crm configure property stonith-enabled=false
现在我们就安装完 corosync 和 pacemaker 了,下一步就是安装 MySQL 并让 Pacemaker 使它高可用度。
(9)在两个节点的 hosts 文件 /etc/hosts 中,加入这行:
192.168.1.10 mysqlmaster #(本文最开始提到的 virtual ip)
(10)首先我们需要为 mysql 下载资源代理
#cd /usr/lib/ocf/resource.d/
#mkdir percona
#cd percona
wget https://raw.github.com/percona/percona-pacemaker-agents/master/agents/mysql_prm
cp mysql_prm mysql #将代理文件重命名为 mysql
chmod u+x mysql
(11)
我们还要将“mysqlmaster”的 IP 绑定到节点上,当失效服务器出现时,它将以 slave 模式启动 MySQL。因为,让我们来建立我们的虚拟 IP:
#crm configure primitive mysqlmasterIP ocf:heartbeat:IPaddr2 params ip=192.168.1.10 cidr_netmask=24 nic=eth0 op monitor interval=10s
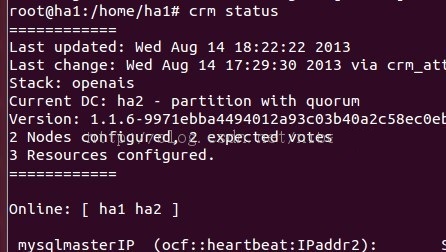
(12)
我们可以通过再次运行集群监视器来检查我们的新 IP:
前言:
openstack 中,controller 节点的单点故障一直是影响整个云计算平台稳定性的重大问题,因此对 controller 节点的各个组件实现 HA 显得至关重要,由于 controller 节点上部署的服务组件众多,MySQL,rabbitmq,keystone,glance,nova 等等,每种组件对于 HA 的实现都有着不同点和共同点,因此必须分开讨论,本文即时在参照之前国内一篇网文的基础之上,对其进行更新与修正,构建里一个基本的 Mysql ha 环境,广大爱好者可以借鉴本文的思路,最终将 mysql 的 HA 应用在两台 controller 节点上。
系统环境:
Ubuntu 12.04.2 LTS
节点 1:192.168.1.143(eth0)ha1
节点 2:192.168.1.144(eth0)ha2
Mysql virtual ip:192.168.1.10(这个稍后会用到)
以两天集群的集群环境为例,开始我们的 Mysql HA 部署
(1)所有节点,编辑 /etc/hosts 文件
vim /etc/hosts
添加以下内容
192.168.1.143 ha1
192.168.1.144 ha2
(2)安装 pacemaker 和 corosync
apt-get install pacemaker corosync
要对 corosync 进行设置,将如下内容复制粘贴到所有节点的 /etc/corosync/corosync.conf 内:
# Please read the openais.conf.5 manual page
totem {
version: 2
# How long before declaring a token lost (ms)
token: 3000
# How many token retransmits before forming a new configuration
token_retransmits_before_loss_const: 10
# How long to wait for join messages in the membership protocol (ms)
join: 60
# How long to wait for consensus to be achieved before starting a new round of membership configuration (ms)
consensus: 3600
# Turn off the virtual synchrony filter
vsftype: none
# Number of messages that may be sent by one processor on receipt of the token
max_messages: 20
# Limit generated nodeids to 31-bits (positive signed integers)
clear_node_high_bit: yes
# Disable encryption
secauth: off
# How many threads to use for encryption/decryption
threads: 0
# Optionally assign a fixed node id (integer)
# nodeid: 1234
# This specifies the mode of redundant ring, which may be none, active, or passive.
rrp_mode: none
interface {
# The following values need to be set based on your environment
ringnumber: 0
bindnetaddr: 192.168.1.0
mcastaddr: 226.94.1.1
mcastport: 5405
}
}
amf {
mode: disabled
}
service {
# Load the Pacemaker Cluster Resource Manager
ver: 1
name: pacemaker
}
quorum {
provider:corosync_votequorum
expected_votes:2
}
aisexec {
user: root
group: root
}
logging {
fileline: off
to_stderr: yes
to_logfile: no
to_syslog: yes
syslog_facility: daemon
debug: off
timestamp: on
logger_subsys {
subsys: AMF
debug: off
tags: enter|leave|trace1|trace2|trace3|trace4|trace6
}
}
更多详情见请继续阅读下一页的精彩内容:http://www.linuxidc.com/Linux/2013-11/92641p2.htm
相关阅读:
在 Ubuntu 12.10 上安装部署 Openstack http://www.linuxidc.com/Linux/2013-08/88184.htm
Ubuntu 12.04 OpenStack Swift 单节点部署手册 http://www.linuxidc.com/Linux/2013-08/88182.htm
MySQL 服务器的 HA 集群之 Corosync+DRBD+Pacemaker 实现 http://www.linuxidc.com/Linux/2012-08/68101.htm
MySQL 服务器的 HA 集群之 Corosync+DRBD+Pacemaker 实现 - 上篇 http://www.linuxidc.com/Linux/2012-06/61963.htm
MySQL 服务器的 HA 集群之 Corosync+DRBD+Pacemaker 实现 - 下篇 http://www.linuxidc.com/Linux/2012-06/61964.htm
(13)现在我们已经配置好了虚拟 IP,接下来设置 MySQL 复制,在两个节点上安装 MySQL 服务器:
#apt-get install mysql-server
(14)我们来安装基本的 replication,在 ha1 上,编辑 /etc/mysql/my.cnf,在 [mysqld] 这部分(85 行附近),取消这部分的注释:
server-id = 1
log_bin = /var/log/mysql/mysql-bin.log
在第二个服务器 ha2 上,同样文件内,取消注释并编辑:
server-id = 2
log_bin = /var/log/mysql/mysql-bin.log
并让 mysql 监听所有地址
bind-address=0.0.0.0 #只需要在 ha2 上修改
(15)建立一个复制和测试用户,在两台 ha1,ha2,上分别用
#mysql -uroot -p 进入数据库
执行如下命令:
grant replication client, replication slave on *.* to repl_user@’192.168.1.%’ identified by ‘password’;
grant replication client, replication slave, SUPER, PROCESS, RELOAD on *.* to repl_user@’localhost’ identified by ‘password’;
grant select ON mysql.user to test_user@’localhost’ identified by ‘password’;
FLUSH PRIVILEGES;
(16)
现在禁用启动时开启 MySQL,因为初始化脚本已经被转换成 upstart,在所有的节点上打开 /etc/init/mysql.conf 并注释掉以下这行:
start on runlevel [2345]
(17)创建 pacemaker 的 MySQL 资源:
#crm configure #先执行该命令,进入 crm 配置模式,然后分别复制粘贴以下内容
primitive clustermysql ocf:percona:mysql \
params binary=”/usr/bin/mysqld_safe” log=”/var/log/mysql.log” socket=”/var/run/mysqld/mysqld.sock” \
evict_outdated_slaves=”false” config=”/etc/mysql/my.cnf” pid=”/var/run/mysqld/mysqld.pid” socket=”/var/run/mysqld/mysqld.sock” \
replication_user=”repl_user” replication_passwd=”password” \
test_user=”test_user” test_passwd=”password” \
op monitor interval=”5s” role=”Master” OCF_CHECK_LEVEL=”1″ \
op monitor interval=”2s” role=”Slave” timeout=”30″ OCF_CHECK_LEVEL=”1″ \
op start interval=”0″ timeout=”120″ \
op stop interval=”0″ timeout=”120″
复制粘贴完毕后,正常不会有错误提示,从 -> 回到配置模式下
最后注意要用 commit 命令提交
(18)执行 crm status
你会发现 MySQL 正在一个节点上运行:
crm_mon -1
============
Last updated: Mon Jul 16 17:36:22 2012
Last change: Mon Jul 16 17:14:55 2012 via cibadmin on ha1
Stack: openais
Current DC: ha2 – partition with quorum
Version: 1.1.6-9971ebba4494012a93c03b40a2c58ec0eb60f50c
2 Nodes configured, 3 expected votes
2 Resources configured.
============
Online: [ha1 ha2]
mysqlmasterIP (ocf::heartbeat:IPaddr2): Started ha2
clustermysql (ocf::heartbeat:mysql): Started ha2
(19)
现在要安装 master/slave 控制器,首先我们需要设置 hosts 的 IP,这样它才能迁移 MySQL 主机,用 crm configure edit 改动这几行:
node ha1 \
attributes clustermysql_mysql_master_IP=”192.168.1.143″
node ha2 \
attributes clustermysql_mysql_master_IP=”192.168.1.144″
(20)
然后创建真正的 master/slave 资源,要实现该步,只需通过 crm 建立:
#crm configure
ms ms_MySQL clustermysql \
meta master-max=”1″ master-node-max=”1″ clone-max=”2″ clone-node-max=”1″ notify=”true” globally-unique=”false” target-role=”Master” is-managed=”true”
最后记得还要用 commit 提交
(21)
现在 MySQL 应以 master/slave 模式启动,crm status 会产生以下结果:

(22)
最后要做的就是当 mysql 以 master 或 slave 模式启动时,变动 master/slave IP,复制粘贴运行以下操作可轻易实现:
#crm configure colocation masterIP_on_mysqlMaster inf: mysqlmasterIP ms_MySQL:Master
#crm configure order mysqlPromote_before_IP inf: ms_MySQL:promote mysqlmasterIP:start
好了,现在当你停止 pacemaker 服务时,MySQL 在另一节点上会以 master 模式启动,而且 ip 也会相应变动。
在 MySQL 之后,我们需要让 RabbitMQ 高度可用。