")

共计 23478 个字符,预计需要花费 59 分钟才能阅读完成。
说明:[Linux86]:Apache 主机 [Linux87]:PHP 主机 [Linux88]:MySQL 主机
内部测试;需在 windows 下需要更改 hosts 文件解析到 httpd 的主机
例子中的 hosts 文件添加:172.16.251.86 www.Androidj.com
172.16.251.86 www.linuxidc.com
——————————————————————————–
LAMP 是指一组通常一起使用来运行动态网站或者服务器的自由软件名称首字母缩写:
Ubuntu 13.04 安装 LAMP\Vsftpd\Webmin\phpMyAdmin 服务及设置 http://www.linuxidc.com/Linux/2013-06/86250.htm
CentOS 5.9 下编译安装 LAMP(Apache 2.2.44+MySQL 5.6.10+PHP 5.4.12) http://www.linuxidc.com/Linux/2013-03/80333p3.htm
RedHat 5.4 下 Web 服务器架构之源码构建 LAMP 环境及应用 PHPWind http://www.linuxidc.com/Linux/2012-10/72484p2.htm
LAMP 源码环境搭建 WEB 服务器 Linux+Apache+MySQL+PHP http://www.linuxidc.com/Linux/2013-05/84882.htm
1、Linux;操作系统;
2、Apache;网页服务器;
3、MariaDB 或 MySQL,数据库管理系统(或者数据库服务器);
4、PHP、Perl 或 Python,脚本语言;
在编译安装之前我们需要先了解下它们之间分开的工作模式:

上图大致的标出 Apache、php 和 mysql 分离各自为单独服务器时的工作模式;下面就直接进行编译安装;首先准备好三个虚拟机。测试机版本:
[Linux86]#lsb_release -a
LSB Version: :base-4.0-amd64:base-4.0-noarch:core-4.0-amd64:core-4.0-noarch:graphics-4.0-amd64:graphics-4.0-noarch:printing-4.0-amd64:printing-4.0-noarch
Distributor ID: CentOS
Description: CentOS release 6.5 (Final)
Release: 6.5
Codename: Final
由于其中操作都是插入代码的;所以命令执行过程并没有把代码都贴出来,只贴出最后几行;
一、编译安装 Apache2.4.9
1、解决依赖关系:
[Linux86]#yum grouplist
#
Installed Groups:
Additional Development
Base
Console internet tools
Desktop
Desktop Platform
Development tools #查看包组是否安装
Server Platform Development #查看包组是否安装
如未安装;请先安装这两个包组
#
[Linux86]#rpm -qa pcre-devel
pcre-devel-7.8-6.el6.x86_64
#
查看是否安装;未安装需事先安装
[Linux86]#ls
apr-1.5.0.tar.bz2 apr-util-1.5.3.tar.bz2 httpd-2.4.9.tar.bz2
[Linux86]#
# 先安装 apr 包;解压后进入该目录
[Linux86]#pwd
/root/program/apr-1.5.0
[Linux86]#./configure –prefix=/usr/local/apr
config.status: executing default commands
config.status: include/apr.h is unchanged
config.status: include/arch/unix/apr_private.h is unchanged #没有报错就继续
[Linux86]#make && make install
/usr/bin/install -c -m 644 build/apr_rules.out /usr/local/apr/build-1/apr_rules.mk
/usr/bin/install -c -m 755 apr-config.out /usr/local/apr/bin/apr-1-config# 没有报错就继续安装 apr-util 包
[Linux86]#
# 解压进入目录
[Linux86]#./configure –prefix=/usr/local/apr-util –with-apr=/usr/local/apr/
config.status: creating test/Makefile
config.status: creating include/private/apu_config.h
config.status: executing default commands
[Linux86]#make && make install
/usr/bin/install -c -m 644 aprutil.exp /usr/local/apr-util/lib
/usr/bin/install -c -m 755 apu-config.out /usr/local/apr-util/bin/apu-1-config
[Linux86]# 都以安装成功
2、编译 Apache:
[Linux86]#rpm -qa httpd
httpd-2.2.15-29.el6.centos.x86_64
#
# 系统自己本身已安装了 httpd2.2 版本的;这里编译 2.4 的;但是老版本不需要卸载;
# 因为卸载后会造成依赖关系不稳定;且后续安装模块时还是会自动安装上的;
# 编译是只要不指定到默认路径即可;确保安装前原来的是停止的;且关闭开启自动启动
#
#
[Linux86]#./configure –prefix=/usr/local/apache –sysconfdir=/etc/httpd24 –enable-so –enable-ssl –enable-cgi –enable-rewrite –with-zlib –with-pcre –with-apr=/usr/local/apr –with-apr-util=/usr/local/apr-util –enable-modules=most –enable-mpms-shared=all –with-mpm=event –enable-proxy –enable-proxy-fcgi
参数可以通过./configure –help 查看;开启自己需要的即可
# 如没有报错直接下一步安装
[Linux86]#make && make install
mkdir /usr/local/apache/build
Installing man pages and online manual
mkdir /usr/local/apache/man
mkdir /usr/local/apache/man/man1
mkdir /usr/local/apache/man/man8
mkdir /usr/local/apache/manual
make[1]: Leaving directory `/root/program/httpd-2.4.9’# 安装完成
[Linux86]#
3、配置 Apache:
# 由于之前的 httpd 没有卸载;那么可以 cp 一个启动脚本当目前的 httpd 脚本;更改下里面的参数
#
[Linux86]#cp /etc/rc.d/init.d/httpd /etc/rc.d/init.d/httpd24
[Linux86]#vi /etc/rc.d/init.d/httpd24
# Path to the apachectl script, server binary, and short-form for messages.
# 以下几个变量定义为目前的路径;并在主配置文件中更改对应的值
achectl=/usr/local/apache/bin/apachectl
httpd=${HTTPD-/usr/local/apache/bin/httpd}
prog=httpd
pidfile=${PIDFILE-/var/run/httpd/httpd.pid}
lockfile=${LOCKFILE-/var/lock/subsys/httpd24}
RETVAL=0
STOP_TIMEOUT=${STOP_TIMEOUT-10}
# 修改主配置文件
[Linux86]#vi /etc/httpd24/httpd.conf
# same ServerRoot for multiple httpd daemons, you will need to change at
# least PidFile.
#
ServerRoot “/usr/local/apache”
pifile “/var/run/httpd/httpd.pid” #加一行 pid 文件路径;与脚本文件对应
# 保存退出
[Linux86]#service httpd24 start
Starting httpd: [OK]
[Linux86]#ss -tnl
State Recv-Q Send-Q Local Address:Port Peer Address:Port
LISTEN 0 128 :::111 :::*
LISTEN 0 128 *:111 *:*
LISTEN 0 128 :::80 :::*
#80 端口已监听
到这里 Apache 已编译安装完成了;也可以在浏览器输入 IP 地址测试下。
二、编译安装 PHP
编译之前都是需要检查开发环境;需要安装的包是否都已安装
[Linux87]#rpm -qa bzip2-devel libmcrypt-devel libxml2-devel
libxml2-devel-2.7.6-14.el6.x86_64
bzip2-devel-1.0.5-7.el6_0.x86_64
libmcrypt-devel-2.5.8-9.el6.x86_64
[Linux87]#
# 如未安装;需要先用 yum 安装上
1、这边是每个服务单独作为一个服务器;所以编译时与放在一台机器上是有分别的;而且也不需要先安装 MySQL;下面来直接编译 PHP
[Linux87]#ls
php-5.4.26.tar.bz2 xcache-3.1.0.tar.bz2
[Linux87]#tar xf php-5.4.26.tar.bz2
[Linux87]#./configure –prefix=/usr/local/php –enable-fpm –with-config-file-path=/etc –with-config-file-scan-dir=/etc/php.d –with-libxml-dir=/usr –with-openssl –with-zlib –with-bz2 –with-jpeg-dir –with-png-dir –with-freetype-dir –enable-mbstring –with-mcrypt –enable-sockets –with-mysql=mysqlnd –with-mysqli=mysqlnd –with-pdo-mysql=mysqlnd
# 注意:–with-mysql 几个选项都要为 mysqlnd;因为 mysql 服务器单独为另一台机器
+——————————————————————–+
| License: |
| This software is subject to the PHP License, available in this |
| distribution in the file LICENSE. By continuing this installation |
| process, you are bound by the terms of this license agreement. |
| If you do not agree with the terms of this license, you must abort |
| the installation process at this point. |
+——————————————————————–+
Thank you for using PHP.
出现上述字符就说明可以继续安装了;
[Linux87]#make && make install
Installing PEAR environment: /usr/local/php/lib/php/
[PEAR] Archive_Tar – installed: 1.3.11
[PEAR] Console_Getopt – installed: 1.3.1
warning: pear/PEAR requires package “pear/Structures_Graph” (recommended version 1.0.4)
warning: pear/PEAR requires package “pear/XML_Util” (recommended version 1.2.1)
[PEAR] PEAR – installed: 1.9.4
Wrote PEAR system config file at: /usr/local/php/etc/pear.conf
You may want to add: /usr/local/php/lib/php to your php.ini include_path
[PEAR] Structures_Graph- installed: 1.0.4
[PEAR] XML_Util – installed: 1.2.1
/root/program/php-5.4.26/build/shtool install -c ext/phar/phar.phar /usr/local/php/bin
ln -s -f /usr/local/php/bin/phar.phar /usr/local/php/bin/phar
Installing PDO headers: /usr/local/php/include/php/ext/pdo/
[Linux87]#
# 到这里说明安装成功了;可能会有些报错说某些软件版本太低
2、下面配置 PHP
配置 php 的配置文件
[Linux87]#cp php.ini-production /etc/php.ini
配置一个启动脚本
[Linux87]#cp sapi/fpm/init.d.php-fpm /etc/rc.d/init.d/php-fpm
给执行权限
[Linux87]#chmod +x /etc/rc.d/init.d/php-fpm
加入 chkconfig
[Linux87]#chkconfig –add php-fpm
[Linux87]#chkconfig php-fpm on
[Linux87]#chkconfig –list php-fpm
php-fpm 0:off 1:off 2:on 3:on 4:on 5:on 6:off
[Linux87]#cd /usr/local/php/etc/
配置 php-fpm 配置文件
[Linux87]#cp php-fpm.conf.default php-fpm.conf
更改配置文件
[Linux87]#vi php-fpm.conf
[global]
; Pid file
; Note: the default prefix is /usr/local/php/var
; Default Value: none
pid = run/php-fpm.pid #这项启用;下面几项对应的改为相应的值即可
;
pm.max_children = 50
; The number of child processes created on startup.
; Note: Used only when pm is set to ‘dynamic’
; Default Value: min_spare_servers + (max_spare_servers – min_spare_servers) / 2
pm.start_servers = 5
; The desired minimum number of idle server processes.
; Note: Used only when pm is set to ‘dynamic’
; Note: Mandatory when pm is set to ‘dynamic’
pm.min_spare_servers = 3
; The desired maximum number of idle server processes.
; Note: Used only when pm is set to ‘dynamic’
; Note: Mandatory when pm is set to ‘dynamic’
pm.max_spare_servers = 8
# 更改完成后启动:
[Linux87]#service php-fpm start
Starting php-fpm done
[Linux87]#ss -tunl | grep 9000
tcp LISTEN 0 128 127.0.0.1:9000 *:*
# 由于 php-rpm 是监听在 9000 端口,查看启动正常
3、与 Apache 整合到一起
[Linux87]#vi /usr/local/php/etc/php-fpm.conf
定位到 listen;IP 地址更改为别人可用访问进来的 IP 地址
; ‘/path/to/unix/socket’ – to listen on a unix socket.
; Note: This value is mandatory.
listen = 172.16.251.87:9000
[Linux87]#service php-fpm restart
[Linux87]#ss -tnul | grep 9000
tcp LISTEN 0 128 172.16.251.87:9000 *:*
[Linux87]#
[Linux87]#cd /var/www/
[Linux87]#mkdir linuxidc Androidj dark mydamin
# 建立几个目录作为虚拟主机目录
4、配置 Apache 虚拟主机来使用 PHP
到 Apache 主机上;找一个目录下面建立几个不同的目录作为虚拟主机目录;
[Linux86]#cd /usr/local/apache/
[Linux86]#mkdir -pv www/{linuxidc,androidj,dark,myadmin}
编辑主配置文件;开启虚拟主机;关闭中心主机
[Linux86]#vi /etc/httpd24/httpd.conf
# DocumentRoot: The directory out of which you will serve your
# documents. By default, all requests are taken from this directory, but
# symbolic links and aliases may be used to point to other locations.
#
#DocumentRoot “/usr/local/apache/htdocs” 注释掉
# Virtual hosts
Include /etc/httpd24/extra/httpd-vhosts.conf #开启这项
# 定位 AddType;添加下面两行
AddType application/x-httpd-php .php
AddType application/x-httpd-php-source .phps
定位至 DirectoryIndex
# DirectoryIndex: sets the file that Apache will serve if a directory
# is requested.
#
<IfModule dir_module>
DirectoryIndex index.php index.html #添加 index.php
</IfModule>
定位到 LoadModule
LoadModule proxy_module modules/mod_proxy.so #开启
#LoadModule proxy_connect_module modules/mod_proxy_connect.so
#LoadModule proxy_ftp_module modules/mod_proxy_ftp.so
#LoadModule proxy_http_module modules/mod_proxy_http.so
LoadModule proxy_fcgi_module modules/mod_proxy_fcgi.so #开启
#
[Linux86]#vi /etc/httpd24/extra/httpd-vhosts.conf 编辑虚拟主机
<VirtualHost *:80>
ServerAdmin admin@linuxidc.com
DocumentRoot “/usr/local/apache/www/linuxidc” #指定 Apache 主机的站点目录
ServerName www.linuxidc.com #指定主机名
ServerAlias linuxidc.com #主机别名
ErrorLog “/usr/local/apache/logs/linuxidc.error_log” #错误日志路径及名称
CustomLog “/usr/local/apache/logs/linuxidc.access_log” combined #访问日志路径及名称
ProxyRequests Off #关闭正向代理
ProxyPassMatch ^/(.*\.php)$ fcgi://172.16.251.87:9000/var/www/linuxidc/$1 #反向代理到 PHP 主机的站点目录
<Directory “/usr/local/apache/www/linuxidc”> #目录的访问权限配置
Options none
AllowOverride none
Require all granted
</Directory>
</VirtualHost>
<VirtualHost *:80>
ServerAdmin admin@androidj.com
DocumentRoot “/usr/local/apache/www/androidj”
ServerName www.androidj.com
ServerAlias androidj.com
ErrorLog “/usr/local/apache/logs/androidj.error_log”
CustomLog “/usr/local/apache/logs/androidj.access_log” combined
ProxyRequests Off
ProxyPassMatch ^/(.*\.php)$ fcgi://172.16.251.87:9000/var/www/androidj/$1
<Directory “/usr/local/apache/www/androidj”>
Options none
AllowOverride none
Require all granted
</Directory>
</VirtualHost>
5、测试
[Linux87]#cd /var/www/linuxidc/
[Linux87]#vi index.php
<?php
phpinfo();
?>
# 保存退出;
在浏览器输入虚拟主机中的主机名;

如上显示;就说明 Apache 和 PHP 已成功整合在一起了;在为 PHP 安装 xcache 加速器以提高性能
[Linux87]#ls
php-5.4.26 php-5.4.26.tar.bz2 xcache-3.1.0.tar.bz2
[Linux87]#tar xf xcache-3.1.0.tar.bz2
[Linux87]#cd xcache-3.1.0
[Linux87]#/usr/local/php/bin/phpize
Configuring for:
PHP Api Version: 20100412
Zend Module Api No: 20100525
Zend Extension Api No: 220100525
[Linux87]#
[Linux87]#./configure –enable-xcache –with-php-config=/usr/local/php/bin/php-config
[Linux87]#make && make install
# 要复制 /usr/local/php/lib/php/extensions/no-debug-non-zts-20100525/ 这行内容
如之前没有 /etc/php.d 目录需先创建
[Linux87]#cp xcache.ini /etc/php.d/
[xcache-common]
;; non-Windows example:
extension = /usr/local/php/lib/php/extensions/no-debug-non-zts-20100525/xcache.so 把前面路径加上
重启下 php-fpmzaic
在此访问之前的测试页面

可以看到红色区域内已出现 xcache 和版本信息了。
说明:[Linux86]:Apache 主机 [Linux87]:PHP 主机 [Linux88]:MySQL 主机
内部测试;需在 windows 下需要更改 hosts 文件解析到 httpd 的主机
例子中的 hosts 文件添加:172.16.251.86 www.Androidj.com
172.16.251.86 www.linuxidc.com
——————————————————————————–
LAMP 是指一组通常一起使用来运行动态网站或者服务器的自由软件名称首字母缩写:
Ubuntu 13.04 安装 LAMP\Vsftpd\Webmin\phpMyAdmin 服务及设置 http://www.linuxidc.com/Linux/2013-06/86250.htm
CentOS 5.9 下编译安装 LAMP(Apache 2.2.44+MySQL 5.6.10+PHP 5.4.12) http://www.linuxidc.com/Linux/2013-03/80333p3.htm
RedHat 5.4 下 Web 服务器架构之源码构建 LAMP 环境及应用 PHPWind http://www.linuxidc.com/Linux/2012-10/72484p2.htm
LAMP 源码环境搭建 WEB 服务器 Linux+Apache+MySQL+PHP http://www.linuxidc.com/Linux/2013-05/84882.htm
1、Linux;操作系统;
2、Apache;网页服务器;
3、MariaDB 或 MySQL,数据库管理系统(或者数据库服务器);
4、PHP、Perl 或 Python,脚本语言;
在编译安装之前我们需要先了解下它们之间分开的工作模式:
上图大致的标出 Apache、php 和 mysql 分离各自为单独服务器时的工作模式;下面就直接进行编译安装;首先准备好三个虚拟机。测试机版本:
[Linux86]#lsb_release -a
LSB Version: :base-4.0-amd64:base-4.0-noarch:core-4.0-amd64:core-4.0-noarch:graphics-4.0-amd64:graphics-4.0-noarch:printing-4.0-amd64:printing-4.0-noarch
Distributor ID: CentOS
Description: CentOS release 6.5 (Final)
Release: 6.5
Codename: Final
由于其中操作都是插入代码的;所以命令执行过程并没有把代码都贴出来,只贴出最后几行;
一、编译安装 Apache2.4.9
1、解决依赖关系:
[Linux86]#yum grouplist
#
Installed Groups:
Additional Development
Base
Console internet tools
Desktop
Desktop Platform
Development tools #查看包组是否安装
Server Platform Development #查看包组是否安装
如未安装;请先安装这两个包组
#
[Linux86]#rpm -qa pcre-devel
pcre-devel-7.8-6.el6.x86_64
#
查看是否安装;未安装需事先安装
[Linux86]#ls
apr-1.5.0.tar.bz2 apr-util-1.5.3.tar.bz2 httpd-2.4.9.tar.bz2
[Linux86]#
# 先安装 apr 包;解压后进入该目录
[Linux86]#pwd
/root/program/apr-1.5.0
[Linux86]#./configure –prefix=/usr/local/apr
config.status: executing default commands
config.status: include/apr.h is unchanged
config.status: include/arch/unix/apr_private.h is unchanged #没有报错就继续
[Linux86]#make && make install
/usr/bin/install -c -m 644 build/apr_rules.out /usr/local/apr/build-1/apr_rules.mk
/usr/bin/install -c -m 755 apr-config.out /usr/local/apr/bin/apr-1-config# 没有报错就继续安装 apr-util 包
[Linux86]#
# 解压进入目录
[Linux86]#./configure –prefix=/usr/local/apr-util –with-apr=/usr/local/apr/
config.status: creating test/Makefile
config.status: creating include/private/apu_config.h
config.status: executing default commands
[Linux86]#make && make install
/usr/bin/install -c -m 644 aprutil.exp /usr/local/apr-util/lib
/usr/bin/install -c -m 755 apu-config.out /usr/local/apr-util/bin/apu-1-config
[Linux86]# 都以安装成功
2、编译 Apache:
[Linux86]#rpm -qa httpd
httpd-2.2.15-29.el6.centos.x86_64
#
# 系统自己本身已安装了 httpd2.2 版本的;这里编译 2.4 的;但是老版本不需要卸载;
# 因为卸载后会造成依赖关系不稳定;且后续安装模块时还是会自动安装上的;
# 编译是只要不指定到默认路径即可;确保安装前原来的是停止的;且关闭开启自动启动
#
#
[Linux86]#./configure –prefix=/usr/local/apache –sysconfdir=/etc/httpd24 –enable-so –enable-ssl –enable-cgi –enable-rewrite –with-zlib –with-pcre –with-apr=/usr/local/apr –with-apr-util=/usr/local/apr-util –enable-modules=most –enable-mpms-shared=all –with-mpm=event –enable-proxy –enable-proxy-fcgi
参数可以通过./configure –help 查看;开启自己需要的即可
# 如没有报错直接下一步安装
[Linux86]#make && make install
mkdir /usr/local/apache/build
Installing man pages and online manual
mkdir /usr/local/apache/man
mkdir /usr/local/apache/man/man1
mkdir /usr/local/apache/man/man8
mkdir /usr/local/apache/manual
make[1]: Leaving directory `/root/program/httpd-2.4.9’# 安装完成
[Linux86]#
3、配置 Apache:
# 由于之前的 httpd 没有卸载;那么可以 cp 一个启动脚本当目前的 httpd 脚本;更改下里面的参数
#
[Linux86]#cp /etc/rc.d/init.d/httpd /etc/rc.d/init.d/httpd24
[Linux86]#vi /etc/rc.d/init.d/httpd24
# Path to the apachectl script, server binary, and short-form for messages.
# 以下几个变量定义为目前的路径;并在主配置文件中更改对应的值
achectl=/usr/local/apache/bin/apachectl
httpd=${HTTPD-/usr/local/apache/bin/httpd}
prog=httpd
pidfile=${PIDFILE-/var/run/httpd/httpd.pid}
lockfile=${LOCKFILE-/var/lock/subsys/httpd24}
RETVAL=0
STOP_TIMEOUT=${STOP_TIMEOUT-10}
# 修改主配置文件
[Linux86]#vi /etc/httpd24/httpd.conf
# same ServerRoot for multiple httpd daemons, you will need to change at
# least PidFile.
#
ServerRoot “/usr/local/apache”
pifile “/var/run/httpd/httpd.pid” #加一行 pid 文件路径;与脚本文件对应
# 保存退出
[Linux86]#service httpd24 start
Starting httpd: [OK]
[Linux86]#ss -tnl
State Recv-Q Send-Q Local Address:Port Peer Address:Port
LISTEN 0 128 :::111 :::*
LISTEN 0 128 *:111 *:*
LISTEN 0 128 :::80 :::*
#80 端口已监听
到这里 Apache 已编译安装完成了;也可以在浏览器输入 IP 地址测试下。
三、配置 MySQL
1、这里使用的是解压包;解压完成后直接配置即可使用
配置前先准备已下工作
[Linux88]#groupadd -r mysql
[Linux88]#useradd -r -g mysql -s /sbin/nologin mysql
# 先创建一个逻辑卷;这里就不演示创建逻辑卷的过程了;逻辑卷也不是实验必须创建的;实验时可以不用创建
[Linux88]#df -Th
Filesystem Type Size Used Avail Use% Mounted on
/dev/mapper/sqlvg-lvsql ext4 9.9G 151M 9.2G 2% /Mysql/data
#
配置 mysql
# 解压到指定路径
[Linux88]#tar xf mysql-5.5.33-linux2.6-x86_64.tar.gz -C /usr/local/
[Linux88]#cd /usr/local/
[Linux88]#ln -sv /usr/local/mysql-5.5.33-linux2.6-x86_64/ /usr/local/mysql
`/usr/local/mysql’ -> `/usr/local/mysql-5.5.33-linux2.6-x86_64/’
[Linux88]#cd mysql
[Linux88]#chown -R root.mysql *
# 初始化数据库;并指定其用户和 data 目录
[Linux88]#scripts/mysql_install_db –user=mysql –datadir=/Mysql/data
[Linux88]#ls /Mysql/data/
lost+found mysql mysql-bin.000001 mysql-bin.000002 mysql-bin.index performance_schema test
# 没有报错并生成以上文件即可
[Linux88]#cp support-files/my-large.cnf /etc/my.cnf 配置一个配置文件
[Linux88]#vi /etc/my.cnf 更改已下配置选项;具体选项根据自己需要配置
# The MySQL server
[mysqld]
port = 3306
socket = /tmp/mysql.sock
skip-external-locking
key_buffer_size = 256M
max_allowed_packet = 1M
table_open_cache = 256
sort_buffer_size = 1M
read_buffer_size = 1M
read_rnd_buffer_size = 4M
myisam_sort_buffer_size = 64M
thread_cache_size = 8
query_cache_size= 16M
# Try number of CPU’s*2 for thread_concurrency
thread_concurrency = 4
datadir = /Mysql/data 新增一行
提供一个服务脚本
[Linux88]#cp support-files/mysql.server /etc/rc.d/init.d/mysqld
[Linux88]#chmod +x /etc/rc.d/init.d/mysqld
[Linux88]#chkconfig –add mysqld
[Linux88]#chkconfig mysqld on
[Linux88]#chkconfig –list mysqld
mysqld 0:off 1:off 2:on 3:on 4:on 5:on 6:off
[Linux88]#service mysqld start
Starting MySQL… [OK]
# 启动成功后导出其他信息
[Linux88]#vi /etc/profile.d/mysql.sh
export PATH=/usr/local/mysql/bin:$PATH
[Linux88]#ln -sv /usr/local/mysql/include/ /usr/include/mysql
`/usr/include/mysql’ -> `/usr/local/mysql/include/’
[Linux88]#
[Linux88]#vi /etc/man.config
定位到 MANPATH
#
MANPATH /usr/man
MANPATH /usr/share/man
MANPATH /usr/local/man
MANPATH /usr/local/share/man
MANPATH /usr/X11R6/man
MANPATH /usr/local/mysql/man #添加一行
#
[Linux88]#echo /usr/local/mysql/lib/ > /etc/ld.so.conf.d/mysql.conf
2、配置 MySQL 整合 PHP
[Linux88]#mysql
Welcome to the MySQL monitor. Commands end with ; or \g.
Your MySQL connection id is 1
Server version: 5.5.33-log MySQL Community Server (GPL)
Copyright (c) 2000, 2013, Oracle and/or its affiliates. All rights reserved.
Oracle is a registered trademark of Oracle Corporation and/or its
affiliates. Other names may be trademarks of their respective
owners.
Type ‘help;’ or ‘\h’ for help. Type ‘\c’ to clear the current input statement.
mysql>use mysql 授权表
mysql> select user,host,password from user;
+——+———————–+———-+
| user | host | password |
+——+———————–+———-+
| root | localhost | |
| root | localhost.localdomain | |
| root | 127.0.0.1 | |
| root | ::1 | |
| | localhost | |
| | localhost.localdomain | |
+——+———————–+———-+
6 rows in set (0.00 sec)
mysql> update user set password = password (‘you_passwd’) where user=’root’;
# 更改 user 表中所有用户为 root 的密码
mysql> drop user ”@’localhost.localdomain’; 删除一些无用的账户;以保证安全性
Query OK, 0 rows affected (0.00 sec)
Rows matched: 4 Changed: 0 Warnings: 0
mysql> select user,host,password from user; 显示 user 的信息;
+——+———————–+——————————————-+
| user | host | password |
+——+———————–+——————————————-+
| root | localhost | *4B78DCD8C21610F21CBEA871E687A33647CF8EE4 |
| root | localhost.localdomain | *4B78DCD8C21610F21CBEA871E687A33647CF8EE4 |
| root | 127.0.0.1 | *4B78DCD8C21610F21CBEA871E687A33647CF8EE4 |
+——+———————–+——————————————-+
3 rows in set (0.00 sec)
#下面的较为重要;这是授权 PHP 主机可以访问的
mysql> grant all privileges on *.* to ‘root’@’172.16.251.87’ identified by ‘you passwd’;
Query OK, 0 rows affected (0.00 sec)
mysql> select user,host,password from user;
+——+———————–+——————————————-+
| user | host | password |
+——+———————–+——————————————-+
| root | localhost | *4B78DCD8C21610F21CBEA871E687A33647CF8EE4 |
| root | localhost.localdomain | *4B78DCD8C21610F21CBEA871E687A33647CF8EE4 |
| root | 127.0.0.1 | *4B78DCD8C21610F21CBEA871E687A33647CF8EE4 |
| root | 172.16.251.87 | *4B78DCD8C21610F21CBEA871E687A33647CF8EE4 |
+——+———————–+——————————————-+
4 rows in set (0.00 sec)
mysql> flush privileges; 更新
Query OK, 0 rows affected (0.00 sec)
mysql>
到此以完成授权;下面就整合测试 WordPress 和 phpmyadmin。
四、测试 LAMP
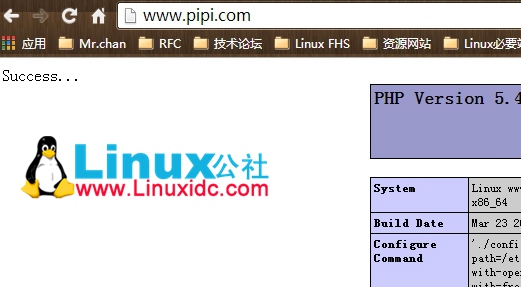
1、先测试在 php 主机上是否可以连接 mysql
[Linux87]#vim index.php
<?php
$link = mysql_connect(‘172.16.251.88′,’root’,’you_passwd’);
if($link)
echo “Success…”;
else
echo “Failed….”;
mysql_close;
phpinfo();
?>
~
能看到左上角有 Success 说明连接成功;也可以停止 mysql 服务测试看下。
2、配置 phpmyadmin
在 Apache 和 php 主机对应的目录下下载这两个软件包
[Linux87]#pwd
/var/www/myadmin
[Linux87]#ls
phpMyAdmin-4.0.5-all-languages.zip
[Linux87]#
# 这是两台不同主机;一个 Apache;一个 PHP
[Linux86]#pwd
/usr/local/apache/www/myadmin
[Linux86]#ls
phpMyAdmin-4.0.5-all-languages.zip
[Linux86]#
[Linux87]#unzip phpMyAdmin-4.0.5-all-languages.zip
[Linux87]#mv phpMyAdmin-4.0.5-all-languages/* ./
上面的操作都是需要两台机器一样操作的;
# 需要连接数据库的操作在 PHP 主机上操作即可
[Linux87]#cp config.sample.inc.php config.inc.php
$cfg[‘Servers’][$i][‘auth_type’] = ‘cookie’;
/* Server parameters */
$cfg[‘Servers’][$i][‘host’] = ‘172.16.251.88’; #这个更改为 MySQL 服务地址
$cfg[‘Servers’][$i][‘connect_type’] = ‘tcp’;
$cfg[‘Servers’][$i][‘compress’] = false;
/* Select mysql if your server does not have mysqli */
$cfg[‘Servers’][$i][‘extension’] = ‘mysqli’;
$cfg[‘Servers’][$i][‘AllowNoPassword’] = false;
配置完成后登陆测试


测试登陆成功。
3、配置 WordPress 博客
同 phpmyadmin 配置一样;两台主机都需同样的代码存放于对应的目录下
[Linux86]#pwd
/usr/local/apache/www/soul
[Linux86]#ls
wordpress-3.8.1-zh_CN.tar.gz
[Linux86]#
#
[Linux87]#pwd
/var/www/soul
[Linux87]#ls
wordpress-3.8.1-zh_CN.tar.gz
[Linux87]#
[Linux87]#tar xf wordpress-3.8.1-zh_CN.tar.gz
[Linux87]#chmod -R 777 wordpress
[Linux87]#mv wordpress/* ./
[Linux87]#cp wp-config-sample.php wp-config.php
[Linux87]#vi wp-config.php 更改已下几项;
define(‘DB_NAME’, ‘wpdb’); #数据库名称
define(‘DB_USER’, ‘wpuser’); #用户名称
define(‘DB_PASSWORD’, ‘wppass’); #密码
define(‘DB_HOST’, ‘172.16.251.88’); #数据库主机
上述配置了数据库的账户信息;需要在数据库进行授权;
1234567891011
[Linux88]#mysql -uroot -p
mysql> use mysql
Database changed
mysql> create database wpdb; #创建 wpdb 数据库
Query OK, 1 row affected (0.01 sec)
mysql> grant all privileges on wpdb.* to ‘wpuser’@’172.16.251.87’ identified by ‘wppass’; #授权 wpdb 数据库可以访问 MySQL
Query OK, 0 rows affected (0.00 sec)
mysql> flush privileges; #更新
Query OK, 0 rows affected (0.00 sec)


测试一切都是正常的;数据库也是更新正常的。到此 LAMP 以编译安装完成。虚拟主机还可以添加多个。这里就不一一测试;主要就是在数据库连接时需要指定主机;而且数据库上需要授权访问。