")

共计 4701 个字符,预计需要花费 12 分钟才能阅读完成。
使用 Ghost 搭了一个自己的个人博客,主机买的是云服务器的。看样子题主还是个一无所知的小白,那刚好我也在这里总结下我自己的搭建 Ghost 博客的过程吧。
服务器篇:
服务器的选择比较广,关于服务器的选择国内国外的争论在此不提。
记住一点:国内主机解析域名需备案!
一核 1G 1M 带宽 就够用。服务器的系统:Ubuntu14.04 64 位。
域名篇:
域名的话和服务器一样,购买选择比较宽泛。
域名解析:
在购买完域名和服务器以后呢,就可以在控制台进行解析。这里不是重点,就不讲了。
工具篇:
有了以上这些东西,为了方便使用云主机,请下载 Xshell,Xftp 两个工具。
这连个工具全部免费,在此不多说。参考下面的
VMware 下 Ubuntu 虚拟机 NAT 模式连接 Xshell http://www.linuxidc.com/Linux/2016-09/135366.htm
Xshell 实现 Windows 上传文件到 Linux 主机 http://www.linuxidc.com/Linux/2015-05/117975.htm
Xshell 登录 CentOS 6.3 中文乱码的解决 http://www.linuxidc.com/Linux/2013-06/86600.htm
VirtualBox4.12 文本安装 CentOS 5.4 以及 Xshell 连接教程 PDF http://www.linuxidc.com/Linux/2013-06/85575.htm
Xshell 连接 CentOS6.5 iptables 或 ls 输出乱码 http://www.linuxidc.com/Linux/2014-06/103725.htm
VMware Linux 使用 Xshell 登陆 http://www.linuxidc.com/Linux/2012-06/62546.htm
使用 Xshell 密钥认证机制远程登录 Linux http://www.linuxidc.com/Linux/2015-03/114947.htm
————————————————- 重点来了 ———————————————-
现在已经有了云服务器的主机,解析了服务器,云主机系统也选择好了(Ubuntu14.04 64 位)
Step1 基础配置:
Ghost 是依托于 node.js 的,所以要先搭建 node 环境。
sudo apt-get update
sudo apt-get install -y Python-software-properties python g++ make
sudo add-apt-repository ppa:chris-lea/node.js
sudo apt-get update
sudo apt-get install nodejs
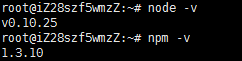
这些命令全部执行完毕以后,要确认是否配置成功。在终端输入:
node -v
v0.10.36
显示 node 的版本号,即为安装成功。
接下来再确认一下 npm 安装是否成功,终端输入:
npm -v
同样,输出版本号为安装成功。
Step2 配置 Ghost:
首先要新建一个工作空间(文件夹)来存放 Ghost:
sudo mkdir -p /var/www/
下载 Ghost:
进入刚才创建的工作空间
cd /var/www/
下载 Ghost 并解压
sudo wget https://ghost.org/zip/ghost-latest.zip
sudo unzip -d ghost ghost-latest.zip
(解压的时候可能会出错,是因为没有下载解压工具 unzip,执行命令下载即可,然后重复解压命令。)
sudo apt-get install unzip
安装 Ghost 的生产模块:
cd ghost/
sudo npm install --production
现在我们已经安装完了,但是需要设置之后,才能启动它。
Ghost 设置:
sudo cp config.example.js config.js
这句话的意思复制 config.example.js 并命名为 config.js,我们要对 config.js 这个文件进行修改:
sudo nano config.js
(这句话是用 nano 打开 config.js,提示没有安装 nano 的话,输入以下命令安装,然后重复上一条命令:)
sudo apt-get install nano
打开以后,修改以下被标注的区域:
config = {
    // ### Production
    // When running Ghost in the wild, use the production environment
    // Configure your URL and mail settings here
    production: {
        url: 'http://my-ghost-blog.com',
### 将‘’内部的内容修改为你的解析后的域名,注意带上 http
        mail: {// Your mail settings},
        database: {
            client: 'sqlite3',
            connection: {filename: path.join(__dirname, '/content/data/ghost.db')
            },
            debug: false
        },

        server: {// Host to be passed to node's `net.Server#listen()`
            host: '127.0.0.1',
### 将‘127.0.0.1’改为‘0.0.0.0’// Port to be passed to node's `net.Server#listen()`, for iisnode s$
            port: '2368'
        }
    },

(...)
然后 CTRL + X 再输入 Y 然后敲 ENTER 退出。
现在已经配置好了 Ghost,输入:
sudo npm start --production
大概会显示:
> ghost@0.6.4 start /var/www/ghost
> node index

Migrations: Database initialisation required for version 003
Migrations: Creating tables...
Migrations: Creating table: posts

[...]
然后现在你就可以让你的 Ghost 使用 2368 这个端口:http:// 你的域名.com:2368 就可以看到 Ghost 本尊。
CTRL + C 可以结束掉正在开启的 Ghost
但是这还不是结束!
接下来要让你的 Ghost 一直处于运行状态。
Step4 配置服务器程序:
在终端执行:
sudo apt-get install nginx
接下来需要对 Nginx 进行一些配置:
sudo apt-get install nginx
sudo rm sites-enabled/default
sudo touch /etc/nginx/sites-available/ghost
sudo nano /etc/nginx/sites-available/ghost
然后把这些代码粘贴进去:
server {
    listen 80;
    server_name your_domain.tld;
### 修该为你的域名
    location / {
        proxy_set_header   X-Real-IP $remote_addr;
        proxy_set_header   Host      $http_host;
        proxy_pass         http://127.0.0.1:2368;
    }
}
然后建立一个链接,将你新建的配置告诉 Nginx:
sudo ln -s /etc/nginx/sites-available/ghost /etc/nginx/sites-enabled/ghost
然后重启 Nginx:
sudo service nginx restart
接下来创建一个新的用户,并给与他权限:
sudo adduser --shell /bin/bash --gecos 'Ghost application' ghost
sudo chown -R ghost:ghost /var/www/ghost/
然后用 ghost 用户使用系统:
su - ghost
现在我们要开启 Ghost:
cd /var/www/ghost
npm start --production
然后你可以在浏览器输入你的域名来查看你的 Ghost 博客。
Step5 保持 Ghost 的运行:
我们得先退出 ghost 用户:
exit
接下来安装 forever:
sudo npm install -g forever
然后执行:
NODE_ENV=production forever start index.js
接下来看一下 forever 是否挂在了 index.js:
forever list
 这个状态的话,你就可以开始你的 Ghost 之路了!
结束进程命令:
forever index.js
到此为止,就是 Ghost 小白扬帆的终点,也是 Ghost 之路的起点。接下来你还要折腾主题,更换数据库等等,献上对我有贡献的教程供大家参考:
How To Create a Blog with Ghost and Nginx on Ubuntu 14.04
使用 apache 设置反向代理:
### 修改 apache 的默认配置文件 000-default.conf 的操作
sudo vi /etc/apache2/sites-available/000-default.conf
### 或者直接创建一个 ghost.conf
sudo vi /etc/apache2/sites-available/ghost.conf
### 然后贴入如下配置文件
<VirtualHost *:80>
# Server Name (domain name), and any aliases
ServerName example.com
ServerAlias www.example.com
# Document Root (where ghost directory are located)
DocumentRoot /var/www/
# Reverse Proxy
ProxyPreserveHost On
ProxyPass / http://localhost:2368/
# Log file locations
LogLevel warn
ErrorLog /var/www/ghost/log/error.log
CustomLog /var/www/ghost/log/access.log combined
</VirtualHost>
### 确保 ProxyPreserveHost On 可以被执行,开启 Apache 反向代理
sudo a2enmod proxy proxy_http
### 重启服务器
sudo service apache2 restart
** 注:
1. log file 文件夹需自己创建,路径填自己的;也可以不使用 log file,删掉相应代码行就好
2.“example.com”需改为自己的域名地址。之前卡在这里最久,如果还没装 apache 就不要 apache 了,还是推荐用 nginx。
国内的教程我也看了很多,可以参考,如下。
CentOS 7 系统安装 Ghost 博客平台 http://www.linuxidc.com/Linux/2016-10/136410.htm
CentOS6 32 位安装 Ghost http://www.linuxidc.com/Linux/2015-09/123063.htm
CentOS 7.2 搭建 Ghost 博客 http://www.linuxidc.com/Linux/2016-11/137336.htm
本文永久更新链接地址 :http://www.linuxidc.com/Linux/2016-11/137337.htm


