共计 21312 个字符,预计需要花费 54 分钟才能阅读完成。
Hadoop2.6 集群环境搭建(HDFS HA+YARN)原来 4G 内存也能任性一次。
准备工作:
1、笔记本 4G 内存,操作系统 WIN7(屌丝的配置)
2、工具 VMware Workstation
3、虚拟机:CentOS6.4 共四台
虚拟机设置:
每台机器:内存 512M,硬盘 40G,网络适配器:NAT 模式
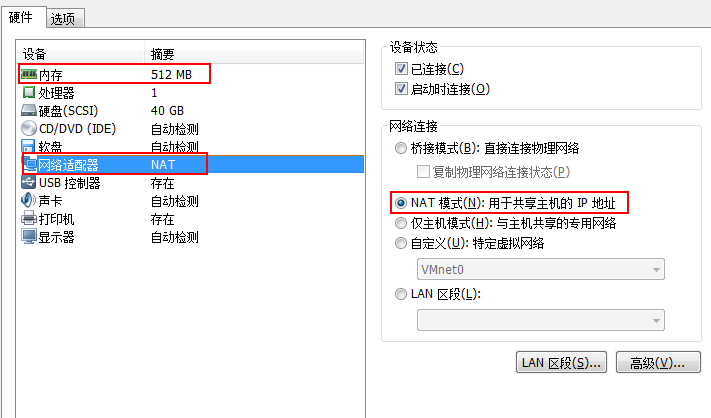
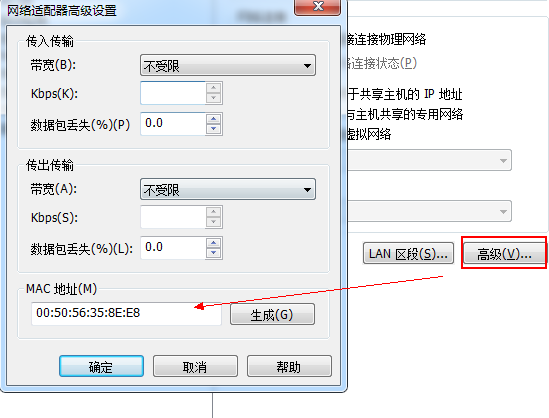
选择高级,新生成虚机 Mac 地址(克隆虚拟机,Mac 地址不会改变,每次最后手动重新生成)
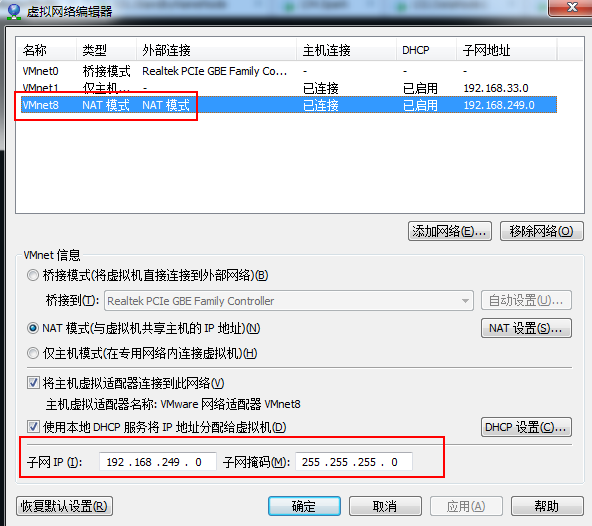
编辑虚拟机网络:
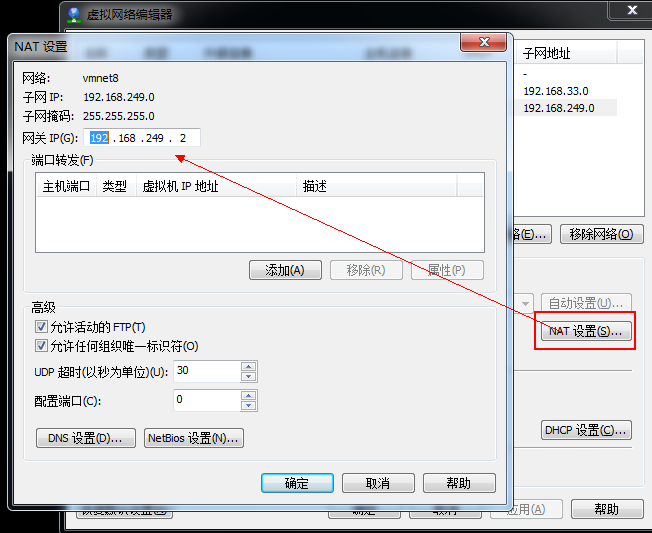
点击 NAT 设置,查看虚机网关 IP,并记住它,该 IP 在虚机的网络设置中非常重要。
NAT 设置默认 IP 会自动生成,但是我们的集群中 IP 需要手动设置。
本机 Win7:VMnet8 网络设置
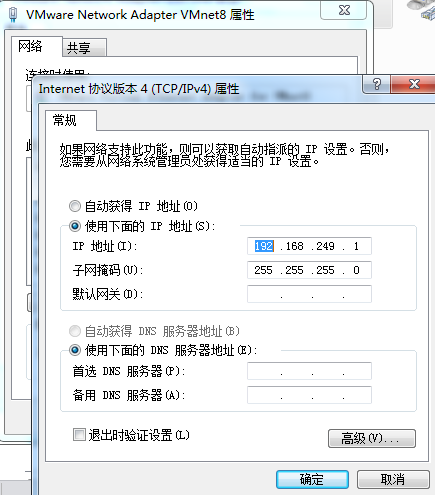
实验环境:
|
Ip |
hostname |
role |
|
192.168.249.130 |
SY-0130 |
ActiveNameNode |
|
192.168.249.131 |
SY-0131 |
StandByNameNode |
|
192.168.249.132 |
SY-0132 |
DataNode1 |
|
192.168.249.133 |
SY-0133 |
DataNode2 |
Linux 网络设置:
1、新建用户如:hadoop。不建议使用 root 用户搭建集群(root 权限过大)
2、使得 hadoop 用户获得 sudo 权限。
[root@SY-0130 ~]# vi /etc/sudoers

## Allow root to run any commands anywhere

root    ALL=(ALL)       ALL

hadoop  ALL=(ALL)       ALL
3、查看当前虚机当前网络使用网卡设备
[root@SY-0130 hadoop]# ifconfig
eth2      Link encap:Ethernet  HWaddr 00:50:56:35:8E:E8
          inet addr:192.168.249.130  Bcast:192.168.249.255  Mask:255.255.255.0
          inet6 addr: fe80::250:56ff:fe35:8ee8/64 Scope:Link
          UP BROADCAST RUNNING MULTICAST  MTU:1500  Metric:1
          RX packets:877059 errors:0 dropped:0 overruns:0 frame:0
          TX packets:597769 errors:0 dropped:0 overruns:0 carrier:0
          collisions:0 txqueuelen:1000
          RX bytes:865720294 (825.6 MiB)  TX bytes:324530557 (309.4 MiB)
          Interrupt:19 Base address:0x2024

lo        Link encap:Local Loopback
          inet addr:127.0.0.1  Mask:255.0.0.0
          inet6 addr: ::1/128 Scope:Host
          UP LOOPBACK RUNNING  MTU:16436  Metric:1
          RX packets:1354 errors:0 dropped:0 overruns:0 frame:0
          TX packets:1354 errors:0 dropped:0 overruns:0 carrier:0
          collisions:0 txqueuelen:0
          RX bytes:196675 (192.0 KiB)  TX bytes:196675 (192.0 KiB)
[root@SY-0130 ~]# cat /proc/net/dev,当前网卡,我的为 eth2
[root@SY-0130 ~]# cat /proc/net/dev
Inter-|   Receive                                                |  Transmit
 face |bytes    packets errs drop fifo frame compressed multicast|bytes    packets errs drop fifo colls carrier compressed
    lo:  196675    1354    0    0    0     0          0         0   196675    1354    0    0    0     0       0          0
  eth2:865576893  875205    0    0    0     0          0         0 324425517  596433    0    0    0     0       0          0
4、查看当前网卡对应的 Mac 地址
[root@SY-0130 ~]# cat /etc/udev/rules.d/70-persistent-net.rules
# This file was automatically generated by the /lib/udev/write_net_rules
# program, run by the persistent-net-generator.rules rules file.
#
# You can modify it, as long as you keep each rule on a single
# line, and change only the value of the NAME= key.

# PCI device 0x1022:0x2000 (vmxnet)
SUBSYSTEM=="net", ACTION=="add", DRIVERS=="?*", ATTR{address}=="00:0c:29:b5:fd:bb", ATTR{type}=="1", KERNEL=="eth*", NAME="eth1"

# PCI device 0x1022:0x2000 (vmxnet)
SUBSYSTEM=="net", ACTION=="add", DRIVERS=="?*", ATTR{address}=="00:50:56:35:8e:e8", ATTR{type}=="1", KERNEL=="eth*", NAME="eth2"
5、Network Configuration
[root@SY-0130 ~]# setup
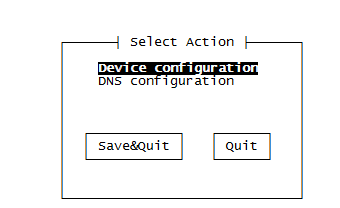
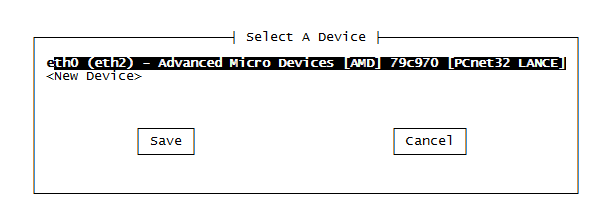
选择 eth2,进行设置,更改为当前网卡设备 eth2,并且进行 IP、网管、DNS 设置。
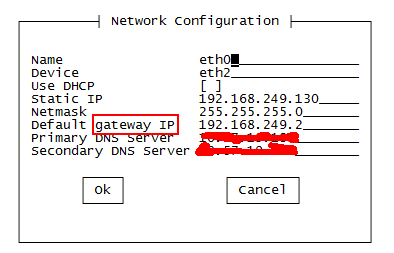
DNS Server 与 Win7 的网络中的 DNS Server 一致,这样虚拟机也可以连接 Internet 网了,方便下载安装软件。
另外还有将防火墙关闭。
6、修改 hostname
[root@SY-0130 ~]# vi /etc/sysconfig/network
NETWORKING=yes
HOSTNAME=SY-0130
7、修改 hosts
[hadoop@SY-0130 ~]$ sudo vi /etc/hosts
# 添加如下内容
192.168.249.130 SY-0130
192.168.249.131 SY-0131
192.168.249.132 SY-0132
192.168.249.133 SY-0133
8、重启虚机. reboot
CentOS 安装和配置 Hadoop2.2.0 http://www.linuxidc.com/Linux/2014-01/94685.htm
Ubuntu 13.04 上搭建 Hadoop 环境 http://www.linuxidc.com/Linux/2013-06/86106.htm
Ubuntu 12.10 +Hadoop 1.2.1 版本集群配置 http://www.linuxidc.com/Linux/2013-09/90600.htm
Ubuntu 上搭建 Hadoop 环境(单机模式 + 伪分布模式)http://www.linuxidc.com/Linux/2013-01/77681.htm
Ubuntu 下 Hadoop 环境的配置 http://www.linuxidc.com/Linux/2012-11/74539.htm
单机版搭建 Hadoop 环境图文教程详解 http://www.linuxidc.com/Linux/2012-02/53927.htm
搭建 Hadoop 环境(在 Winodws 环境下用虚拟机虚拟两个 Ubuntu 系统进行搭建)http://www.linuxidc.com/Linux/2011-12/48894.htm
更多详情见请继续阅读下一页的精彩内容:http://www.linuxidc.com/Linux/2015-01/111461p2.htm
软件安装:
(注:用户 Hadoop 登录 SY-130)
1、SY-130 用户目录创建 toolkit 文件夹,用来保存所有软件安装包,建立 labc 文件作为本次实验环境目录。
[hadoop@SY-0130 ~]$ mkdir labc
[hadoop@SY-0130 ~]$ mkdir toolkit
[hadoop@SY-0130 ~]$ ls
labc toolkit
# 我将下载的软件包存放在 toolkit 中如下
[hadoop@SY-0130 toolkit]$ ls
hadoop-2.5.2.tar.gz  hadoop-2.6.0.tar.gz  jdk-7u71-linux-i586.gz  scala-2.10.3.tgz  spark-1.2.0-bin-hadoop2.3.tgz  zookeeper-3.4.6.tar.gz
1、JDK 安装及环境变量设置
[hadoop@SY-0130 ~]$ mkdir lab
# 我将 jdk7 安装在 lab 目录
[hadoop@SY-0130 jdk1.7.0_71]$ pwd
/home/hadoop/lab/jdk1.7.0_71
# 环境变量设置:
[hadoop@SY-0130 ~]$ vi .bash_profile
# User specific environment and startup programs

export Java_HOME=/home/hadoop/lab/jdk1.7.0_71

PATH=$JAVA_HOME/bin:$PATH:$HOME/bin
export PATH

export CLASSPATH=.:$JAVA_HOME/lib/dt.jar:$JAVA_HOME/lib/tools.jar
# 设置生效
[hadoop@SY-0130 ~]$ source .bash_profile
2、Hadoop2.6 安装及设置
# 解压 toolkit 文件夹中的 hadoop-2.6.0.tar.gz 到. /home/hadoop/labc 目录
[hadoop@SY-0130 hadoop-2.6.0]$ pwd
/home/hadoop/labc/hadoop-2.6.0
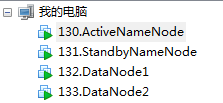
JDK,Hadoop 基本安装完成,除了一些配置,现在可以将此虚拟机进行克隆。
该虚拟机命名:
130.ActiveNameNode
我将它克隆了 3 次,分别命名为:
131.StandbyNameNode
132.DataNode1
133..DataNode2
并且将克隆之后的 3 个虚拟机,重新生成了 Mac 地址,查看了他们分别使用的网卡,更改了对应的 IP,dns,hostname , hosts,关闭防火墙。具体操作按照上述说明操作即可。在网络配置这块我花了不少的时间。

软件配置:
至此,我拥有了四台安装好了 JDK、Hadoop、及配置好对应的 IP,能够访问 Internet 的 Linux 虚机。
在具体 Hadoop HA 配置前,为了让节点之间通信方便,将 4 节点之间设置 SSH 免密码登录。
1、SSH 免密码登录
[hadoop@SY-0130 ~]$ ssh-keygen -t rsa #一直回车即可.
# 查看生成公钥
[hadoop@SY-0130 .ssh]$ ls
id_rsa id_rsa.pub known_hosts
# 远程复制 id_rsa.pub 到 SY-0131, SY-0132, SY-0133 节点。
[hadoop@SY-0130 .ssh]$ scp id_rsa.pub hadoop@SY-0131:.ssh/authorized_keys
[hadoop@SY-0130 .ssh]$ scp id_rsa.pub hadoop@SY-0132:.ssh/authorized_keys
[hadoop@SY-0130 .ssh]$ scp id_rsa.pub hadoop@SY-0133:.ssh/authorized_keys
# 注意:SY-130 为 ActiveName , 在此我只配置了 SY-0130 到其他节点的免密码登录,即只是单向,没有设置双向。
# 完成上述配置后,测试 SY-130 免密码登录
# 连接 sy-0131
[hadoop@SY-0130 ~]$ ssh sy-0131
Last login: Tue Jan  6 07:32:46 2015 from 192.168.249.1
[hadoop@SY-0131 ~]$
#ctrl+d 可退出连接
#连接 sy-0132
[hadoop@SY-0130 ~]$ ssh sy-0132
Last login: Tue Jan  6 21:25:16 2015 from 192.168.249.1
[hadoop@SY-0132 ~]$
#连接 sy-0132
[hadoop@SY-0130 ~]$ ssh sy-0133
Last login: Tue Jan  6 21:25:18 2015 from 192.168.249.1
[hadoop@SY-0133 ~]$
#测试成功
2、Hadoop 设置
# 进入 hadoop 安装目录
[hadoop@SY-0130 hadoop-2.6.0]$ pwd
/home/hadoop/labc/hadoop-2.6.0
# 修改 hadoop-env.sh,添加 Java 环境变量
[hadoop@SY-0130 hadoop-2.6.0]$ vi etc/hadoop/hadoop-env.sh
# The java implementation to use.
export JAVA_HOME=/home/hadoop/lab/jdk1.7.0_71
# 修改 core-site.xml
<?xml version="1.0"?>
<?xml-stylesheet type="text/xsl" href="https://www.linuxidc.com/Linux/2015-01/configuration.xsl"?>

<!--
   Licensed to the Apache Software Foundation (ASF) under one or more
   contributor license agreements.  See the NOTICE file distributed with
   this work for additional information regarding copyright ownership.
   The ASF licenses this file to You under the Apache License, Version 2.0
   (the "License"); you may not use this file except in compliance with
   the License.  You may obtain a copy of the License at

       http://www.apache.org/licenses/LICENSE-2.0

   Unless required by applicable law or agreed to in writing, software
   distributed under the License is distributed on an "AS IS" BASIS,
   WITHOUT WARRANTIES OR CONDITIONS OF ANY KIND, either express or implied.
   See the License for the specific language governing permissions and
   limitations under the License.
-->

<!-- Do not modify this file directly.  Instead, copy entries that you -->
<!-- wish to modify from this file into core-site.xml and change them -->
<!-- there.  If core-site.xml does not already exist, create it.      -->

<configuration>

<property>
  <name>fs.defaultFS</name>
  <value>hdfs://SY-0130:8020</value>
  <description>The name of the default file system.  A URI whose
  scheme and authority determine the FileSystem implementation.  The
  uri's scheme determines the config property (fs.SCHEME.impl) naming
  the FileSystem implementation class.  The uri's authority is used to
  determine the host, port, etc. for a filesystem.</description>
</property>

</configuration>
# 修改 hdfs-site.xml
<?xml version="1.0"?>
<?xml-stylesheet type="text/xsl" href="https://www.linuxidc.com/Linux/2015-01/configuration.xsl"?>

<!--
   Licensed to the Apache Software Foundation (ASF) under one or more
   contributor license agreements.  See the NOTICE file distributed with
   this work for additional information regarding copyright ownership.
   The ASF licenses this file to You under the Apache License, Version 2.0
   (the "License"); you may not use this file except in compliance with
   the License.  You may obtain a copy of the License at

       http://www.apache.org/licenses/LICENSE-2.0

   Unless required by applicable law or agreed to in writing, software
   distributed under the License is distributed on an "AS IS" BASIS,
   WITHOUT WARRANTIES OR CONDITIONS OF ANY KIND, either express or implied.
   See the License for the specific language governing permissions and
   limitations under the License.
-->

<!-- Do not modify this file directly.  Instead, copy entries that you -->
<!-- wish to modify from this file into hdfs-site.xml and change them -->
<!-- there.  If hdfs-site.xml does not already exist, create it.      -->

<configuration>

<property>
  <name>dfs.nameservices</name>
  <value>hadoop-test</value>
  <description>
    Comma-separated list of nameservices.
  </description>
</property>

<property>
  <name>dfs.ha.namenodes.hadoop-test</name>
  <value>nn1,nn2</value>
  <description>
    The prefix for a given nameservice, contains a comma-separated
    list of namenodes for a given nameservice (eg EXAMPLENAMESERVICE).
  </description>
</property>

<property>
  <name>dfs.namenode.rpc-address.hadoop-test.nn1</name>
  <value>SY-0130:8020</value>
  <description>
    RPC address for nomenode1 of hadoop-test
  </description>
</property>

<property>
  <name>dfs.namenode.rpc-address.hadoop-test.nn2</name>
  <value>SY-0131:8020</value>
  <description>
    RPC address for nomenode2 of hadoop-test
  </description>
</property>

<property>
  <name>dfs.namenode.http-address.hadoop-test.nn1</name>
  <value>SY-0130:50070</value>
  <description>
    The address and the base port where the dfs namenode1 web ui will listen on.
  </description>
</property>

<property>
  <name>dfs.namenode.http-address.hadoop-test.nn2</name>
  <value>SY-0131:50070</value>
  <description>
    The address and the base port where the dfs namenode2 web ui will listen on.
  </description>
</property>

<property>
  <name>dfs.namenode.name.dir</name>
  <value>file:///home/hadoop/labc/hdfs/name</value>
  <description>Determines where on the local filesystem the DFS name node
      should store the name table(fsimage).  If this is a comma-delimited list
      of directories then the name table is replicated in all of the
      directories, for redundancy. </description>
</property>

<property>
  <name>dfs.namenode.shared.edits.dir</name>
  <value>qjournal://SY-0131:8485;SY-0132:8485;SY-0133:8485/hadoop-test</value>
  <description>A directory on shared storage between the multiple namenodes
  in an HA cluster. This directory will be written by the active and read
  by the standby in order to keep the namespaces synchronized. This directory
  does not need to be listed in dfs.namenode.edits.dir above. It should be
  left empty in a non-HA cluster.
  </description>
</property>

<property>
  <name>dfs.datanode.data.dir</name>
  <value>file:///home/hadoop/labc/hdfs/data</value>
  <description>Determines where on the local filesystem an DFS data node
  should store its blocks.  If this is a comma-delimited
  list of directories, then data will be stored in all named
  directories, typically on different devices.
  Directories that do not exist are ignored.
  </description>
</property>

<property>
  <name>dfs.ha.automatic-failover.enabled</name>
  <value>false</value>
  <description>
    Whether automatic failover is enabled. See the HDFS High
    Availability documentation for details on automatic HA
    configuration.
  </description>
</property>

<property>
  <name>dfs.journalnode.edits.dir</name>
  <value>/home/hadoop/labc/hdfs/journal/</value>
</property>

</configuration>
# 修改 mapred-site.xml
<?xml version="1.0"?>
<!--
   Licensed to the Apache Software Foundation (ASF) under one or more
   contributor license agreements.  See the NOTICE file distributed with
   this work for additional information regarding copyright ownership.
   The ASF licenses this file to You under the Apache License, Version 2.0
   (the "License"); you may not use this file except in compliance with
   the License.  You may obtain a copy of the License at

       http://www.apache.org/licenses/LICENSE-2.0

   Unless required by applicable law or agreed to in writing, software
   distributed under the License is distributed on an "AS IS" BASIS,
   WITHOUT WARRANTIES OR CONDITIONS OF ANY KIND, either express or implied.
   See the License for the specific language governing permissions and
   limitations under the License.
-->
<?xml-stylesheet type="text/xsl" href="https://www.linuxidc.com/Linux/2015-01/configuration.xsl"?>

<!-- Do not modify this file directly.  Instead, copy entries that you -->
<!-- wish to modify from this file into mapred-site.xml and change them -->
<!-- there.  If mapred-site.xml does not already exist, create it.      -->

<configuration>

<!-- MR YARN Application properties -->

<property>
  <name>mapreduce.framework.name</name>
  <value>yarn</value>
  <description>The runtime framework for executing MapReduce jobs.
  Can be one of local, classic or yarn.
  </description>
</property>

<!-- jobhistory properties -->
<property>
  <name>mapreduce.jobhistory.address</name>
  <value>SY-0131:10020</value>
  <description>MapReduce JobHistory Server IPC host:port</description>
</property>

<property>
  <name>mapreduce.jobhistory.webapp.address</name>
  <value>SY-0131:19888</value>
  <description>MapReduce JobHistory Server Web UI host:port</description>
</property>

</configuration>
# 修改:yarn-site.xml
<?xml version="1.0"?>
<?xml-stylesheet type="text/xsl" href="https://www.linuxidc.com/Linux/2015-01/configuration.xsl"?>

<!--
   Licensed to the Apache Software Foundation (ASF) under one or more
   contributor license agreements.  See the NOTICE file distributed with
   this work for additional information regarding copyright ownership.
   The ASF licenses this file to You under the Apache License, Version 2.0
   (the "License"); you may not use this file except in compliance with
   the License.  You may obtain a copy of the License at

       http://www.apache.org/licenses/LICENSE-2.0

   Unless required by applicable law or agreed to in writing, software
   distributed under the License is distributed on an "AS IS" BASIS,
   WITHOUT WARRANTIES OR CONDITIONS OF ANY KIND, either express or implied.
   See the License for the specific language governing permissions and
   limitations under the License.
-->

<!-- Do not modify this file directly.  Instead, copy entries that you -->
<!-- wish to modify from this file into yarn-site.xml and change them -->
<!-- there.  If yarn-site.xml does not already exist, create it.      -->

<configuration>

  <!-- Resource Manager Configs -->
  <property>
    <description>The hostname of the RM.</description>
    <name>yarn.resourcemanager.hostname</name>
    <value>SY-0130</value>
  </property>

  <property>
    <description>The address of the applications manager interface in the RM.</description>
    <name>yarn.resourcemanager.address</name>
    <value>${yarn.resourcemanager.hostname}:8032</value>
  </property>

  <property>
    <description>The address of the scheduler interface.</description>
    <name>yarn.resourcemanager.scheduler.address</name>
    <value>${yarn.resourcemanager.hostname}:8030</value>
  </property>

  <property>
    <description>The http address of the RM web application.</description>
    <name>yarn.resourcemanager.webapp.address</name>
    <value>${yarn.resourcemanager.hostname}:8088</value>
  </property>

  <property>
    <description>The https adddress of the RM web application.</description>
    <name>yarn.resourcemanager.webapp.https.address</name>
    <value>${yarn.resourcemanager.hostname}:8090</value>
  </property>

  <property>
    <name>yarn.resourcemanager.resource-tracker.address</name>
    <value>${yarn.resourcemanager.hostname}:8031</value>
  </property>

  <property>
    <description>The address of the RM admin interface.</description>
    <name>yarn.resourcemanager.admin.address</name>
    <value>${yarn.resourcemanager.hostname}:8033</value>
  </property>

  <property>
    <description>The class to use as the resource scheduler.</description>
    <name>yarn.resourcemanager.scheduler.class</name>
    <value>org.apache.hadoop.yarn.server.resourcemanager.scheduler.fair.FairScheduler</value>
  </property>

  <property>
    <description>fair-scheduler conf location</description>
    <name>yarn.scheduler.fair.allocation.file</name>
    <value>${yarn.home.dir}/etc/hadoop/fairscheduler.xml</value>
  </property>
  <property>
    <description>List of directories to store localized files in. An
      application's localized file directory will be found in:
      ${yarn.nodemanager.local-dirs}/usercache/${user}/appcache/application_${appid}.
      Individual containers' work directories, called container_${contid}, will
      be subdirectories of this.
   </description>
    <name>yarn.nodemanager.local-dirs</name>
    <value>/home/hadoop/labc/yarn/local</value>
  </property>

  <property>
    <description>Whether to enable log aggregation</description>
    <name>yarn.log-aggregation-enable</name>
    <value>true</value>
  </property>

  <property>
    <description>Where to aggregate logs to.</description>
    <name>yarn.nodemanager.remote-app-log-dir</name>
    <value>/tmp/logs</value>
  </property>

  <property>
    <description>Amount of physical memory, in MB, that can be allocated
    for containers.</description>
    <name>yarn.nodemanager.resource.memory-mb</name>
    <value>30720</value>
  </property>

  <property>
    <description>Number of CPU cores that can be allocated
    for containers.</description>
    <name>yarn.nodemanager.resource.cpu-vcores</name>
    <value>12</value>
  </property>

  <property>
    <description>the valid service name should only contain a-zA-Z0-9_ and can not start with numbers</description>
    <name>yarn.nodemanager.aux-services</name>
    <value>mapreduce_shuffle</value>
  </property>

</configuration>
# 修改 slaves
SY-0131
SY-0132
SY-0133
# 在 /home/hadoop/labc/hadoop-2.6.0/etc/hadoop 下,增加 fairscheduler.xml
<?xml version="1.0"?>
<allocations>

  <queue name="infrastructure">
    <minResources>102400 mb, 50 vcores </minResources>
    <maxResources>153600 mb, 100 vcores </maxResources>
    <maxRunningApps>200</maxRunningApps>
    <minSharePreemptionTimeout>300</minSharePreemptionTimeout>
    <weight>1.0</weight>
    <aclSubmitApps>root,yarn,search,hdfs</aclSubmitApps>
  </queue>

   <queue name="tool">
      <minResources>102400 mb, 30 vcores</minResources>
      <maxResources>153600 mb, 50 vcores</maxResources>
   </queue>

   <queue name="sentiment">
      <minResources>102400 mb, 30 vcores</minResources>
      <maxResources>153600 mb, 50 vcores</maxResources>
   </queue>

</allocations>
将 etc/hadoop/ 目录中的这几个配置文件通过 scp 命令远程拷贝到 SY-0131,SY-0132,SY-0133 节点对应目录。
3、Hadoop 启动(HDFS , YARN 启动)
注意:所有操作均在 Hadoop 部署目录下进行。启动 Hadoop 集群:Step1 :
在各个 JournalNode 节点上,输入以下命令启动 journalnode 服务:sbin/hadoop-daemon.sh start journalnode

Step2:
在 [nn1] 上,对其进行格式化,并启动:bin/hdfs namenode -format
sbin/hadoop-daemon.sh start namenode

Step3:
在 [nn2] 上,同步 nn1 的元数据信息:bin/hdfs namenode -bootstrapStandby

Step4:
启动[nn2]:sbin/hadoop-daemon.sh start namenode

经过以上四步操作,nn1 和 nn2 均处理 standby 状态
Step5:
将 [nn1] 切换为 Active
bin/hdfs haadmin -transitionToActive nn1

Step6:
在 [nn1] 上,启动所有 datanode
sbin/hadoop-daemons.sh start datanode

关闭 Hadoop 集群:在 [nn1] 上,输入以下命令
sbin/stop-dfs.sh
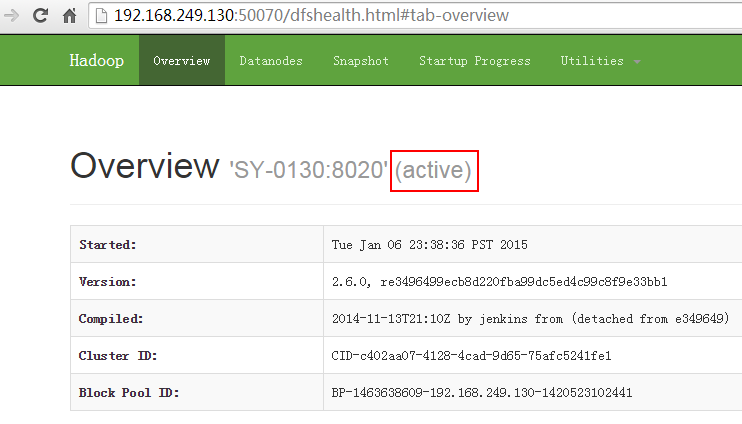
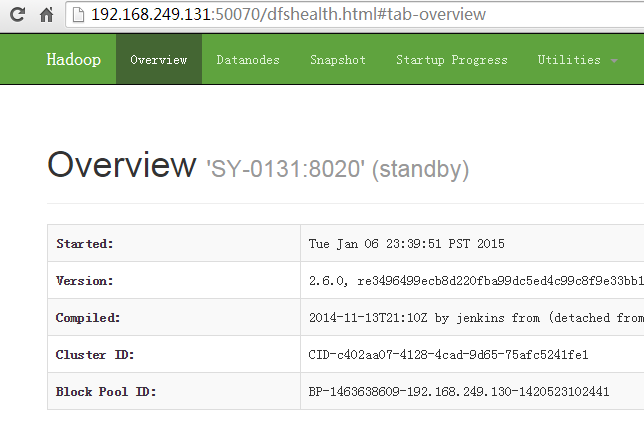
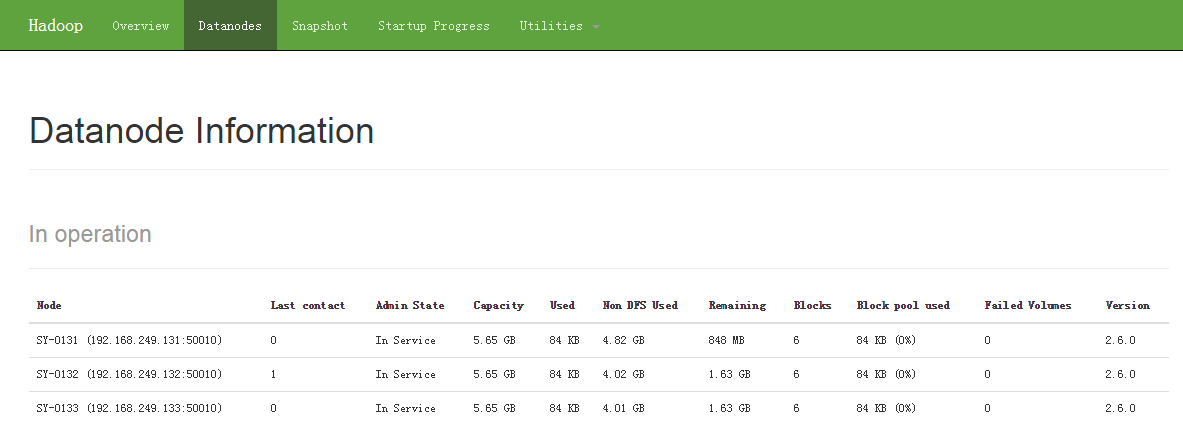
web 地址访问:
activenamenode
standbynamenode
datanodes info
4G 内存,任性一次,开始 Hadoop 之旅!
PS:
一、Hdfs 命令的区别:
1、如果 Apache hadoop 版本是 0.x 或者 1.x,
bin/hadoop hdfs fs -mkdir -p /in
bin/hadoop hdfs fs -put /home/du/input /in
2、如果 Apache hadoop 版本是 2.x.
bin/hdfs dfs -mkdir -p /in
bin/hdfs dfs -put /home/du/input /in
二、有时候 DataNode 启动不了有如下原因:
1、因重复格式化 namenode 时候,集群 ID 会更改,原先已有数据的 datanode 中记录的集群 ID 与 NameNode 不一致,该问题会导致 datanode 启动不了。
在第一次格式化 dfs 后,启动并使用了 hadoop,后来又重新执行了格式化命令(hdfs namenode -format),这时 namenode 的 clusterID 会重新生成,而 datanode 的 clusterID 保持不变。
# 对比 clusterID :
namenode
[hadoop@SY-0131 current]$ pwd

/home/hadoop/labc/hdfs/name/current

[hadoop@SY-0131 current]$ cat VERSION

#Tue Jan 06 23:39:38 PST 2015

namespaceID=313333531

clusterID=CID-c402aa07-4128-4cad-9d65-75afc5241fe1

cTime=0

storageType=NAME_NODE

blockpoolID=BP-1463638609-192.168.249.130-1420523102441

layoutVersion=-60
datanode
[hadoop@SY-0132 current]$ pwd

/home/hadoop/labc/hdfs/data/current


[hadoop@SY-0132 current]$ cat VERSION

#Tue Jan 06 23:41:36 PST 2015

storageID=DS-9475efc9-f890-4890-99e2-fdedaf1540c5

clusterID=CID-c402aa07-4128-4cad-9d65-75afc5241fe1

cTime=0

datanodeUuid=d3f6a297-9b79-4e17-9e67-631732f94698

storageType=DATA_NODE

layoutVersion=-56
2、data 目录的权限不够
更多 Hadoop 相关信息见Hadoop 专题页面 http://www.linuxidc.com/topicnews.aspx?tid=13
Hadoop2.6 集群环境搭建(HDFS HA+YARN)原来 4G 内存也能任性一次。
准备工作:
1、笔记本 4G 内存,操作系统 WIN7(屌丝的配置)
2、工具 VMware Workstation
3、虚拟机:CentOS6.4 共四台
虚拟机设置:
每台机器:内存 512M,硬盘 40G,网络适配器:NAT 模式

选择高级,新生成虚机 Mac 地址(克隆虚拟机,Mac 地址不会改变,每次最后手动重新生成)

编辑虚拟机网络:

点击 NAT 设置,查看虚机网关 IP,并记住它,该 IP 在虚机的网络设置中非常重要。
NAT 设置默认 IP 会自动生成,但是我们的集群中 IP 需要手动设置。

本机 Win7:VMnet8 网络设置

实验环境:
|
Ip |
hostname |
role |
|
192.168.249.130 |
SY-0130 |
ActiveNameNode |
|
192.168.249.131 |
SY-0131 |
StandByNameNode |
|
192.168.249.132 |
SY-0132 |
DataNode1 |
|
192.168.249.133 |
SY-0133 |
DataNode2 |
Linux 网络设置:
1、新建用户如:hadoop。不建议使用 root 用户搭建集群(root 权限过大)
2、使得 hadoop 用户获得 sudo 权限。
[root@SY-0130 ~]# vi /etc/sudoers

## Allow root to run any commands anywhere

root    ALL=(ALL)       ALL

hadoop  ALL=(ALL)       ALL
3、查看当前虚机当前网络使用网卡设备
[root@SY-0130 hadoop]# ifconfig
eth2      Link encap:Ethernet  HWaddr 00:50:56:35:8E:E8
          inet addr:192.168.249.130  Bcast:192.168.249.255  Mask:255.255.255.0
          inet6 addr: fe80::250:56ff:fe35:8ee8/64 Scope:Link
          UP BROADCAST RUNNING MULTICAST  MTU:1500  Metric:1
          RX packets:877059 errors:0 dropped:0 overruns:0 frame:0
          TX packets:597769 errors:0 dropped:0 overruns:0 carrier:0
          collisions:0 txqueuelen:1000
          RX bytes:865720294 (825.6 MiB)  TX bytes:324530557 (309.4 MiB)
          Interrupt:19 Base address:0x2024

lo        Link encap:Local Loopback
          inet addr:127.0.0.1  Mask:255.0.0.0
          inet6 addr: ::1/128 Scope:Host
          UP LOOPBACK RUNNING  MTU:16436  Metric:1
          RX packets:1354 errors:0 dropped:0 overruns:0 frame:0
          TX packets:1354 errors:0 dropped:0 overruns:0 carrier:0
          collisions:0 txqueuelen:0
          RX bytes:196675 (192.0 KiB)  TX bytes:196675 (192.0 KiB)
[root@SY-0130 ~]# cat /proc/net/dev,当前网卡,我的为 eth2
[root@SY-0130 ~]# cat /proc/net/dev
Inter-|   Receive                                                |  Transmit
 face |bytes    packets errs drop fifo frame compressed multicast|bytes    packets errs drop fifo colls carrier compressed
    lo:  196675    1354    0    0    0     0          0         0   196675    1354    0    0    0     0       0          0
  eth2:865576893  875205    0    0    0     0          0         0 324425517  596433    0    0    0     0       0          0
4、查看当前网卡对应的 Mac 地址
[root@SY-0130 ~]# cat /etc/udev/rules.d/70-persistent-net.rules
# This file was automatically generated by the /lib/udev/write_net_rules
# program, run by the persistent-net-generator.rules rules file.
#
# You can modify it, as long as you keep each rule on a single
# line, and change only the value of the NAME= key.

# PCI device 0x1022:0x2000 (vmxnet)
SUBSYSTEM=="net", ACTION=="add", DRIVERS=="?*", ATTR{address}=="00:0c:29:b5:fd:bb", ATTR{type}=="1", KERNEL=="eth*", NAME="eth1"

# PCI device 0x1022:0x2000 (vmxnet)
SUBSYSTEM=="net", ACTION=="add", DRIVERS=="?*", ATTR{address}=="00:50:56:35:8e:e8", ATTR{type}=="1", KERNEL=="eth*", NAME="eth2"
5、Network Configuration
[root@SY-0130 ~]# setup


选择 eth2,进行设置,更改为当前网卡设备 eth2,并且进行 IP、网管、DNS 设置。

DNS Server 与 Win7 的网络中的 DNS Server 一致,这样虚拟机也可以连接 Internet 网了,方便下载安装软件。
另外还有将防火墙关闭。
6、修改 hostname
[root@SY-0130 ~]# vi /etc/sysconfig/network
NETWORKING=yes
HOSTNAME=SY-0130
7、修改 hosts
[hadoop@SY-0130 ~]$ sudo vi /etc/hosts
# 添加如下内容
192.168.249.130 SY-0130
192.168.249.131 SY-0131
192.168.249.132 SY-0132
192.168.249.133 SY-0133
8、重启虚机. reboot
CentOS 安装和配置 Hadoop2.2.0 http://www.linuxidc.com/Linux/2014-01/94685.htm
Ubuntu 13.04 上搭建 Hadoop 环境 http://www.linuxidc.com/Linux/2013-06/86106.htm
Ubuntu 12.10 +Hadoop 1.2.1 版本集群配置 http://www.linuxidc.com/Linux/2013-09/90600.htm
Ubuntu 上搭建 Hadoop 环境(单机模式 + 伪分布模式)http://www.linuxidc.com/Linux/2013-01/77681.htm
Ubuntu 下 Hadoop 环境的配置 http://www.linuxidc.com/Linux/2012-11/74539.htm
单机版搭建 Hadoop 环境图文教程详解 http://www.linuxidc.com/Linux/2012-02/53927.htm
搭建 Hadoop 环境(在 Winodws 环境下用虚拟机虚拟两个 Ubuntu 系统进行搭建)http://www.linuxidc.com/Linux/2011-12/48894.htm
更多详情见请继续阅读下一页的精彩内容:http://www.linuxidc.com/Linux/2015-01/111461p2.htm


