共计 8272 个字符,预计需要花费 21 分钟才能阅读完成。
LEMP 组合包是一款日益流行的网站服务组合软件包,在许多生产环境中的核心网站服务上起着强有力的作用。正如其名称所暗示的,LEMP 包是由 Linux、nginx、MariaDB/MySQL 和 PHP 组成的。在传统的 LAMP 包中使用的 Apache HTTP 协议服务器性能低下而且难于大规模集群,相比来说 nginx 的高性能及轻量级等特性,正是其的替代方案。MariaDB 是一款社区支持驱动的 MySQL 数据库的分支,其功能更多性能更佳。PHP,服务端编程语言,具体是由 PHP FastCGI 的增强版 PHP-FPM 组件来处理,生成网页动态内容。
(LCTT 译注:为何采用 LEMP 而不是 LNMP 的缩写?据 https://lemp.io/ 的解释:Nginx 的发音是 Engine-X,重要的发音而不是首字母,而且 LEMP 实际上是可读的,而 LNMP 看起来只是字母表。)
这篇文章里,我们示范 如何在 CentOS 操作平台上安装 LEMP 包。我们安装的目标是 CentOS 6 和 CentOS 7 两个操作平台,如有必要会指出它们的不同。

LEMP 架构及应用部署——Nginx 延伸 http://www.linuxidc.com/Linux/2013-07/87548.htm
CentOS 5.6+Nginx 1.0+PHP 5.3.6+MySQL 5.5.11 构建 LEMP(X64)平台 http://www.linuxidc.com/Linux/2011-07/38107.htm
Linux 环境下 Nginx 搭建高性能 WEB 服务器 LEMP http://www.linuxidc.com/Linux/2009-11/22465.htm
在 Ubuntu 14.10/14.04/13.10 上安装 LEMP 服务和 phpMyAdmin http://www.linuxidc.com/Linux/2014-11/109438p2.htm
第一步: Nginx
让我们在 CentOS 上安装 nginx 作为第一步,然后对它作些基本的配置,比如使其能引导时启动和对防火墙做个性化设置。
安装 Nginx
让我们从它的官方的 RPM 源来安装一个预构建的稳定版本的 nginx 包。
在 CentOS 7 系统上:
- $ sudo rpm —import http://nginx.org/keys/nginx_signing.key
- $ sudo rpm –ivh http://nginx.org/packages/centos/7/noarch/RPMS/nginx-release-centos-7-0.el7.ngx.noarch.rpm
- $ sudo yum install nginx
在 CentOS 6 系统上:
- $ sudo rpm —import http://nginx.org/keys/nginx_signing.key
- $ sudo rpm –ivh http://nginx.org/packages/centos/6/noarch/RPMS/nginx-release-centos-6-0.el6.ngx.noarch.rpm
- $ sudo yum install nginx
注意在安装 nginx RPM 包之前,如果您没有导入 nginx 的官方 GPG 密钥的话,会出一如下所示的警告:
- warning:/var/tmp/rpm–tmp.KttVHD:Header V4 RSA/SHA1 Signature, key ID 7bd9bf62: NOKEY
启动 Nginx
安装完成后,nginx 是不会自动启动的。现在让我们来启动它吧,还要做些配置让其可以随着操作系统启动而启动。我们也需要在防火墙里打开 TCP/80 端口,以使得可以远程访问 nginx 的 web 服务。所有这些操作、设置都只需要输入如下命令就可实现。
在 CentOS 7 系统上:
- $ sudo systemctl start nginx
- $ sudo systemctl enable nginx
- $ sudo firewall–cmd —zone=public—add–port=80/tcp —permanent
- $ sudo firewall–cmd —reload
在 CentOS 6 系统上:
- $ sudo service nginx start
- $ sudo chkconfig nginx on
- $ sudo iptables –I INPUT –p tcp –m tcp —dport 80–j ACCEPT
- $ sudo service iptables save
测试 Nginx
nginx 的默认文档要目录是 /usr/share/nginx/html。默认的 index.html 文件一定已经在这目录下了。让我们检测下是否可以访问到这个测试 web 页,输入 http://nginx 的 ip 地址 / 访问。
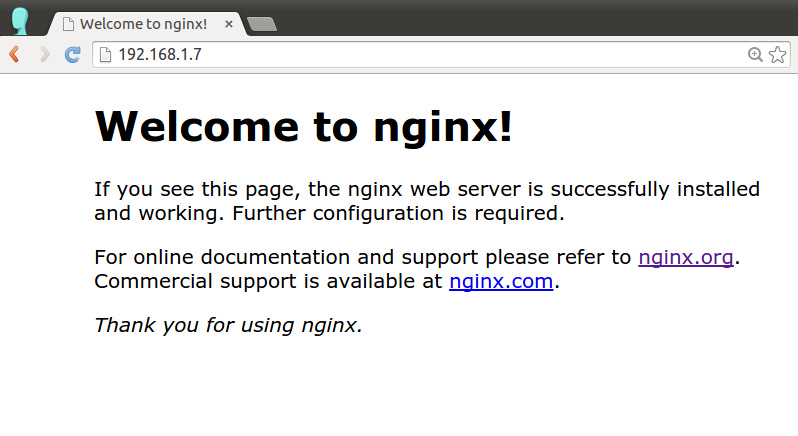
如果您看到的是如上所示的页面的话,说明 nginx 已经正常启动。继续往下。
第二步: MariaDB/MySQL
下一步就是安装 LEMP 包的数据库组件。CentOS/RHEL 6 或早期的版本中提供的是 MySQL 的服务器 / 客户端安装包,但 CentOS/RHEL 7 已使用了 MariaDB 替代了默认的 MySQL。作为 MySQL 的简单替代品,MariaDB 保证了与 MySQL 的 API 和命令行用法方面最大的兼容性。下面是关于怎么在 CentOS 上安装和配置 MaraDB/MySQL 的操作示例。
在 CentOS 7 系统上:
如下所示操作来安装 MariaDB 服务 / 客户端包以及启动 MariaDB 服务。
- $ sudo yum install mariadb–server
- $ sudo systemctl start mariadb
- $ sudo systemctl enable mariadb
在 CentOS 6 系统上:
如下示,安装 MySQL 服务 / 客户端包并且启动 MySQL 服务。
- $ sudo yum install mysql–server
- $ sudo service mysqld start
- $ sudo chkconfig mysqld on
在成功启动 MariaDB/MySQL 服务后,执行在 MariaDB/MySQL 服务包中的脚本。这一次的运行会为为数据库服务器进行一些安全强化措施,如设置(非空)的 root 密码、删除匿名用户、锁定远程访问。
- $ sudo mysql_secure_installation
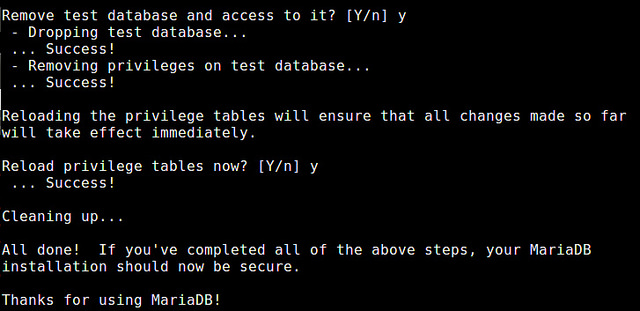
这就是数据库的设置。现在进行下一步。
LEMP 组合包是一款日益流行的网站服务组合软件包,在许多生产环境中的核心网站服务上起着强有力的作用。正如其名称所暗示的,LEMP 包是由 Linux、nginx、MariaDB/MySQL 和 PHP 组成的。在传统的 LAMP 包中使用的 Apache HTTP 协议服务器性能低下而且难于大规模集群,相比来说 nginx 的高性能及轻量级等特性,正是其的替代方案。MariaDB 是一款社区支持驱动的 MySQL 数据库的分支,其功能更多性能更佳。PHP,服务端编程语言,具体是由 PHP FastCGI 的增强版 PHP-FPM 组件来处理,生成网页动态内容。
(LCTT 译注:为何采用 LEMP 而不是 LNMP 的缩写?据 https://lemp.io/ 的解释:Nginx 的发音是 Engine-X,重要的发音而不是首字母,而且 LEMP 实际上是可读的,而 LNMP 看起来只是字母表。)
这篇文章里,我们示范 如何在 CentOS 操作平台上安装 LEMP 包。我们安装的目标是 CentOS 6 和 CentOS 7 两个操作平台,如有必要会指出它们的不同。

LEMP 架构及应用部署——Nginx 延伸 http://www.linuxidc.com/Linux/2013-07/87548.htm
CentOS 5.6+Nginx 1.0+PHP 5.3.6+MySQL 5.5.11 构建 LEMP(X64)平台 http://www.linuxidc.com/Linux/2011-07/38107.htm
Linux 环境下 Nginx 搭建高性能 WEB 服务器 LEMP http://www.linuxidc.com/Linux/2009-11/22465.htm
在 Ubuntu 14.10/14.04/13.10 上安装 LEMP 服务和 phpMyAdmin http://www.linuxidc.com/Linux/2014-11/109438p2.htm
第一步: Nginx
让我们在 CentOS 上安装 nginx 作为第一步,然后对它作些基本的配置,比如使其能引导时启动和对防火墙做个性化设置。
安装 Nginx
让我们从它的官方的 RPM 源来安装一个预构建的稳定版本的 nginx 包。
在 CentOS 7 系统上:
- $ sudo rpm —import http://nginx.org/keys/nginx_signing.key
- $ sudo rpm –ivh http://nginx.org/packages/centos/7/noarch/RPMS/nginx-release-centos-7-0.el7.ngx.noarch.rpm
- $ sudo yum install nginx
在 CentOS 6 系统上:
- $ sudo rpm —import http://nginx.org/keys/nginx_signing.key
- $ sudo rpm –ivh http://nginx.org/packages/centos/6/noarch/RPMS/nginx-release-centos-6-0.el6.ngx.noarch.rpm
- $ sudo yum install nginx
注意在安装 nginx RPM 包之前,如果您没有导入 nginx 的官方 GPG 密钥的话,会出一如下所示的警告:
- warning:/var/tmp/rpm–tmp.KttVHD:Header V4 RSA/SHA1 Signature, key ID 7bd9bf62: NOKEY
启动 Nginx
安装完成后,nginx 是不会自动启动的。现在让我们来启动它吧,还要做些配置让其可以随着操作系统启动而启动。我们也需要在防火墙里打开 TCP/80 端口,以使得可以远程访问 nginx 的 web 服务。所有这些操作、设置都只需要输入如下命令就可实现。
在 CentOS 7 系统上:
- $ sudo systemctl start nginx
- $ sudo systemctl enable nginx
- $ sudo firewall–cmd —zone=public—add–port=80/tcp —permanent
- $ sudo firewall–cmd —reload
在 CentOS 6 系统上:
- $ sudo service nginx start
- $ sudo chkconfig nginx on
- $ sudo iptables –I INPUT –p tcp –m tcp —dport 80–j ACCEPT
- $ sudo service iptables save
测试 Nginx
nginx 的默认文档要目录是 /usr/share/nginx/html。默认的 index.html 文件一定已经在这目录下了。让我们检测下是否可以访问到这个测试 web 页,输入 http://nginx 的 ip 地址 / 访问。

如果您看到的是如上所示的页面的话,说明 nginx 已经正常启动。继续往下。
第三步: PHP
PHP 是 LEMP 包中一个重要的组件,它负责把存储在 MariaDB/MySQL 服务器的数据取出生成动态内容。为了 LEMP 需要,您至少需要安装上 PHP-FPM 和 PHP-MySQL 两个模块。PHP-FPM(FastCGI 进程管理器)实现的是 nginx 服务器和生成动态内容的 PHP 应用程序的访问接口。PHP-MySQL 模块使 PHP 程序能访问 MariaDB/MySQL 数据库。
安装 PHP 模块
在 CentOS 7 系统上:
- $ sudo yum php php–fpm php–mysql
在 CentOS 6 系统上:
首先,您需要从仓库中安装 REMI 库(参见本指南),并安装软件包。
- $ sudo yum —enablerepo=remi install php php–fpm php–mysql
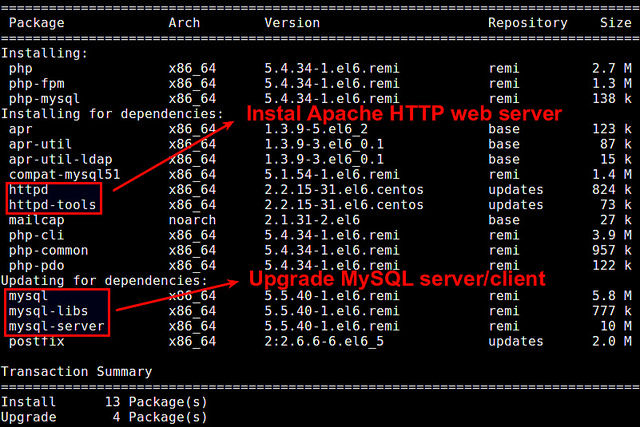
在安装 PHP 时,得注意两个地方:
在 CentOS 6 系统中,安装 REMI 仓库中最新的 php-mysql 模块时,MySQL 的服务端包和客户端包会被当做一部分依赖包而自动的更新。
在 CentOS 6 和 CentOS 7 中,在安装 PHP 包的同时会把 Apache web 服务器(即 httpd)当做它的依赖包一起安装。这会跟 nginx web 服务器起冲突。这个问题会在下一节来讨论。
取决于您的使用情况,可以使用 yum 命令来定制您的 PHP 引擎,也许会想安装下面的任意一个扩展 PHP 模块包。
- php-cli: PHP 的命令行界面。从命令行里测试 PHP 时非常有用。
- php-gd: PHP 的图像处理支持。
- php-bcmath: PHP 的数学支持。
- php-mcrypt: PHP 的加密算法支持 (例如 DES、Blowfish、CBC、CFB、ECB ciphers 等)。
- php-xml: PHP 的 XML 解析和处理支持。
- php-dba: PHP 的数据抽象层支持。
- php-pecl-apc: PHP 加速器 / 缓存支持。
安装时,要查看可用的 PHP 模块的完整列表的话,可以运行:
- $ sudo yum search php–(CentOS7)
- $ sudo yum —enablerepo=remi search php–(CentOS6)
启动 PHP-FPM
您需要启动 PHP-FPM,然后把它放到自动启动服务列表。
在 CentOS 7 系统上:
- $ sudo systemctl start php–fpm
- $ sudo systemctl enable php–fpm
在 CentOS 6 系统上:
- $ sudo chkconfig php–fpm on
- $ sudo service php–fpm start
第四步: 配置 LEMP 组合包
本教程的最后一步是调整 LEMP 组合包的配置。
使 Httpd 不可用
首先,让我们把早先随 PHP 包安装的 httpd 服务给禁用掉。
在 CentOS 7 系统上:
- $ sudo systemctl disable httpd
在 CentOS 6 系统上:
- $ sudo chkconfig httpd off
配置 Nginx
接下来,让我们配置 nginx 虚拟主机,使得 nginx 可以通过 PHP-FPM 来处理 PHP 的任务。用文本编辑器打开 /etc/nginx/conf.d/default.conf,然后按如下所示修改。
- $ sudo vi /etc/nginx/conf.d/default.conf
- server {
- listen 80;
- server_name www.server_domain.com;
- root /usr/share/nginx/html;
- index index.php index.html index.htm;
- location /{
- }
- # redirect server error pages to the static page /50x.html
- error_page 500502503504/50x.html;
- location =/50x.html {
- }
- # nginx passes PHP scripts to FastCGI server via a TCP/9000 socket
- # this setting much be consistent with /etc/php-fpm.d/www.conf
- # try_files prevents nginx from passing bad scripts to FastCGI server
- location ~ \.php$ {
- try_files $uri =404;
- fastcgi_pass 127.0.0.1:9000;
- fastcgi_index index.php;
- fastcgi_param SCRIPT_FILENAME $document_root$fastcgi_script_name;
- include fastcgi_params;
- }
- }
nginx 的默认工作线程数(在 /etc/nginx/nginx.conf 文件中指定的)是 1,让我们也来调整一下这个数字。通常来说我们创建的工作线程数应该和 CPU 核数相同。要确信您的 CPU 的核数,请运行下面这命令:
- $ grep processor /proc/cpuinfo | wc –l
如果您的 CPU 是 4 核的,就如下所示修改 /etc/nginx/nginx.conf 文件。
- $ sudo vi /etc/nginx/nginx.conf
- worker_processes 4;
配置 PHP
接下来,让我们对 PHP 的配置文件 /etc/php.ini 做自定义设置。更具体的就是在 /etc/php.ini 文件中增加以下两行。
- cgi.fix_pathinfo=0
- date.timezone =“PRC”
为了安全起见,我们希望的是 PHP 解释器只是处理指定文件路径的文件任务,而不是预测搜索一些并不存在的文件任务。上面的第一行起的就是这个作用。(LCTT 译注:原文用的时区是“America/New York”,根据国内情况,应该用 PRC 或 Asia 下的中国城市。)
第二行定义的是 PHP 中日期 / 时间相关函数使用相关的默认时区。使用本指南,找出您所在的时区,并设置相应 date.timezone 的值。
测试 PHP
最后,让我们来测试下 nginx 是否能处理 PHP 页面。在测试之前,请确保重启 nginx 和 PHP-FPM。
在 CentOS 7 系统上:
- $ sudo systemctl restart nginx
- $ sudo systemctl restart php–fpm
在 CentOS 6 系统上:
- $ sudo service nginx restart
- $ sudo service php–fpm restart
创建一个叫名叫 test.php 的文件,然后写入如下内容,并放入 /var/www/html/ 目录。
- <?php phpinfo();?>
打开浏览器,输入 http://nginx 的 IP 地址 /test.php。
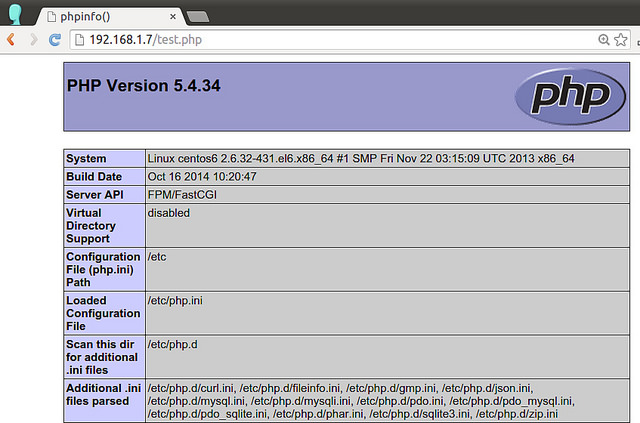
如果您能看到如上所示的页面,说明设置的 LEMP 完全成功!
更多 CentOS 相关信息见CentOS 专题页面 http://www.linuxidc.com/topicnews.aspx?tid=14
How to set the default timezone in PHP
Question: How can I set the default timezone used by all date/time related PHP functions?
The default timezone for PHP is defined in php.ini configuration file. So you will need to edit the file by hand.
First, find the location of php.ini on your system as follows. In this example, it is found at /etc/php5/cli/php.ini.
$ php –ini
Configuration File (php.ini) Path: /etc/php5/cli
Loaded Configuration File: /etc/php5/cli/php.ini
Scan for additional .ini files in: /etc/php5/cli/conf.d
Additional .ini files parsed: /etc/php5/cli/conf.d/10-pdo.ini
Next, find out the timezone (TZ) string of your region. For that, you can use a command-line tool called tzselect. Simply run the following command:
$ tzselect
You will then go through interactive menu to identify your region.
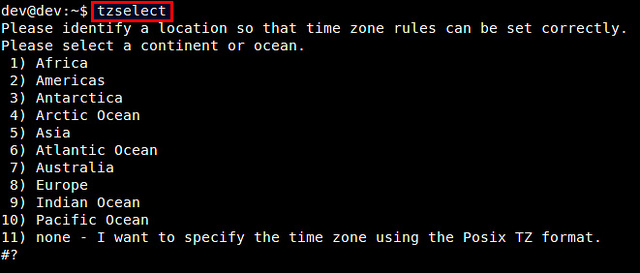
After you are done, tzselect will print the value of TZ variable as follows. In this example, the TZ value is “America/New York”.
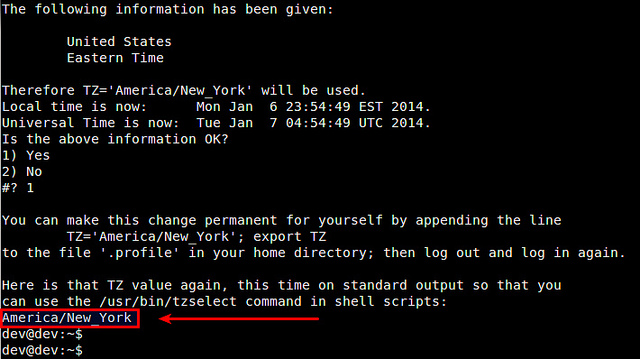
Now open up php.ini in a text editor, and look up “date.timezone” variable in it. If “date.timezone” variable definition is commented out, uncomment the line. Then change the timezone accordingly. You are done!
date.timezone = “America/New_York”


