共计 9947 个字符,预计需要花费 25 分钟才能阅读完成。
作为后台开发人员,在代码开发过程中,我们开发流程一般是本地开发 -> 同步到服务器编译 ->svn 提交。如何在团队开发中高效处理这些步骤是个很基本的问题。通常我们的本地环境大多是 Windows,通过 ssh 客户端远程连接到服务器,一般由于后台代码的庞大,我们的都会有自己的编译环境,如何在开发过程中及时的将代码编译,更新到版本库有很多种方法,例如有 sshclient,securecrt 都可以支持 ftp 协议进行文件传输,还有 rsync for windows。但这种更新文件的方法第一需要手动进行,第二是全量更新,最后有时候会忘记更改了那些文件,只能把不确定的全部更新了。
为了能够在 Windows 和 unix 之间进行文件的共享,支持文件的直接修改,而不是通过拷贝文件来进行更新,samba 诞生了。我们都知道 unix 之间可以 NFS 服务器来实现文件的共享,Windows 之间通过 CIFS,即网上邻居来进行共享,samba 的诞生就是为了能够使 Windows 能够访问 Unix 的资源,包括文件,打印机等。
———————————— 分割线 ————————————
VMWare 虚拟机 Ubuntu 双网卡 访问 samba 速度 翻倍 http://www.linuxidc.com/Linux/2013-06/85445.htm
Samba 文件共享服务器加入 Windows Server 2003 域 http://www.linuxidc.com/Linux/2013-06/86391.htm
Samba 安装配置 http://www.linuxidc.com/Linux/2013-06/86101.htm
CentOS 6.2 下 Samba 服务的配置 http://www.linuxidc.com/Linux/2013-01/78390.htm
Win7+VMware+Fedora18 Samba 服务器的搭建图解 http://www.linuxidc.com/Linux/2013-01/78234.htm
———————————— 分割线 ————————————
1.samba 安装和启动
samba 的源码安装采用最新版本 samba-4.1.14,官网下载。安装过程如下:
$ sudo mkdir /usr/local/samba-4.1.14
$ ./configure –prefix=/usr/local/samba-4.1.14
…
Checking for program xsltproc : not found
Checking for program Python : /usr/bin/python
Checking for program python : /usr/bin/python
Checking for program python : /usr/bin/python
Checking for Python version >= 2.5.0 : ok 2.7.6
Checking for library python2.7 : not found
Checking for library python2.7 : yes
Checking for program python2.7-config : not found
Checking for program python-config-2.7 : not found
Checking for custom code : Could not find the python development headers
/home/anonymalias/Downloads/samba-4.1.14/wscript:100: error: the configuration failed (see ‘/home/anonymalias/Downloads/samba-4.1.14/bin/config.log’)
上面错误的原因是 samba 必须依赖 python,执行
$ sudo apt-get install python-dev
后面就是 make && sudo make install,安装 ok 后,安装目录结构如下:
/usr/local/samba-4.1.14$ ls
bin etc include lib private sbin share va
将源码文件下默认的 conf 文件拷贝到安装目录下的 etc 目录中
/usr/local/samba-4.1.14$ cp /home/anonymalias/Downloads/samba-4.1.14/examples/smb.conf.default etc/smb.conf
修改 smb.conf 中配置
global 段添加如下字段
[global]
…
netbios name = ubuntu
共享资源字段采用默认配置
[homes]
comment = Home Directories
browseable = no
writable = yes
# NOTE: If you have a BSD-style print system there is no need to
# specifically define each individual printer
[printers]
comment = All Printers
path = /usr/spool/samba
browseable = no
# Set public = yes to allow user ‘guest account’ to print
guest ok = no
writable = no
printable = yes
添加用户名为 Ubuntu 的账户,
/usr/local/samba-4.1.14$ sudo bin/smbpasswd -a ubuntu
New SMB password:
Retype new SMB password:
samba 服务器的用户是依赖于 linux 的用户,只能添加 linux 中已存在的用户,否则会出现如下错误:
/usr/local/samba-4.1.14$ sudo bin/smbpasswd -a user1
New SMB password:
Retype new SMB password:
Failed to add entry for user user1.
启动 samba 服务
/usr/local/samba-4.1.14$ sudo sbin/nmbd
/usr/local/samba-4.1.14$ sudo sbin/smbd
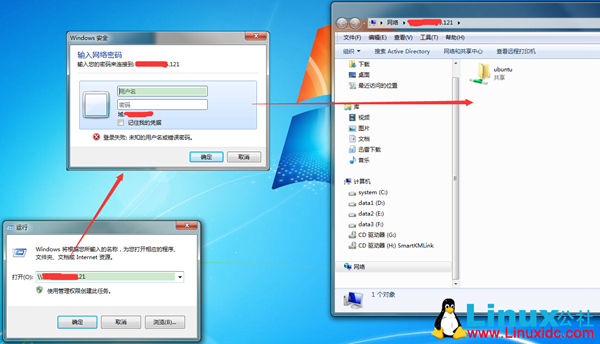
在 Windwos 文件管理器或直接 win+R,输入 server ip,可以看到如下界面:

更多详情见请继续阅读下一页的精彩内容:http://www.linuxidc.com/Linux/2014-12/110459p2.htm
2.smb.conf 配置参数
下面解释一下 conf 中比较重要的参数的含义。smb.conf 配置包含两部分:全局配置和共享资源配置。全局配置包括:工作组、主机的 NetBIOS 名称、字符编码的显示、登录文件的设定、是否使用密码以及使用密码验证的机制等等。共享资源配置主要是对各个共享资源的权限进行限定。
参数配置中可以使用的特殊字符
%m:代表 Client 端的 NetBIOS 主机名喔!, 即 Windows 的主机名
%M:代表 Client 端的 Internet 主机名喔!就是 HOSTNAME。
%L:代表 SAMBA 主机的 NetBIOS 主机名。
%H:代表用户的家目录。
%U:代表目前登入的使用者的使用者名称
%g:代表登入的使用者的组名。
%h:代表目前这部 SAMBA 主机的 HOSTNAME 喔!注意是 hostname 不是 NetBIOS name 喔!
%I:代表 Client 的 IP 咯。
%T:代表目前的日期与时间
#======================= Global Settings =====================================
[global]
// samba server 要加入的工作组
workgroup = mygroup
// samba 服务器的描述
server string = Samba Server
// netbios 主机名,对于 windows 是其 hostname,netbios name 不能相同
netbios name = Ubuntu
// 服务器可担任主域控制器、独立域服务器和域成员服务器等角色
server role = standalone server/member server
// 所有 samba 系统主机所不能正确识别的用户都映射成 guest 用户
map to guest = bad user
// 对每一个登录用户使用不同配置文件来覆盖缺省的配置文件。如果文件不存在,则该项无效。这个参数很有用,可以使得 samba 配置更灵活,让一台 samba 服务器模拟多台不同配置的服务器
config file = /usr/local/samba/etc/smb.conf.%m
//log 文件路径
log file = /usr/local/samba/var/log.%m
interfaces = lo eth0 192.168.12.2/24 192.168.13.2/24
说明:设置 Samba Server 监听哪些网卡,可以写网卡名,也可以写该网卡的 IP 地址。
hosts allow = 127. 192.168.1. 192.168.10.1
说明:表示允许连接到 Samba Server 的客户端,多个参数以空格隔开。可以用一个 IP 表示,也可以用一个网段表示。hosts deny 与 hosts allow 刚好相反。
# 密码数据库格式, 之前 samba 服务器的用户信息都是以数据文件信息存放,为了加快速度, 目前密码文件已经转为使用数据库了!
# 默认的数据库格式为 tdbsam , 存放在 private/passwd.tdb,早期使用 smbpasswd 命令来管理用户密码,
# 后来使用 TDB 数据库, 因此建议使用新的 pdbedit 指令来管理用户数据,smbpasswd 仍然可以使用
passdb backend = tdbsam
# 使用以 Client 端的 NetBIOS 主机名命名的配置文件,
; include = /usr/local/samba/lib/smb.conf.%m
#=============== Share Definitions ==============================
共享资源的配置如下:
[分享资源的名称]
参数 = 内容
最常用的参数内容有:
// 目录的说明,只起到注释作用
comment = 任意字符串
// 共享目录的路径
path = linux 路径
// 是否允许该目录被所有人看到,默认是 yes
browseable = yes/no
// 是否可写入
writable = yes/no
// 只读,与 writable 同时设定为 yes 时,遵循覆盖原则
read only = yes/no
// 允许 / 禁止登入的用户,用户之前用逗号分隔,组名前要加 @
valid users = user1, user2, @group1
invalid users = user1, user2, @group1
// 允许写入该共享的用户
write list = user1, user2, @group1
// 是否允许 guest 访问,public 和 guest ok 与 valid users 参数是互斥的,有 valid users 回覆盖 public 和 guest ok 的 yes 选项
public = yes/no
guest ok = yes/no
下面是默认 smb.conf 中提供的几个示例:
# 这是一个很特殊的共享目录配置,最新的 samba 中,该共享目录的配置表示,每个用户登录都会进入自己的 home 目录,不需要配置 valid users = %S
[homes]
comment = Home Directories
browseable = no
writable = yes
# 用于所有用户共享资源的目录
[tmp]
comment = Temporary file space
path = /tmp
read only = no
public = yes
# 用于用户向其他用户共享资源的目录,只有 staff 中的用户可以修改该目录
[public]
comment = Public Stuff
path = /home/samba
public = yes
writable = no
printable = no
write list = @staff
#fred 的私有用户
[fredsdir]
comment = Fred’s Service
path = /usr/somewhere/private
valid users = fred
public = no
writable = yes
printable = no
参数配置完后可以通过 bin 目录下 testparm 来测试一下 smb.conf 的配置,testparm - v 可以查看 global 域中未配置的参数的默认值:
ubuntu@VM-178-53-ubuntu:/usr/local/samba-4.1.14$ bin/testparm -v
Load smb config files from /usr/local/samba-4.1.14/etc/smb.conf
rlimit_max: increasing rlimit_max (1024) to minimum Windows limit (16384)
Processing section “[public]”
Loaded services file OK.
Server role: ROLE_STANDALONE
Press enter to see a dump of your service definitions
[global]
dos charset = CP850
unix charset = UTF-8
workgroup = MYGROUP
realm =
netbios name = UBUNTU
netbios aliases =
netbios scope =
server string = Samba Server
interfaces =
bind interfaces only = No
server role = standalone server
security = USER
auth methods =
encrypt passwords = Yes
client schannel = Auto
server schannel = Auto
allow trusted domains = Yes
map to guest = Bad User
null passwords = No
obey pam restrictions = No
password server = *
smb passwd file = /usr/local/samba-4.1.14/private/smbpasswd
…
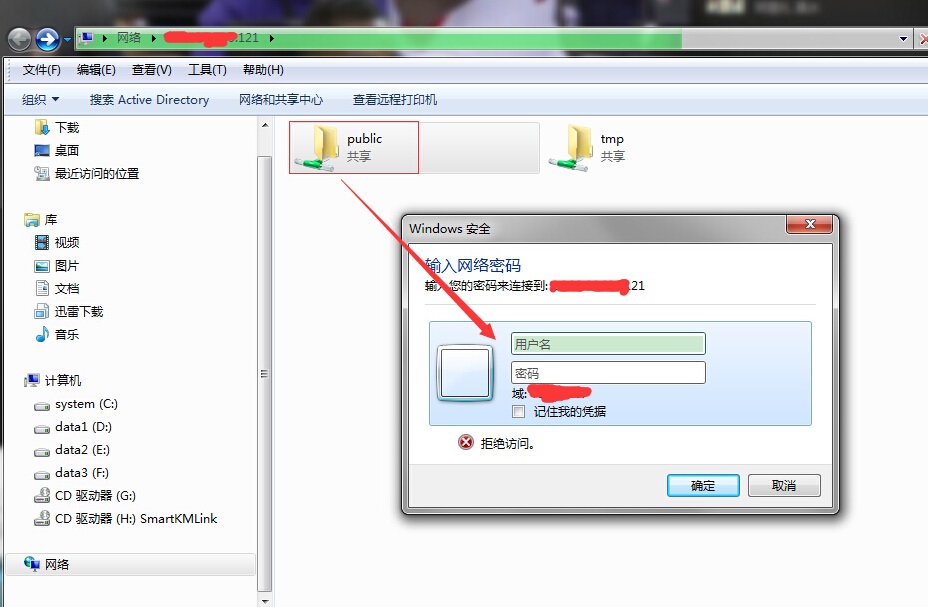
global 域中有一个很强悍的参数 map to guest = bad user,这个配置的意思是将所有 samba 系统主机所不能正确识别的用户都映射成 guest 用户,这样其他主机登录 samba 服务器首先就不需要输入用户名密码,可以看到所有 browseable = yes 的共享资源目录。如下配置:
[global]
…
map to guest = bad user
…
[tmp]
comment = Temporary file space
path = /tmp
read only = no
public = yes
[public]
comment = Public Stuff
path = /home/samba
valid users = ubuntu
public = yes
writable = no
printable = no
通过上面配置,重启 smbd 进程,可以得到如下图,不需要输入密码就可以看到可以浏览的 tmp 和 public,当如需要查看 public 资源时,才会提示输入密码:
3.samba 服务器的其他
SAMBA 服务主要通过两个 daemon 服务来进行管理:
nmbd : 用来管理工作组、NetBIOS name 等等的解析。主要利用 UDP 协议开启 port 137, 138 来负责名称解析的任务;
smbd : 用来管理 SAMBA 主机分享的目录、档案与打印机等等。主要利用可靠的 TCP 协议来传输数据, 开放的端口口为 139 及 445(不一定存在)

作为后台开发人员,在代码开发过程中,我们开发流程一般是本地开发 -> 同步到服务器编译 ->svn 提交。如何在团队开发中高效处理这些步骤是个很基本的问题。通常我们的本地环境大多是 Windows,通过 ssh 客户端远程连接到服务器,一般由于后台代码的庞大,我们的都会有自己的编译环境,如何在开发过程中及时的将代码编译,更新到版本库有很多种方法,例如有 sshclient,securecrt 都可以支持 ftp 协议进行文件传输,还有 rsync for windows。但这种更新文件的方法第一需要手动进行,第二是全量更新,最后有时候会忘记更改了那些文件,只能把不确定的全部更新了。
为了能够在 Windows 和 unix 之间进行文件的共享,支持文件的直接修改,而不是通过拷贝文件来进行更新,samba 诞生了。我们都知道 unix 之间可以 NFS 服务器来实现文件的共享,Windows 之间通过 CIFS,即网上邻居来进行共享,samba 的诞生就是为了能够使 Windows 能够访问 Unix 的资源,包括文件,打印机等。
———————————— 分割线 ————————————
VMWare 虚拟机 Ubuntu 双网卡 访问 samba 速度 翻倍 http://www.linuxidc.com/Linux/2013-06/85445.htm
Samba 文件共享服务器加入 Windows Server 2003 域 http://www.linuxidc.com/Linux/2013-06/86391.htm
Samba 安装配置 http://www.linuxidc.com/Linux/2013-06/86101.htm
CentOS 6.2 下 Samba 服务的配置 http://www.linuxidc.com/Linux/2013-01/78390.htm
Win7+VMware+Fedora18 Samba 服务器的搭建图解 http://www.linuxidc.com/Linux/2013-01/78234.htm
———————————— 分割线 ————————————
1.samba 安装和启动
samba 的源码安装采用最新版本 samba-4.1.14,官网下载。安装过程如下:
$ sudo mkdir /usr/local/samba-4.1.14
$ ./configure –prefix=/usr/local/samba-4.1.14
…
Checking for program xsltproc : not found
Checking for program Python : /usr/bin/python
Checking for program python : /usr/bin/python
Checking for program python : /usr/bin/python
Checking for Python version >= 2.5.0 : ok 2.7.6
Checking for library python2.7 : not found
Checking for library python2.7 : yes
Checking for program python2.7-config : not found
Checking for program python-config-2.7 : not found
Checking for custom code : Could not find the python development headers
/home/anonymalias/Downloads/samba-4.1.14/wscript:100: error: the configuration failed (see ‘/home/anonymalias/Downloads/samba-4.1.14/bin/config.log’)
上面错误的原因是 samba 必须依赖 python,执行
$ sudo apt-get install python-dev
后面就是 make && sudo make install,安装 ok 后,安装目录结构如下:
/usr/local/samba-4.1.14$ ls
bin etc include lib private sbin share va
将源码文件下默认的 conf 文件拷贝到安装目录下的 etc 目录中
/usr/local/samba-4.1.14$ cp /home/anonymalias/Downloads/samba-4.1.14/examples/smb.conf.default etc/smb.conf
修改 smb.conf 中配置
global 段添加如下字段
[global]
…
netbios name = ubuntu
共享资源字段采用默认配置
[homes]
comment = Home Directories
browseable = no
writable = yes
# NOTE: If you have a BSD-style print system there is no need to
# specifically define each individual printer
[printers]
comment = All Printers
path = /usr/spool/samba
browseable = no
# Set public = yes to allow user ‘guest account’ to print
guest ok = no
writable = no
printable = yes
添加用户名为 Ubuntu 的账户,
/usr/local/samba-4.1.14$ sudo bin/smbpasswd -a ubuntu
New SMB password:
Retype new SMB password:
samba 服务器的用户是依赖于 linux 的用户,只能添加 linux 中已存在的用户,否则会出现如下错误:
/usr/local/samba-4.1.14$ sudo bin/smbpasswd -a user1
New SMB password:
Retype new SMB password:
Failed to add entry for user user1.
启动 samba 服务
/usr/local/samba-4.1.14$ sudo sbin/nmbd
/usr/local/samba-4.1.14$ sudo sbin/smbd
在 Windwos 文件管理器或直接 win+R,输入 server ip,可以看到如下界面:

更多详情见请继续阅读下一页的精彩内容:http://www.linuxidc.com/Linux/2014-12/110459p2.htm


