共计 6800 个字符,预计需要花费 17 分钟才能阅读完成。
准备 Windows 下安装 XWiki,看了一下有三种安装方式:
XWiki is a Java-based wiki and runs on a Servlet Container such as Tomcat, Jetty, JBoss, WebLogic, WebSphere, etc. It also uses a relational database to store its content. It can run on almost any database (HSQL, MySQL, etc) but XWiki and the database need to be setup correctly.
There are 3 ways of installing XWiki:
- Use the Standalone distribution which already packages a Servlet Container (Jetty) and a database (HSQL). This is the recommended option for first time XWiki users and for users who wish to quickly try out XWiki.
- Use the WAR distribution and configure both your container and your database to work with it.
- Use the .deb package to install the last version of XWiki and the dependencies.
目标机需要满足以下条件:
- Java 6 or greater installed.
- A Servlet Container supporting Servlet 2.4.
- Enough memory, check the Memory section of the Performance Guide.
- Check the release notes for the version you’re installing to see what browsers and databases are supported for it. You can also check our general support strategy.
(一)第一种方式:
我采用的第一种安装方式是独立运行的版本安装,包括 exe 安装,jar 安装,或者 zip 解压的方式,可直接运行,方便想要快速用起来 xwiki 的人,比如下面是 exe 方式安装步骤:
采用最简单的 windows 的 exe 版本安装:
1、安装 jdk7;(下载地址:http://www.oracle.com/technetwork/java/javase/downloads/jdk7-downloads-1880260.html)
2、安装 xwiki-enterprise-installer-windows-5.2.2.exe(下载地址:http://enterprise.xwiki.org/xwiki/bin/view/Main/Download)
3、启动 start_xwiki.bat;
4、在浏览器中打开 http://localhost:8080/;
5、Admin/admin 登录
6、打开管理 wiki 界面,点击 Localization,在默认语言栏中奖 en 改为 zh,保存即切换为中文了。
问题:
但是我在 win8 系统上按照这个步骤一点问题都没有,XWiki 还运行非常良好!!!
但是当我在 win7 和 win Server2008 上面安装 exe 版本的时候,到最后一步,点击 next 出现空白 wizard,就再也不前进了,然后启动不了 xwiki,安装解压版的 (zip) 也是,解压了之后,点击 start.bat 也是启动不了,出现一个异常然后控制台界面消失,都看不到是什么异常。。。网上有人出现这个问题,xwiki 作者回答的是新版本不会有这个问题,但是我装的是最新的版本啊,不知道为什么!!!是否是我的 win7 和 server08 上面有上面东西和它冲突了我也不知道。
(二)第二种方式:
我才用的第二种方式是 war 文件 + tomcat + MySQL,安装到 windows server 2008 上,当然 Web 容器和数据库也可以换成其它的,下面是详细步骤:
(1)下载准备:
我用的是 XWiki 5.2.2 稳定版
Xwiki war 文件:http://main.xwiki.org/xwiki/bin/view/DownloadCode/DownloadFeedback?downloadLink=http://download.forge.ow2.org/xwiki/xwiki-enterprise-web-5.2.2.war&projectType=Older%20Stable&projectVersion=5.2.2&projectID=1
Xwiki 模版 xar 文件:http://main.xwiki.org/xwiki/bin/view/DownloadCode/DownloadFeedback?downloadLink=http://download.forge.ow2.org/xwiki/xwiki-enterprise-ui-mainwiki-all-5.2.2.xar&projectType=Older%20Stable&projectVersion=5.2.2&projectID=1
JDK:jdk7
Tomcat:tomcat7
MySQL JDBC 驱动 下载:
—————————————— 分割线 ——————————————
免费下载地址在 http://linux.linuxidc.com/
用户名与密码都是www.linuxidc.com
具体下载目录在 /2014 年资料 /10 月 /18 日 /Windows 下安装 Java 开源知识库 XWiki
下载方法见 http://www.linuxidc.com/Linux/2013-07/87684.htm
—————————————— 分割线 ——————————————
Linux+Tomcat+XWiki+MySQL 安装配置 见 http://www.linuxidc.com/Linux/2013-11/93033.htm
XWiki 安装教程及更改语言配置 http://www.linuxidc.com/Linux/2014-10/108173.htm
(2)详细步骤:
1 安装 JDK 和 Tomcat
设置 JAVA_HOME,CATALINA_HOME,Path 三个环境变量,前两者分别是 JAVA 安装主目录和 Tomcat 安装主目录。
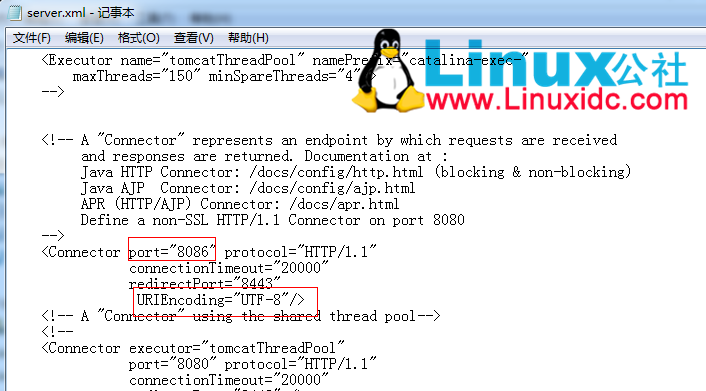
修改 tomcat 端口号和设置 URIEncoding=”UTF-8″

更多详情见请继续阅读下一页的精彩内容:http://www.linuxidc.com/Linux/2014-10/108176p2.htm
2 安装 MySQL:
我安装的是 server only,因为是离线安装,所以没办法,如果可以联网你可以安装 full 或者 developer
到其中有一步选择作用的时候,选择用作 server
安装好之后将 MYSQL 的 bin 路径加到 path 中
修改 my-default.ini,在 [mysqld] 下面加上
max_allowed_packet=64M
备注:例如删除大量页面时可能会出现发送到 mysql 包太大的错误,这个时候可以改大这个值。
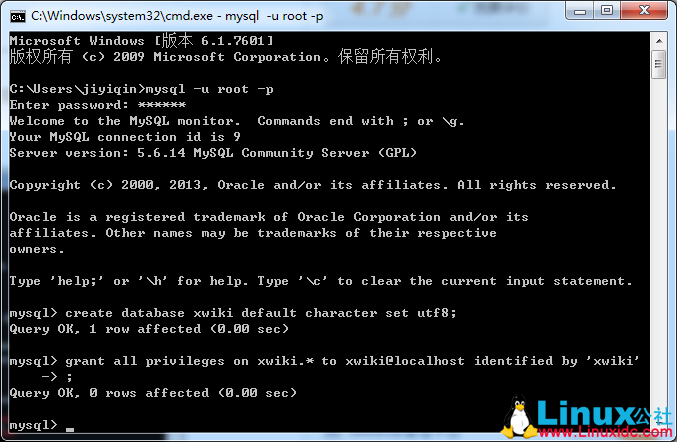
打开 CMD,开始创建数据库和用户
重启 MYSQL 服务:

3 部署 XWiki 到 tomcat:
(1)拷贝 war 文件到 webapps 目录下,启动 tomcat,然后再停掉
删除 war 文件,将 war 解压后的文件夹名字改为 xwiki,然后将 MYSQL 的 JDBC 驱动拷贝到 xwiki 的 WEB-INF 的 lib 目录下
(2)修改 hibernate.cfg.xml 文件注释掉 HSQLDB 的连接部分,放开 MYSQL 的连接部分
(3)修改 catalina.bat 文件,在
echo Using CATALINA_BASE: “%CATALINA_BASE%”
的上方,加上下面两句:
set Java_OPTS=%JAVA_OPTS% -server -Xms800m -Xmx800m -XX:MaxNewSize=256m
set JAVA_OPTS=%JAVA_OPTS% -server -XX:PermSize=128M -XX:MaxPermSize=512m
不加的话会有内存 / 栈溢出错误(Out of Memory : Perm Gen Space – Stack Overflow)。
(4)修改 xwiki.cfg 放开超级管理员。
找到 system 那一行,去掉前面的“#”号。
4 打开浏览器输入:
http://localhost:port/xwiki
(1)情况 1:如果联网:就点击 continue,开始更新,直接成功装上了。
(2)情况 2:如果没有联网,只能点击 skip 了,然后可以看到一个找不到文档的提示。
用超级管理员 (superadmin/system) 登录,然后点击管理 xwiki,就可以开始导入 xar 模板文件了。
但是我的导入之后出现权限问题,再次单击 xar 文件,再次导入,退出登录,再次登录就会好了。
想要熟练使用 XWiki,需要参阅教程:
http://platform.xwiki.org/xwiki/bin/view/AdminGuide/WebHome
XWiki 的详细介绍:请点这里
XWiki 的下载地址:请点这里
准备 Windows 下安装 XWiki,看了一下有三种安装方式:
XWiki is a Java-based wiki and runs on a Servlet Container such as Tomcat, Jetty, JBoss, WebLogic, WebSphere, etc. It also uses a relational database to store its content. It can run on almost any database (HSQL, MySQL, etc) but XWiki and the database need to be setup correctly.
There are 3 ways of installing XWiki:
- Use the Standalone distribution which already packages a Servlet Container (Jetty) and a database (HSQL). This is the recommended option for first time XWiki users and for users who wish to quickly try out XWiki.
- Use the WAR distribution and configure both your container and your database to work with it.
- Use the .deb package to install the last version of XWiki and the dependencies.
目标机需要满足以下条件:
- Java 6 or greater installed.
- A Servlet Container supporting Servlet 2.4.
- Enough memory, check the Memory section of the Performance Guide.
- Check the release notes for the version you’re installing to see what browsers and databases are supported for it. You can also check our general support strategy.
(一)第一种方式:
我采用的第一种安装方式是独立运行的版本安装,包括 exe 安装,jar 安装,或者 zip 解压的方式,可直接运行,方便想要快速用起来 xwiki 的人,比如下面是 exe 方式安装步骤:
采用最简单的 windows 的 exe 版本安装:
1、安装 jdk7;(下载地址:http://www.oracle.com/technetwork/java/javase/downloads/jdk7-downloads-1880260.html)
2、安装 xwiki-enterprise-installer-windows-5.2.2.exe(下载地址:http://enterprise.xwiki.org/xwiki/bin/view/Main/Download)
3、启动 start_xwiki.bat;
4、在浏览器中打开 http://localhost:8080/;
5、Admin/admin 登录
6、打开管理 wiki 界面,点击 Localization,在默认语言栏中奖 en 改为 zh,保存即切换为中文了。
问题:
但是我在 win8 系统上按照这个步骤一点问题都没有,XWiki 还运行非常良好!!!
但是当我在 win7 和 win Server2008 上面安装 exe 版本的时候,到最后一步,点击 next 出现空白 wizard,就再也不前进了,然后启动不了 xwiki,安装解压版的 (zip) 也是,解压了之后,点击 start.bat 也是启动不了,出现一个异常然后控制台界面消失,都看不到是什么异常。。。网上有人出现这个问题,xwiki 作者回答的是新版本不会有这个问题,但是我装的是最新的版本啊,不知道为什么!!!是否是我的 win7 和 server08 上面有上面东西和它冲突了我也不知道。
(二)第二种方式:
我才用的第二种方式是 war 文件 + tomcat + MySQL,安装到 windows server 2008 上,当然 Web 容器和数据库也可以换成其它的,下面是详细步骤:
(1)下载准备:
我用的是 XWiki 5.2.2 稳定版
Xwiki war 文件:http://main.xwiki.org/xwiki/bin/view/DownloadCode/DownloadFeedback?downloadLink=http://download.forge.ow2.org/xwiki/xwiki-enterprise-web-5.2.2.war&projectType=Older%20Stable&projectVersion=5.2.2&projectID=1
Xwiki 模版 xar 文件:http://main.xwiki.org/xwiki/bin/view/DownloadCode/DownloadFeedback?downloadLink=http://download.forge.ow2.org/xwiki/xwiki-enterprise-ui-mainwiki-all-5.2.2.xar&projectType=Older%20Stable&projectVersion=5.2.2&projectID=1
JDK:jdk7
Tomcat:tomcat7
MySQL JDBC 驱动 下载:
—————————————— 分割线 ——————————————
免费下载地址在 http://linux.linuxidc.com/
用户名与密码都是www.linuxidc.com
具体下载目录在 /2014 年资料 /10 月 /18 日 /Windows 下安装 Java 开源知识库 XWiki
下载方法见 http://www.linuxidc.com/Linux/2013-07/87684.htm
—————————————— 分割线 ——————————————
Linux+Tomcat+XWiki+MySQL 安装配置 见 http://www.linuxidc.com/Linux/2013-11/93033.htm
XWiki 安装教程及更改语言配置 http://www.linuxidc.com/Linux/2014-10/108173.htm
(2)详细步骤:
1 安装 JDK 和 Tomcat
设置 JAVA_HOME,CATALINA_HOME,Path 三个环境变量,前两者分别是 JAVA 安装主目录和 Tomcat 安装主目录。
修改 tomcat 端口号和设置 URIEncoding=”UTF-8″

更多详情见请继续阅读下一页的精彩内容:http://www.linuxidc.com/Linux/2014-10/108176p2.htm


