共计 6320 个字符,预计需要花费 16 分钟才能阅读完成。
MHA 简介
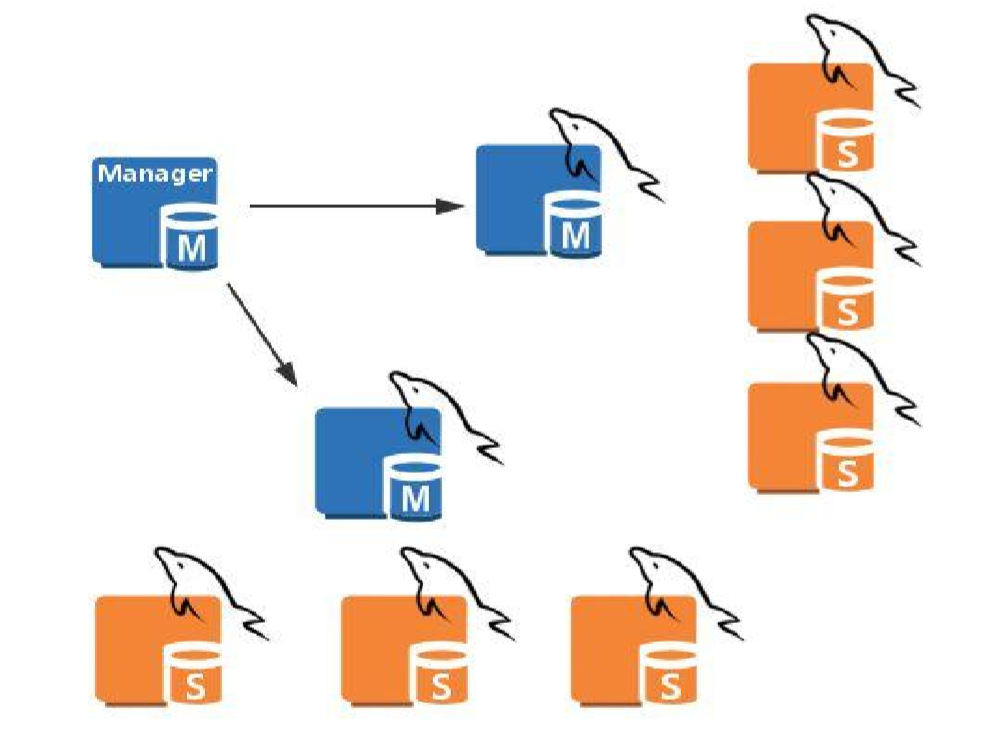
MHA:Master High Availability, 对主节点进行监控,可实现自动故障转移至其他从节点;通过提升某一从节点为新的主节点,基于主从复制实现,还需要客户端配合实现,目前 MHA 主要支持一主二从,即一台充当 master,一台充当备用 master,另外一台充当从数据库,出于机器成本的考虑,淘宝进行了改造,目前淘宝 TMHA 已经一主一从。
MHA 架构

MHA 的工作原理

MHA 是由一台 manager 服务器远程监控主服务器, 当主服务器挂了提升一台从服务器作为主服务器。
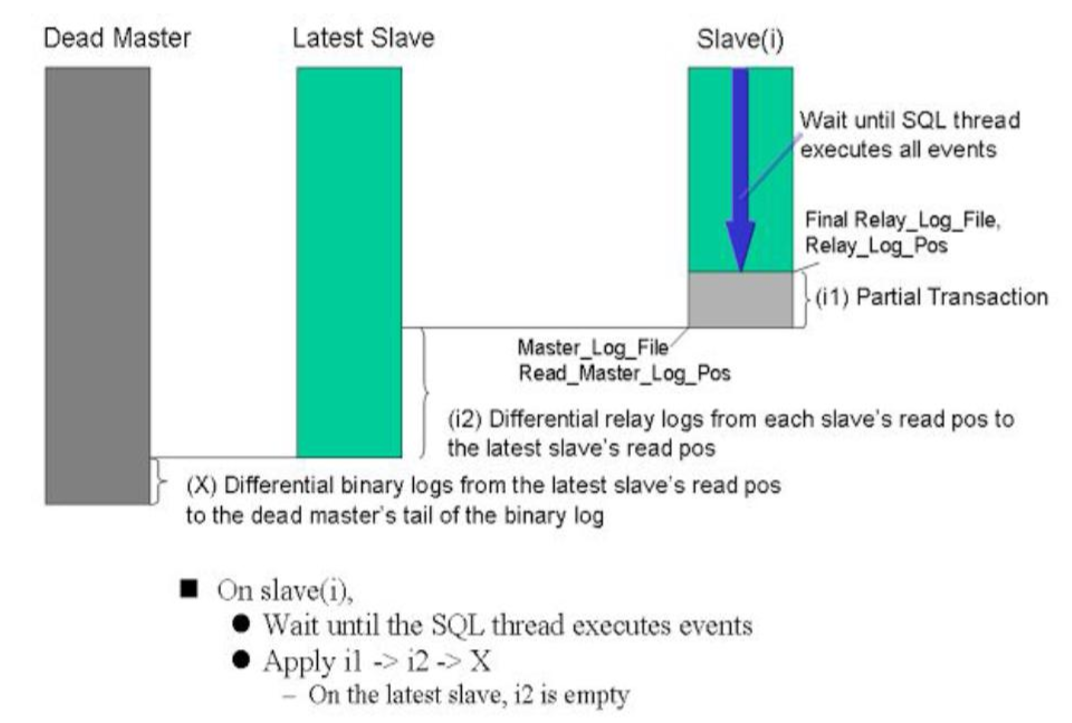
当主节点挂了,manager 首先要查看哪台从节点,同步的数据最多,然后提升同步最多的从节点为主节点,再将其余的 MySQL 服务器对他做从节点。
如果原主节点没彻底死透,manager 会让新的主机通过 ssh 协议远程连接到原先的主节点,拉取二进制日志进行同步。如果主节死透了那就放弃。
MHA 搭建
环境准备
一、准备 4 台主机,管理节点 1 台,主节点 MySQL 服务器 1 台,从节点 MySQL 服务器 2 台
| 主机 | IP |
|---|---|
| Manager | 192.168.73.111 |
| Master | 192.168.73.110 |
| Slave1 | 192.168.73.112 |
| Slave2 | 192.168.73.113 |
二、将 Manager 管理节点配置为时间服务器,向所有 MySQL 服务器提供时间同步。
1. 安装 chrony 服务
[root@Manager ~]# yum install -y chrony2. 修改 chrony 配置文件
[root@Manager ~]# vim /etc/chrony.conf
server 172.22.0.1 iburst
allow 192.168.0.0/16
local stratum 10
3. 启动 chrony 服务
[root@Manager ~]# systemctl start chronyd4. 将 MySQL 服务器与 Manager 服务器进行时间同步
4.1 在所有 MySQL 主机上修改配置文件并启动,并启动服务
[root@Master ~]# sed -i '/^server 0/i server 192.168.73.111 iburst' /etc/chrony.conf
[root@Master ~]# systemctl start chronyd
4.2 确认时间同步
[root@Master ~]# chronyc sources -v
210 Number of sources = 1

  .-- Source mode  '^' = server, '=' = peer, '#' = local clock.
 / .- Source state '*' = current synced, '+' = combined , '-' = not combined,
| /   '?' = unreachable, 'x' = time may be in error, '~' = time too variable.
||                                                 .- xxxx [yyyy] +/- zzzz
||      Reachability register (octal) -.           |  xxxx = adjusted offset,
||      Log2(Polling interval) --.      |          |  yyyy = measured offset,
||                                \     |          |  zzzz = estimated error.
||                                 |    |           \
MS Name/IP address         Stratum Poll Reach LastRx Last sample
===============================================================================
^* 192.168.73.111                4   6   377    54    +25us[+41us] +/-  105ms
三、配置 ssh 为的密钥认证登陆
当主节点宕机,manager 会让从节点通过 ssh 协议去尝试连接主节点,并拉取二进制日志,所以要时用密钥的认证方式让从节点登陆到主节点拉取数据。
1. 在 manager 服务器上生成私钥文件
[root@Manager ~]# ssh-keygen
Generating public/private rsa key pair.
Enter file in which to save the key (/root/.ssh/id_rsa):
Enter passphrase (empty for no passphrase):
Enter same passphrase again:
Your identification has been saved in /root/.ssh/id_rsa.
Your public key has been saved in /root/.ssh/id_rsa.pub.
The key fingerprint is:
SHA256:yAvC2PJUlRyAf1udlrVXzmIsUljTdUdW6X6FVpQ3Ajo root@Manager
The key's randomart image is:
+---[RSA 2048]----+
|   ..ooo   ++. +%|
|  .  .o   o oo.=*|
|   ..    E = oo*o|
| + ...... B o B.+|
|o = ..ooS. . =...|
| + . ...       ..|
|  .   .         .|
|                 |
|                 |
+----[SHA256]-----+
2. 将公钥文件复制给自己
[root@Manager ~]# ssh-copy-id 127.0.0.13. 将整个~/.ssh 目录复制给所有的 MySQL 主机
[root@Manager ~]# scp -r ~/.ssh 192.168.73.110:/root至此所有环境准备完毕
一、配置主从复制
主节点配置
1. 修改配置文件
[root@Master ~]# vim /etc/my.cnf
[mysqld]
server-id=1
log-bin
binlog-format=row
skip_name_resolve
2. 启动数据库服务
[root@Master ~]# systemctl start mariadb3. 创建主从复制账号
[root@Master ~]# mysql -e "GRANT REPLICATION SLAVE ON *.* TO'repluser'@'192.168.73.%'IDENTIFIED BY'CentOS';"4. 添加 mha 的管理账号,让管理节点远程连接到主机用来设置主从调整
[root@Master ~]# mysql -e "GRANT ALL ON *.* TO'mhauser'@'192.168.73.%'IDENTIFIED BY'centos';"从节点配置
1. 修改配置文件
[root@Slave1 ~]# vim /etc/my.cnf
[mysqld]
server-id=2
read-only
log-bin
relay_log_purge=0
skip_name_resolve
2. 启动服务
[root@Slave1 ~]# systemctl start mariadb3. 配置 CHANGE MASTER TO
MariaDB [(none)]> CHANGE MASTER TO MASTER_HOST='192.168.73.110', MASTER_USER='repluser',MASTER_PASSWORD='centos',MASTER_PORT=3306,MASTER_LOG_FILE='mariadb-bin.000001',MASTER_LOG_POS=245;
Query OK, 0 rows affected (0.00 sec)
4. 启动线程
MariaDB [(none)]> START SLAVE;
Query OK, 0 rows affected (0.00 sec)
在 Slave2 节点上也执行相同的操作,此处步骤省略,需要注意 server-id 需要修改为和其他主从节点不同
5. 测试
主节点导入 hellodb 库
[root@Master ~]# mysql < hellodb_innodb.sql从节点查看是否同步
slave1
[root@Slave1 ~]# mysql -e "SHOW DATABASES;"
+--------------------+
| Database           |
+--------------------+
| information_schema |
| hellodb            |
| mysql              |
| performance_schema |
| test               |
+--------------------+
Slave2
[root@Slave2 ~]# mysql -e "SHOW DATABASES;"
+--------------------+
| Database           |
+--------------------+
| information_schema |
| hellodb            |
| mysql              |
| performance_schema |
| test               |
+--------------------+
二、配置管理节点及被管理节点
1. 在管理节上安装 mha4mysql-manager、mha4mysql-node,将两个包放在同一目录下
[root@Manager ~]# yum install *.rpm -y #这两个包有依赖管理需要一起安装2. 在所有被管理节点上安装 mha4mysql-node
[root@Master ~]# yum install mha4mysql-node-0.56-0.el6.noarch.rpm -y[root@Slave1 ~]# yum install mha4mysql-node-0.56-0.el6.noarch.rpm -y[root@Slave2 ~]# yum install mha4mysql-node-0.56-0.el6.noarch.rpm -y3. 在管理节点上创建配置文件
[root@Manager ~]# vim /etc/mha/aap1.conf

[server default]
user=mhauser
password=centos
manager_workdir=/data/mastermha/app1/
manager_log=/data/mastermha/app1/manager.log
remote_workdir=/data/mastermha/app1/
ssh_user=root
repl_user=repluser
repl_password=centos
ping_interval=1

[server1]
hostname=192.168.73.110
candidate_master=1
[server2]
hostname=192.168.73.112
candidate_master=1
[server3]
hostname=192.168.73.113
candidate_master=1
4. 做检查
4.1 检查 ssh 连接
[root@Manager ~]# masterha_check_ssh --conf=/etc/mha/aap1.conf 4.2 检查主从复制
[root@Manager ~]# masterha_check_repl --conf=/etc/mha/aap1.conf 5. 以上两项全部成功后启动程序
mha 这个程序是跑在前台的,一次性的可以使用 nohub 或 screen 来解决跑在前台的问题
[root@Manager ~]# masterha_manager --conf=/etc/mha/aap1.conf 三、测试
1. 在 master 上跑个存储过程,导入存储过程
[root@Master ~]# mysql hellodb < testlog.sql 2. 调用存储过程
MariaDB [(none)]> USE hellodb
Reading table information for completion of table and column names
You can turn off this feature to get a quicker startup with -A

Database changed
MariaDB [hellodb]> call pro_testlog;
3. 另起一个主节点窗口将主节点断网
[root@Master ~]# ifdown ens334.manager 端完成切换退出,查看日志,查看新的主节点是哪台 slave
[root@Manager app1]# tail /data/mastermha/app1/manager.log

Started automated(non-interactive) failover.
The latest slave 192.168.73.112(192.168.73.112:3306) has all relay logs for recovery.
Selected 192.168.73.112(192.168.73.112:3306) as a new master.
192.168.73.112(192.168.73.112:3306): OK: Applying all logs succeeded.
192.168.73.113(192.168.73.113:3306): This host has the latest relay log events.
Generating relay diff files from the latest slave succeeded.
192.168.73.113(192.168.73.113:3306): OK: Applying all logs succeeded. Slave started, replicating from 192.168.73.112(192.168.73.112:3306)
192.168.73.112(192.168.73.112:3306): Resetting slave info succeeded.
Master failover to 192.168.73.112(192.168.73.112:3306) completed successfully.
# 此处显示最新的主节点为 192.168.73.112
由于从节点在配置文件中定义的为 read-only,此时被提升为主能执行写操作时应为管理服务器上有管理账号,他将从节点的服务器全局变量 read_only 给关闭了
[root@Slave1 ~]# mysql -e "SELECT @@read_only;"
+-------------+
| @@read_only |
+-------------+
|           0 |
+-------------+
为了防止服务服务重启再次变为 read-only,此时需要对新主节点的配置文件进行修改将 read-only 行注释
[mysqld]
server-id=2
#read-only
log-bin
relay_log_purge=0
skip_name_resolve
四、测试新的主节点
1. 对 hellodb.teachers 表插入数据
[root@Slave1 ~]# mysql -e "INSERT hellodb.teachers VALUES(5,'Tang San',30,'M');"2.Slave2 主机上查看是否同步
[root@Slave2 ~]# mysql -e "SELECT * FROM hellodb.teachers;"
+-----+---------------+-----+--------+
| TID | Name          | Age | Gender |
+-----+---------------+-----+--------+
|   1 | Song Jiang    |  45 | M      |
|   2 | Zhang Sanfeng |  94 | M      |
|   3 | Miejue Shitai |  77 | F      |
|   4 | Lin Chaoying  |  93 | F      |
|   5 | Tang San      |  30 | M      |    # 已经同步
+-----+---------------+-----+--------+
其他事项
当原主节点被修复后,将其添加为从节点使用。
:


