共计 20995 个字符,预计需要花费 53 分钟才能阅读完成。
下载 Oracle Database 12cRelease 1 安装介质
官方的下载地址:
1:http://www.oracle.com/technetwork/database/enterprise-edition/downloads/index.html
2:https://edelivery.oracle.com/EPD/Download/get_form?egroup_aru_number=16496132
URL 地址 2 需要先注册,然后才能登陆下载,注册登陆界面https://edelivery.oracle.com
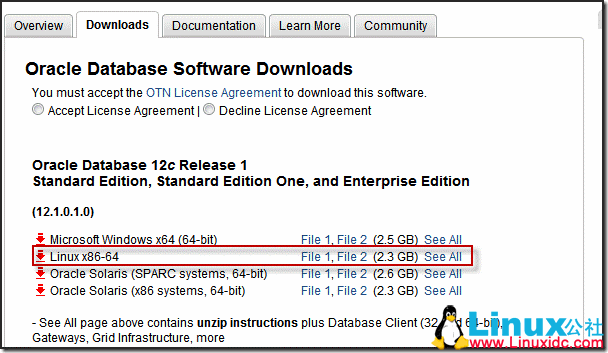
关于这两者有啥区别:听一个同事说,用 metalink 账号下载的安装文件完整一些。具体情况是不是如此,还不得而知。
地址 1 下载的文件为:
linuxamd64_12c_database_1of2.zip
linuxamd64_12c_database_2of2.zip
地址 2 下载的文件为:
V38500-01_1of2.zip
V38500-01_2of2.zip
2)检查硬件要求(Check Hardware Requirements)
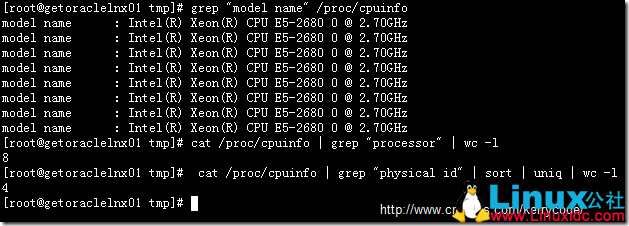
2.1 Check CPU
[root@getoraclelnx01 tmp]#
[root@getoraclelnx01 tmp]# grep “model name” /proc/cpuinfo
model name : Intel(R) Xeon(R) CPU E5-2680 0 @ 2.70GHz
model name : Intel(R) Xeon(R) CPU E5-2680 0 @ 2.70GHz
model name : Intel(R) Xeon(R) CPU E5-2680 0 @ 2.70GHz
model name : Intel(R) Xeon(R) CPU E5-2680 0 @ 2.70GHz
model name : Intel(R) Xeon(R) CPU E5-2680 0 @ 2.70GHz
model name : Intel(R) Xeon(R) CPU E5-2680 0 @ 2.70GHz
model name : Intel(R) Xeon(R) CPU E5-2680 0 @ 2.70GHz
model name : Intel(R) Xeon(R) CPU E5-2680 0 @ 2.70GHz
[root@getoraclelnx01 tmp]# cat /proc/cpuinfo | grep “processor” | wc -l
8
[root@getoraclelnx01 tmp]# cat /proc/cpuinfo | grep “physical id” | sort | uniq | wc -l
4
[root@getoraclelnx01 tmp]#
2.2 Check Memory
[root@getoraclelnx01 tmp]# grep MemTotal /proc/meminfo
MemTotal: 24736752 kB
[root@getoraclelnx01 tmp]# grep SwapTotal /proc/meminfo
SwapTotal: 37748728 kB
[root@getoraclelnx01 tmp]# free -g
total used free shared buffers cached
Mem: 23 7 16 0 0 5
-/+ buffers/cache: 1 22
Swap: 35 0 35
[root@getoraclelnx01 tmp]#

Oracle 12c 对系统内存的最低要求为 1G,推荐 2G 或更大的内存,从上面结果可以知道系统内存 23G,完全满足要求。
Oracle 对交换分区(Swap Space)的推荐设置如下,这里 Swap Space 为 35G,不是 16G, 需要做一下调整。

2.3 Check Disk Capacity

Oracle 12c 企业版的需要 6.4G 大小的磁盘空间,标准版需要 6.1G 大小的磁盘空间。/tmp 需要至少 1G 的大小。从上面结果得知,磁盘空间完全满足。
3)检查软件要求(Checking the Software Requirements)
3.1 操作系统版本检测
Oracle 12 c 只支持 64 位的 Linux 系统。不支持 32Linux 平台,这也许是以后的趋势了。Operating System Requirements for x86-64 Linux Platforms。Oracle 的官方文档明确列出了支持下面三个 Linux 版本
- Supported Oracle Linux 6 and Red Hat Enterprise Linux 6 Distributions for x86-64
- Supported Oracle Linux 5 and Red Hat Enterprise Linux 5 Distributions for x86-64
- Supported SUSE Distributions for x86-64
[root@getoraclelnx01 /]# uname -m
x86_64
[root@getoraclelnx01 /]# uname -r
2.6.32-200.13.1.el5uek
[root@getoraclelnx01 /]# more /etc/RedHat-release
Red Hat Enterprise Linux Server release 5.7 (Tikanga)
[root@getoraclelnx01 ~]# uname -a
Linux getoraclelnx01.gfg1.esquel.com 2.6.32-200.13.1.el5uek #1 SMP Wed Jul 27 21:02:33 EDT 2011 x86_64 x86_64 x86_64 GNU/Linux
[root@getoraclelnx01 Server]# lsb_release -id
Distributor ID: EnterpriseEnterpriseServer
Description: Enterprise Linux Enterprise Linux Server release 5.7 (Carthage)
[root@getoraclelnx01 Server]#
3.2 检查 oracle 12c 所需包
关于 Oracle 12c 所需包,从官方文档看,不同版本的操作系统似乎有所不同,Oracle Linux 5 and Red Hat Enterprise Linux 5 需要安装下面一些包
binutils-2.17.50.0.6 compat-libstdc++-33-3.2.3 compat-libstdc++-33-3.2.3 (32 bit) gcc-4.1.2 gcc-c++-4.1.2 glibc-2.5-58 glibc-2.5-58 (32 bit) glibc-devel-2.5-58 glibc-devel-2.5-58 (32 bit) ksh libaio-0.3.106 libaio-0.3.106 (32 bit) libaio-devel-0.3.106 libaio-devel-0.3.106 (32 bit) libgcc-4.1.2 libgcc-4.1.2 (32 bit) libstdc++-4.1.2 libstdc++-4.1.2 (32 bit) libstdc++-devel 4.1.2 libXext-1.0.1 libXext-1.0.1 (32 bit) libXtst-1.0.1 libXtst-1.0.1 (32 bit) libX11-1.0.3 libX11-1.0.3 (32 bit) libXau-1.0.1 libXau-1.0.1 (32 bit) libXi-1.0.1 libXi-1.0.1 (32 bit) make-3.81 sysstat-7.0.2 |
rpm -q binutils compat-libstdc++ gcc gcc-c++ glibc glibc-devel ksh libaio libaio-devel libgcc libstdc++ libstdc++-devel libXext libXtst libX11 libXau libXi make sysstat
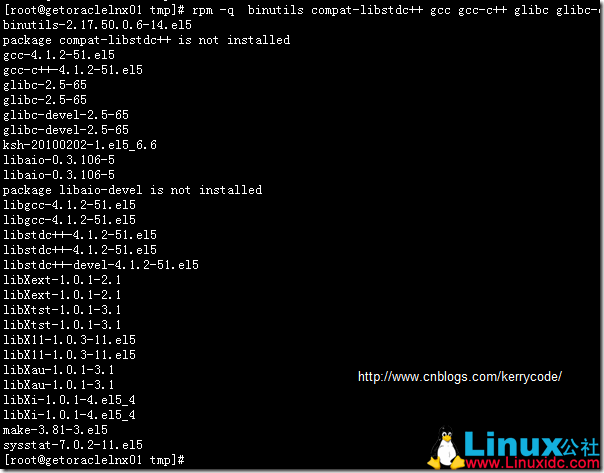
如上所示,还需要安装包 compat-libstdc++ 和 libaio-devel 相关包

[root@getoraclelnx01 Server]# rpm -ivh compat-libstdc++-33-3.2.3-61.i386.rpm
warning: compat-libstdc++-33-3.2.3-61.i386.rpm: Header V3 DSA signature: NOKEY, key ID 1e5e0159
Preparing… ########################################### [100%]
package compat-libstdc++-33-3.2.3-61.i386 is already installed
[root@getoraclelnx01 Server]# rpm -ivh compat-libstdc++-33-3.2.3-61.x86_64.rpm
warning: compat-libstdc++-33-3.2.3-61.x86_64.rpm: Header V3 DSA signature: NOKEY, key ID 1e5e0159
Preparing… ########################################### [100%]
package compat-libstdc++-33-3.2.3-61.x86_64 is already installed
[root@getoraclelnx01 Server]# ls *libaio-devel*
libaio-devel-0.3.106-5.i386.rpm libaio-devel-0.3.106-5.x86_64.rpm
[root@getoraclelnx01 Server]# rpm -ivh libaio-devel-0.3.106-5.i386.rpm
warning: libaio-devel-0.3.106-5.i386.rpm: Header V3 DSA signature: NOKEY, key ID 1e5e0159
Preparing… ########################################### [100%]
1:libaio-devel ########################################### [100%]
[root@getoraclelnx01 Server]# rpm -ivh libaio-devel-0.3.106-5.x86_64.rpm
warning: libaio-devel-0.3.106-5.x86_64.rpm: Header V3 DSA signature: NOKEY, key ID 1e5e0159
Preparing… ########################################### [100%]
1:libaio-devel ########################################### [100%]
[root@getoraclelnx01 Server]#
如上所示,既可以用 rpm 安装,也可以用 yum 本地源进行安装,这个就看那个方便以及个人的喜好、习惯了。一般推荐用 yum 安装,不过需要进行配置。具体可以参见我的博客。
4)系统配置准备
4.1 创建 Oracle 用户和用户组
[root@getoraclelnx01 Server]# groupadd dba
[root@getoraclelnx01 Server]# groupadd oinstall
[root@getoraclelnx01 Server]# useradd -g oinstall -G dba oracle
[root@getoraclelnx01 Server]# id oracle
uid=502(oracle) gid=503(oinstall) groups=503(oinstall),502(dba)
[root@getoraclelnx01 Server]#

创建了 oracle 用户以及相关用户组后,需要设置 oracle 用户密码。
4.2 创建安装目录
[root@getoraclelnx01 Server]#
[root@getoraclelnx01 Server]# mkdir -p /u01/app/oracle
[root@getoraclelnx01 Server]# chown -R oracle:oinstall /u01/app/oracle
[root@getoraclelnx01 Server]# chmod -R 775 /u01/app/oracle
[root@getoraclelnx01 Server]#

4.3 Disable SELinux
[root@getoraclelnx01 ~]# /usr/sbin/sestatus
SELinux status: disabled
[root@getoraclelnx01 ~]# /usr/sbin/getenforce
Disabled
[root@getoraclelnx01 ~]#

从上面可以看出 SELinux 已经被禁用了,如果没有禁用,则可以通过下面命令禁用
getenforce (returns “Enforcing”)
setenforce 0
getenforce (returns “Permissive”)
End to restore it to enforcing
setenforce 1
getenforce (returns “Enforcing”)
[root@getoraclelnx01 os]# /usr/sbin/sestatus SELinux status: disabled [root@getoraclelnx01 os]# /usr/sbin/getenforce Disabled [root@getoraclelnx01 os]# Disable secure linux by editing the “/etc/selinux/config” file, making sure the SELINUX flag is set as follows. SELINUX=disabled |
4.4 修改系统内核参数
在修改系统内核参数前,你可以用命令先查看一下当前各类系统参数的值,亦或直接查看配置文件 /etc/sysctl.conf
[root@getoraclelnx01 ~]# getconf PAGESIZE
4096
[root@getoraclelnx01 ~]# sysctl -a | grep sem
kernel.sem = 250 32000 32 128
[root@getoraclelnx01 ~]# sysctl -a | grep shm
kernel.shmmax = 68719476736
kernel.shmall = 4294967296
kernel.shmmni = 4096
vm.hugetlb_shm_group = 0
[root@getoraclelnx01 ~]# sysctl -a | grep file-max
fs.file-max = 2414060
[root@getoraclelnx01 ~]# sysctl -a | grep ip_local_port_range
net.ipv4.ip_local_port_range = 32768 61000
[root@getoraclelnx01 ~]#
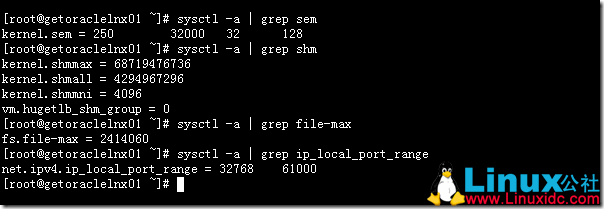
关于内核参数的一些设置建议,可以参考下面资料:
kernel.shmmax
关于内核参数 kernel.shmmax,oracle 建议,kernel.shmmax 的值不能少于物理内存的一半,而且要大于 Oracle 中 sga-max-size 的值,否则会造成 oracle 性能下降
一般 32bit 操作系统,直接设置为系统支持的最大内存即可,64bit 操作系统设置大于 sga-max-size 的值即可
如:当前内存为 2G 则 kernel.shmmax = 2*1024*1024=2097152
当前内存为 8G 则 kernel.shmmax = 7*1024*1024=7340032
Kernel.shmall
Shmall 指系统一次可以使用的共享内存段的最大数量,以页为单位。Oracle 默认设置为 kernel.shmall = 2097152
即最大 8G(2097152*4/1024/1024),(在调整 SGA 时需要注意,SGA 大小设置不可超过该值),根据系统内存大小和使用的不同可以参考如下:设置的一般规律
kernel.shmall = 8G/4k=8388608k/4k=2097152 — 内存 8G
kernel.shmall = 16G/4k=16777216k/4k=4194304 — 内存 16G
kernel.shmall = 32G/4k=33554432k/4k=8388608 — 内存 32G
(RedHat linux 系统中页大小为 4096 即 4K,实际环境以 getconf PAGE_SIZE 结果为准)
kernel.shmmni
shmmni ��系统共享内存段的最大数量
oracle 设置默认值为 4096,一般是足够用了,不需要调整
文件句柄数的相关内核参数设置
fs.file-max
fs.file-max 指系统能够打开最大的文件句柄数
oracle 建议设置为 65536,一般不用修改
信号的相关内核参数设置
kernel.sem
kernel.sem 是指 semmsl,semmns,semopm,semmni 这 4 个参数
semmsl 指每个线号集的最大信号数,Oracle 建议是设置为 oracle 的最大进程数 +10
semmni 指整个系统的信号集的最大数量
semmns 指整个系统的信号总数,也就是 semmni*semmsl 的结果
semopm 指每个 semop 系统调用可以执行的信号操作的最大数量
oracle 默认设置
semmsl=250
semmns=3200
semopm=100
semmni=128
即 kernel.sem= 250 3200 100 128
例:在 oracle ora.init 文件参数中设置 PROCESSES 参数为 5000
则 semmsl=5010,semmni=128,semmns=semmsl* semmni=641280
另外 semopm 建议设置等于 semmsl 值即 5010
那么 kernel.sem=5010 641280 5010 128
网络相关的内核参数设置
net.core.rmem_default
net.core.rmem_default 指网络套接字的默认接收缓冲区的大小,oracle 建议设置为 265K 即 262144
net.core.rmem_max
net.core.rmem_max 指网络套接字的最大接收缓冲区的大小,oracle10g 及以前版本建议设置为 256k 即 262144
oracle11g 建议设置为 4M 即 4194304
net.core.wmem_default
net.core.wmem_default 指网络套接字的默认发送缓冲区的大小,oracle 建议设置为 265K 即 262144
net.core.wmem_max
net.core.wmem_max 指网络套接字的最大发送缓冲区的大小,oracle10g 及以前版本建议设置为 256k 即 262144
oracle11g 建议设置为 1M 即 1048576
net.ipv4.ip_local_port_range
net.ipv4.ip_local_port_range,指本地的允许打开随机端口范围
oracle10g 前建议端口范围为 1024 65000,oracle11g 建议端口范围为:
65500 并忽略 oracle 安装程序任何关于这个参数的警告
Asynchronous I/ O 相关的内核参数设置
fs.aio-max-nr
fs.aio-max-nr 指系统允许的最大的异步 IO 请求大小
oracle 默认设置为 1M 即 1048576,一般不用更改
修改前最后先备份一下 /etc/sysctl.conf,以防万一。
[root@getoraclelnx01 ~]# cp /etc/sysctl.conf /etc/sysctl.conf.bak
[root@getoraclelnx01 ~]# vi /etc/sysctl.conf 添加或修改下面参数
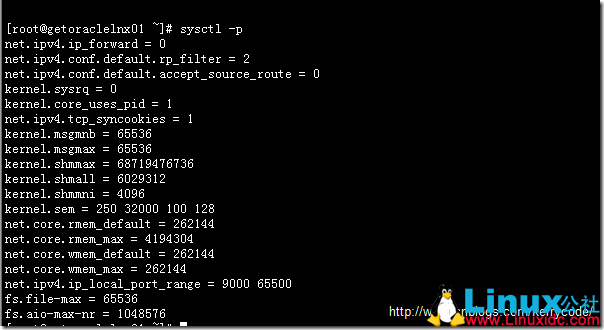
kernel.shmmax = 68719476736
kernel.shmall = 6029312
kernel.shmmni = 4096
kernel.sem =250 32000 100 128
net.core.rmem_default = 262144
net.core.rmem_max = 4194304
net.core.wmem_default = 262144
net.core.wmem_max = 262144
net.ipv4.ip_local_port_range =9000 65500
fs.file-max=65536
fs.aio-max-nr=1048576
kernel.shmall =physical RAM size / pagesize (getconf PAGESIZE) — If the defaults are greater then leave it.
kernel.shmall = 内存大小 /4k=23G*1024*1024/4k = 6029312
kernel.shmmax = 20*1024*1024=20971520 而默认的为 68719476736,那么使用默认值
修改完成后保存,然后运行 sysctl -p 命令使之生效
4.5 设置用户限制
在/etc/security/limits.conf 中添加如下配置。
oracle soft nproc 2047
oracle hard nproc 16384
oracle soft nofile 1024
oracle hard nofile 65536
oracle soft stack 10240
oracle hard stack 10240
Add the following line to the “/etc/pam.d/login” file,
if it does not already exist.
session required /lib/security/pam_limits.so
session required pam_limits.so
Add the following to
/etc/profile if Oracle user will use the bash shell.
if [$USER = “oracle”]; then
ulimit -u 16384
ulimit -n 65536
fi
4.6 配置环境变量
首先切换到 oracle 账户,编辑修改主目录下 .bash_profile
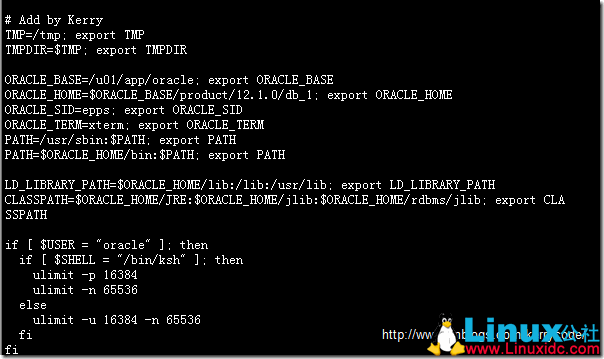
TMP=/tmp; export TMP
TMPDIR=$TMP; export TMPDIR
ORACLE_BASE=/u01/app/oracle; export ORACLE_BASE
ORACLE_HOME=$ORACLE_BASE/product/12.1.0/db_1; export ORACLE_HOME
ORACLE_SID=epps; export ORACLE_SID
ORACLE_TERM=xterm; export ORACLE_TERM
PATH=/usr/sbin:$PATH; export PATH
PATH=$ORACLE_HOME/bin:$PATH; export PATH
LD_LIBRARY_PATH=$ORACLE_HOME/lib:/lib:/usr/lib; export LD_LIBRARY_PATH
CLASSPATH=$ORACLE_HOME/JRE:$ORACLE_HOME/jlib:$ORACLE_HOME/rdbms/jlib; export CLASSPATH
if [$USER = “oracle”]; then
if [$SHELL = “/bin/ksh”]; then
ulimit -p 16384
ulimit -n 65536
else
ulimit -u 16384 -n 65536
fi
fi
使配置生效
[oracle@getoraclelnx01 ~]$ source .bash_profile
[oracle@getoraclelnx01 ~]$
更多详情见请继续阅读下一页的精彩内容:http://www.linuxidc.com/Linux/2017-12/149043p2.htm
解压安装镜像文件
[Oracle@getoraclelnx01 tmp]$ unzip V38500-01_1of2.zip
[oracle@getoraclelnx01 tmp]$ unzip V38500-01_2of2.zip
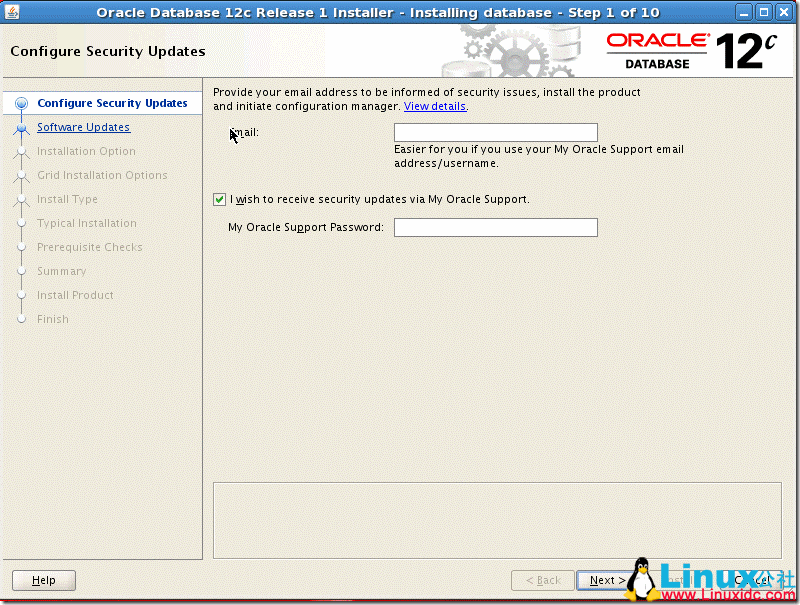
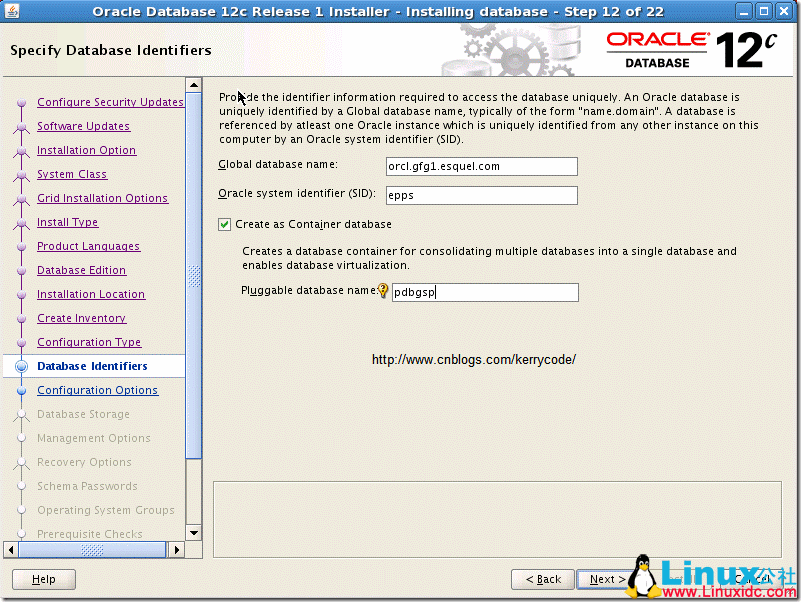
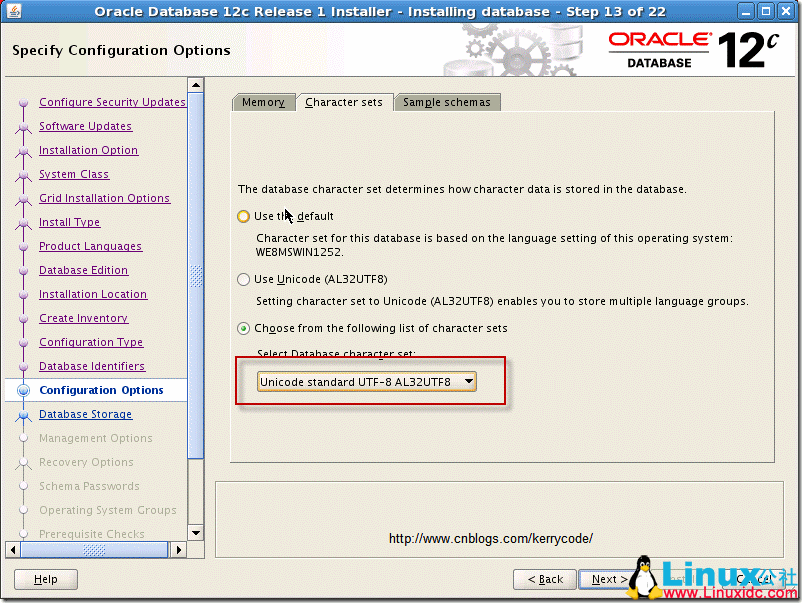
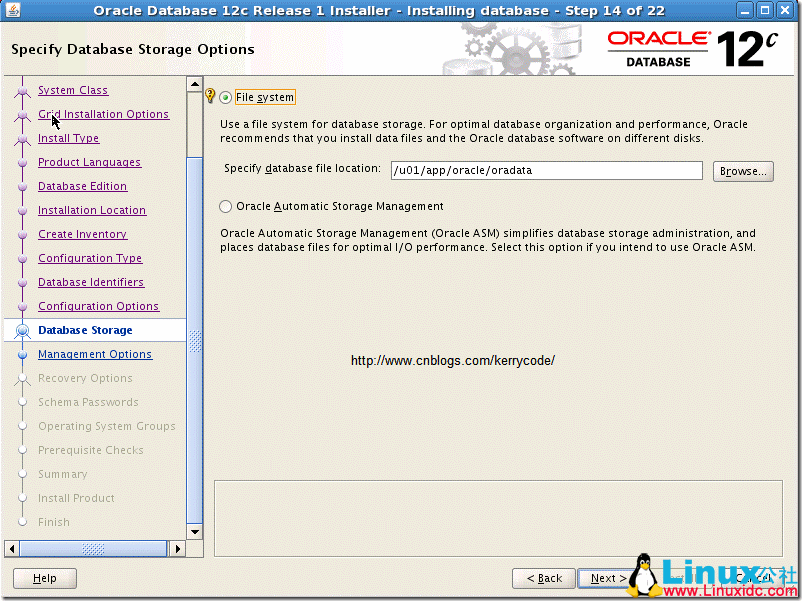
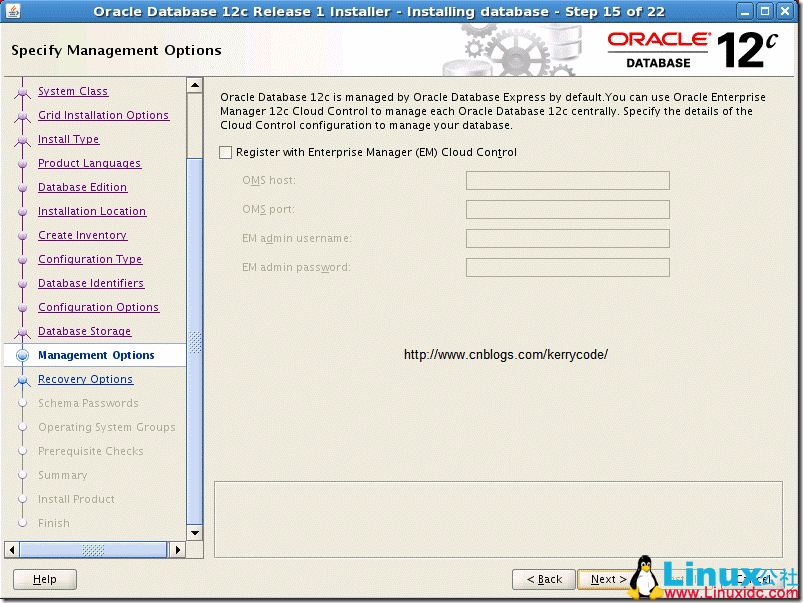
安装步骤截图
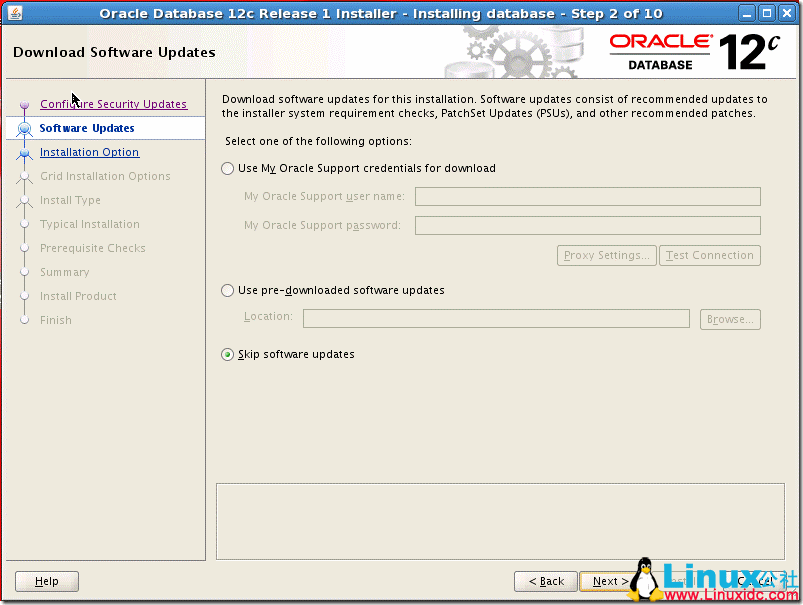
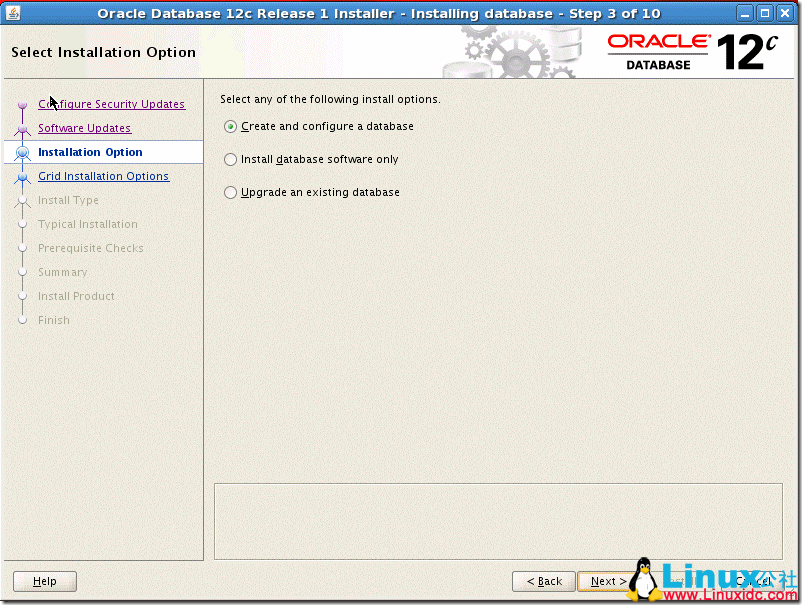

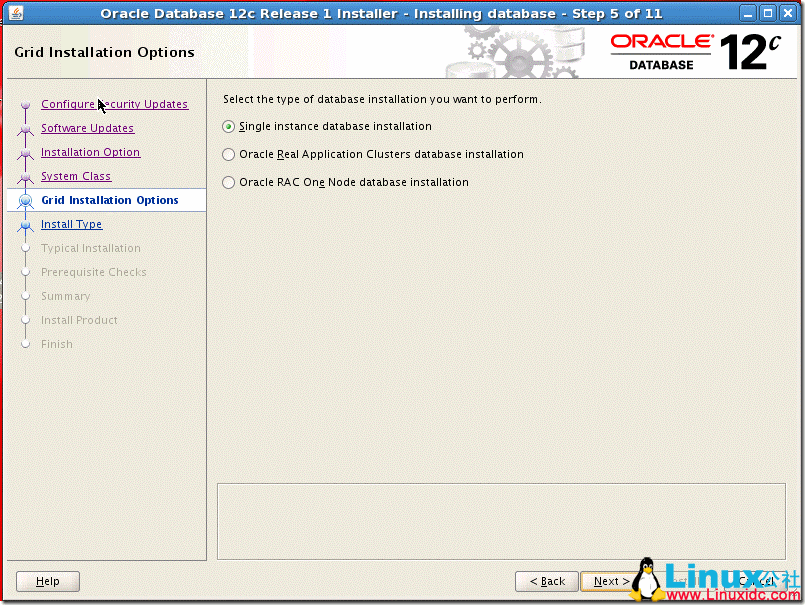
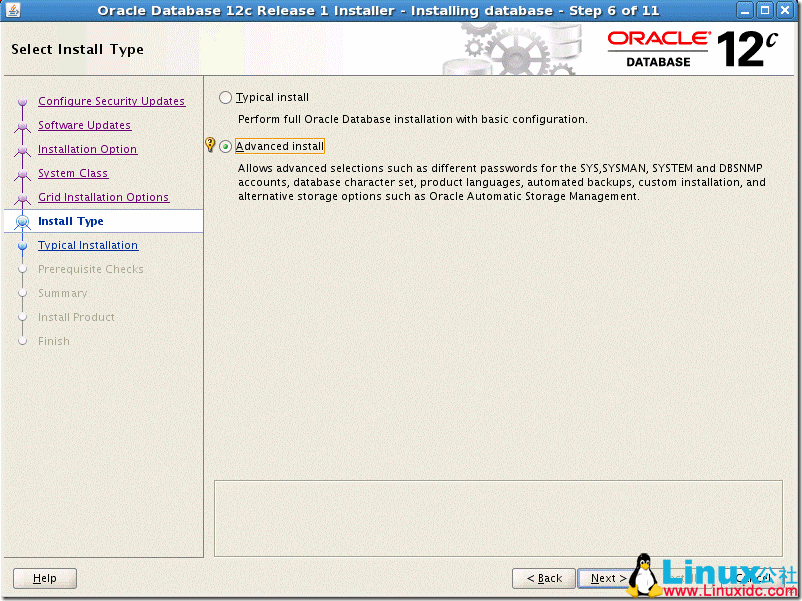
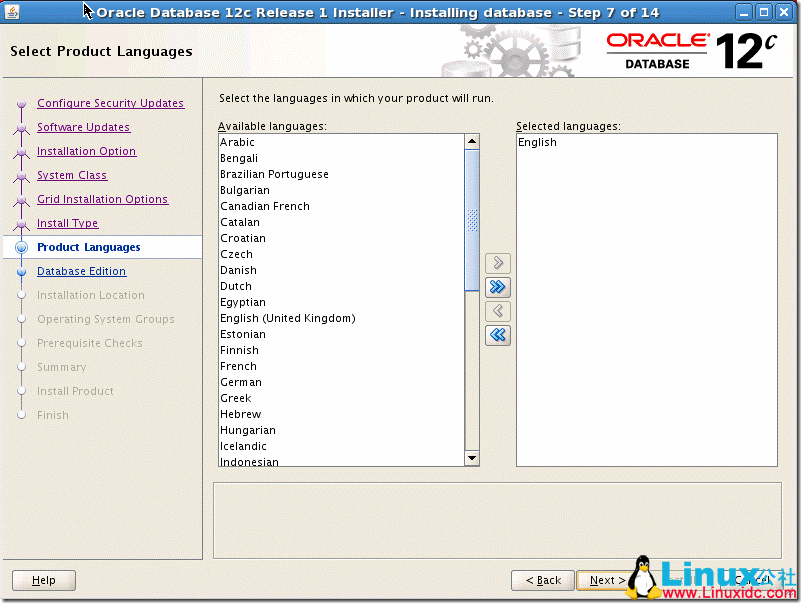
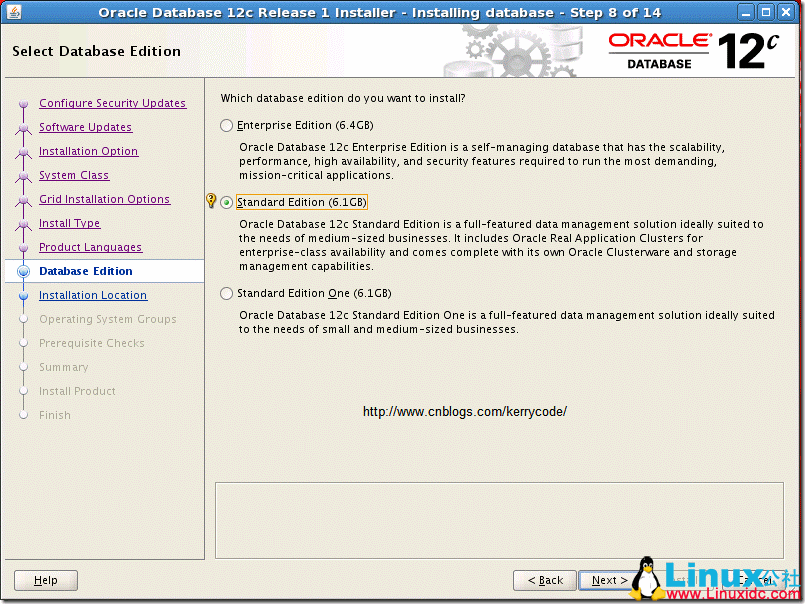
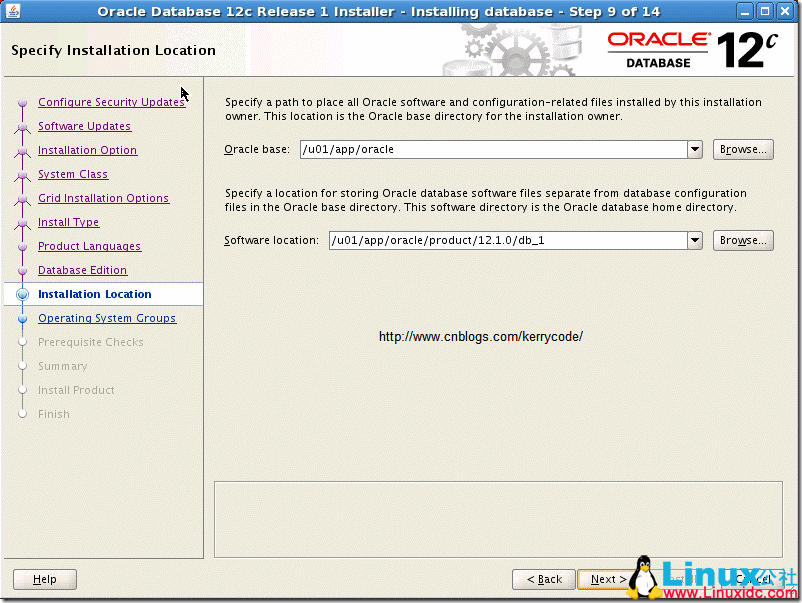
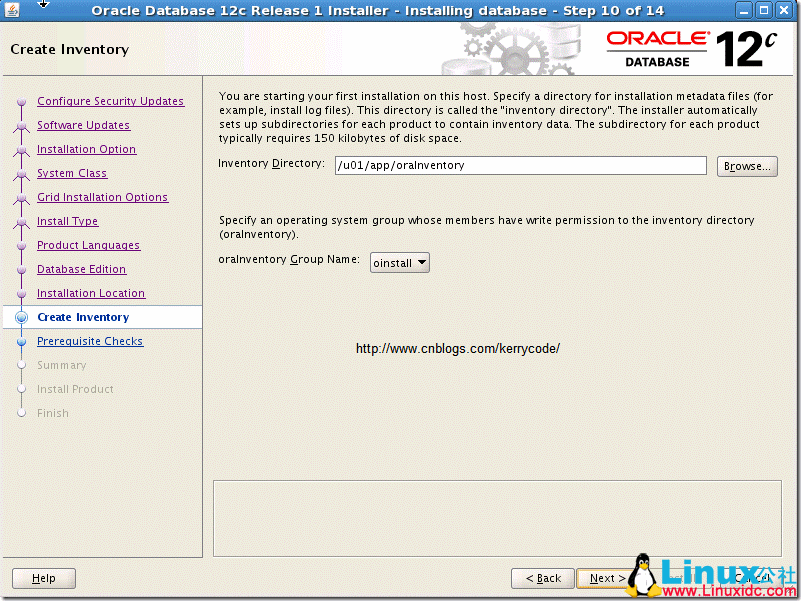
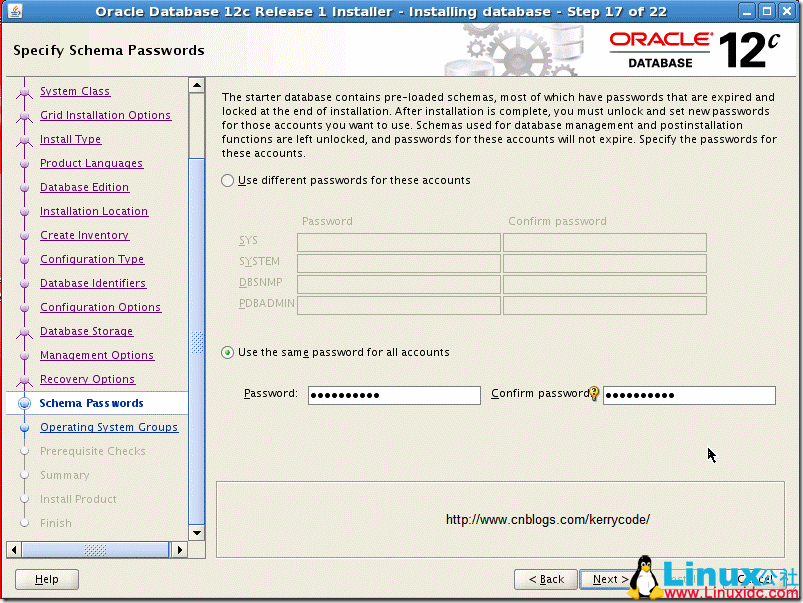
在这一步时,无法继续,因为 oracle 账户无法创建 oraInventory 目录,所以必须先创建该用户并授权
[root@getoraclelnx01 ~]# mkdir -p /u01/app/oraInventory
[root@getoraclelnx01 ~]# chown -R oracle:oinstall /u01/app/oraInventory
[root@getoraclelnx01 ~]# chmod -R 775 /u01/app/oraInventory
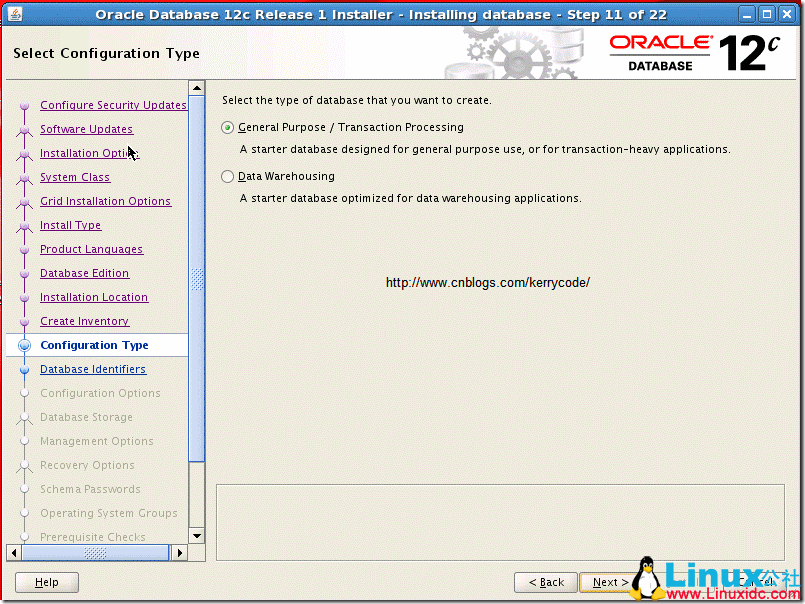



下载 Oracle Database 12cRelease 1 安装介质
官方的下载地址:
1:http://www.oracle.com/technetwork/database/enterprise-edition/downloads/index.html
2:https://edelivery.oracle.com/EPD/Download/get_form?egroup_aru_number=16496132
URL 地址 2 需要先注册,然后才能登陆下载,注册登陆界面https://edelivery.oracle.com

关于这两者有啥区别:听一个同事说,用 metalink 账号下载的安装文件完整一些。具体情况是不是如此,还不得而知。
地址 1 下载的文件为:
linuxamd64_12c_database_1of2.zip
linuxamd64_12c_database_2of2.zip
地址 2 下载的文件为:
V38500-01_1of2.zip
V38500-01_2of2.zip
2)检查硬件要求(Check Hardware Requirements)
2.1 Check CPU
[root@getoraclelnx01 tmp]#
[root@getoraclelnx01 tmp]# grep “model name” /proc/cpuinfo
model name : Intel(R) Xeon(R) CPU E5-2680 0 @ 2.70GHz
model name : Intel(R) Xeon(R) CPU E5-2680 0 @ 2.70GHz
model name : Intel(R) Xeon(R) CPU E5-2680 0 @ 2.70GHz
model name : Intel(R) Xeon(R) CPU E5-2680 0 @ 2.70GHz
model name : Intel(R) Xeon(R) CPU E5-2680 0 @ 2.70GHz
model name : Intel(R) Xeon(R) CPU E5-2680 0 @ 2.70GHz
model name : Intel(R) Xeon(R) CPU E5-2680 0 @ 2.70GHz
model name : Intel(R) Xeon(R) CPU E5-2680 0 @ 2.70GHz
[root@getoraclelnx01 tmp]# cat /proc/cpuinfo | grep “processor” | wc -l
8
[root@getoraclelnx01 tmp]# cat /proc/cpuinfo | grep “physical id” | sort | uniq | wc -l
4
[root@getoraclelnx01 tmp]#

2.2 Check Memory
[root@getoraclelnx01 tmp]# grep MemTotal /proc/meminfo
MemTotal: 24736752 kB
[root@getoraclelnx01 tmp]# grep SwapTotal /proc/meminfo
SwapTotal: 37748728 kB
[root@getoraclelnx01 tmp]# free -g
total used free shared buffers cached
Mem: 23 7 16 0 0 5
-/+ buffers/cache: 1 22
Swap: 35 0 35
[root@getoraclelnx01 tmp]#

Oracle 12c 对系统内存的最低要求为 1G,推荐 2G 或更大的内存,从上面结果可以知道系统内存 23G,完全满足要求。
Oracle 对交换分区(Swap Space)的推荐设置如下,这里 Swap Space 为 35G,不是 16G, 需要做一下调整。

2.3 Check Disk Capacity

Oracle 12c 企业版的需要 6.4G 大小的磁盘空间,标准版需要 6.1G 大小的磁盘空间。/tmp 需要至少 1G 的大小。从上面结果得知,磁盘空间完全满足。
3)检查软件要求(Checking the Software Requirements)
3.1 操作系统版本检测
Oracle 12 c 只支持 64 位的 Linux 系统。不支持 32Linux 平台,这也许是以后的趋势了。Operating System Requirements for x86-64 Linux Platforms。Oracle 的官方文档明确列出了支持下面三个 Linux 版本
- Supported Oracle Linux 6 and Red Hat Enterprise Linux 6 Distributions for x86-64
- Supported Oracle Linux 5 and Red Hat Enterprise Linux 5 Distributions for x86-64
- Supported SUSE Distributions for x86-64
[root@getoraclelnx01 /]# uname -m
x86_64
[root@getoraclelnx01 /]# uname -r
2.6.32-200.13.1.el5uek
[root@getoraclelnx01 /]# more /etc/RedHat-release
Red Hat Enterprise Linux Server release 5.7 (Tikanga)
[root@getoraclelnx01 ~]# uname -a
Linux getoraclelnx01.gfg1.esquel.com 2.6.32-200.13.1.el5uek #1 SMP Wed Jul 27 21:02:33 EDT 2011 x86_64 x86_64 x86_64 GNU/Linux
[root@getoraclelnx01 Server]# lsb_release -id
Distributor ID: EnterpriseEnterpriseServer
Description: Enterprise Linux Enterprise Linux Server release 5.7 (Carthage)
[root@getoraclelnx01 Server]#
3.2 检查 oracle 12c 所需包
关于 Oracle 12c 所需包,从官方文档看,不同版本的操作系统似乎有所不同,Oracle Linux 5 and Red Hat Enterprise Linux 5 需要安装下面一些包
binutils-2.17.50.0.6 compat-libstdc++-33-3.2.3 compat-libstdc++-33-3.2.3 (32 bit) gcc-4.1.2 gcc-c++-4.1.2 glibc-2.5-58 glibc-2.5-58 (32 bit) glibc-devel-2.5-58 glibc-devel-2.5-58 (32 bit) ksh libaio-0.3.106 libaio-0.3.106 (32 bit) libaio-devel-0.3.106 libaio-devel-0.3.106 (32 bit) libgcc-4.1.2 libgcc-4.1.2 (32 bit) libstdc++-4.1.2 libstdc++-4.1.2 (32 bit) libstdc++-devel 4.1.2 libXext-1.0.1 libXext-1.0.1 (32 bit) libXtst-1.0.1 libXtst-1.0.1 (32 bit) libX11-1.0.3 libX11-1.0.3 (32 bit) libXau-1.0.1 libXau-1.0.1 (32 bit) libXi-1.0.1 libXi-1.0.1 (32 bit) make-3.81 sysstat-7.0.2 |
rpm -q binutils compat-libstdc++ gcc gcc-c++ glibc glibc-devel ksh libaio libaio-devel libgcc libstdc++ libstdc++-devel libXext libXtst libX11 libXau libXi make sysstat

如上所示,还需要安装包 compat-libstdc++ 和 libaio-devel 相关包

[root@getoraclelnx01 Server]# rpm -ivh compat-libstdc++-33-3.2.3-61.i386.rpm
warning: compat-libstdc++-33-3.2.3-61.i386.rpm: Header V3 DSA signature: NOKEY, key ID 1e5e0159
Preparing… ########################################### [100%]
package compat-libstdc++-33-3.2.3-61.i386 is already installed
[root@getoraclelnx01 Server]# rpm -ivh compat-libstdc++-33-3.2.3-61.x86_64.rpm
warning: compat-libstdc++-33-3.2.3-61.x86_64.rpm: Header V3 DSA signature: NOKEY, key ID 1e5e0159
Preparing… ########################################### [100%]
package compat-libstdc++-33-3.2.3-61.x86_64 is already installed
[root@getoraclelnx01 Server]# ls *libaio-devel*
libaio-devel-0.3.106-5.i386.rpm libaio-devel-0.3.106-5.x86_64.rpm
[root@getoraclelnx01 Server]# rpm -ivh libaio-devel-0.3.106-5.i386.rpm
warning: libaio-devel-0.3.106-5.i386.rpm: Header V3 DSA signature: NOKEY, key ID 1e5e0159
Preparing… ########################################### [100%]
1:libaio-devel ########################################### [100%]
[root@getoraclelnx01 Server]# rpm -ivh libaio-devel-0.3.106-5.x86_64.rpm
warning: libaio-devel-0.3.106-5.x86_64.rpm: Header V3 DSA signature: NOKEY, key ID 1e5e0159
Preparing… ########################################### [100%]
1:libaio-devel ########################################### [100%]
[root@getoraclelnx01 Server]#
如上所示,既可以用 rpm 安装,也可以用 yum 本地源进行安装,这个就看那个方便以及个人的喜好、习惯了。一般推荐用 yum 安装,不过需要进行配置。具体可以参见我的博客。
4)系统配置准备
4.1 创建 Oracle 用户和用户组
[root@getoraclelnx01 Server]# groupadd dba
[root@getoraclelnx01 Server]# groupadd oinstall
[root@getoraclelnx01 Server]# useradd -g oinstall -G dba oracle
[root@getoraclelnx01 Server]# id oracle
uid=502(oracle) gid=503(oinstall) groups=503(oinstall),502(dba)
[root@getoraclelnx01 Server]#

创建了 oracle 用户以及相关用户组后,需要设置 oracle 用户密码。
4.2 创建安装目录
[root@getoraclelnx01 Server]#
[root@getoraclelnx01 Server]# mkdir -p /u01/app/oracle
[root@getoraclelnx01 Server]# chown -R oracle:oinstall /u01/app/oracle
[root@getoraclelnx01 Server]# chmod -R 775 /u01/app/oracle
[root@getoraclelnx01 Server]#

4.3 Disable SELinux
[root@getoraclelnx01 ~]# /usr/sbin/sestatus
SELinux status: disabled
[root@getoraclelnx01 ~]# /usr/sbin/getenforce
Disabled
[root@getoraclelnx01 ~]#

从上面可以看出 SELinux 已经被禁用了,如果没有禁用,则可以通过下面命令禁用
getenforce (returns “Enforcing”)
setenforce 0
getenforce (returns “Permissive”)
End to restore it to enforcing
setenforce 1
getenforce (returns “Enforcing”)
[root@getoraclelnx01 os]# /usr/sbin/sestatus SELinux status: disabled [root@getoraclelnx01 os]# /usr/sbin/getenforce Disabled [root@getoraclelnx01 os]# Disable secure linux by editing the “/etc/selinux/config” file, making sure the SELINUX flag is set as follows. SELINUX=disabled |
4.4 修改系统内核参数
在修改系统内核参数前,你可以用命令先查看一下当前各类系统参数的值,亦或直接查看配置文件 /etc/sysctl.conf
[root@getoraclelnx01 ~]# getconf PAGESIZE
4096
[root@getoraclelnx01 ~]# sysctl -a | grep sem
kernel.sem = 250 32000 32 128
[root@getoraclelnx01 ~]# sysctl -a | grep shm
kernel.shmmax = 68719476736
kernel.shmall = 4294967296
kernel.shmmni = 4096
vm.hugetlb_shm_group = 0
[root@getoraclelnx01 ~]# sysctl -a | grep file-max
fs.file-max = 2414060
[root@getoraclelnx01 ~]# sysctl -a | grep ip_local_port_range
net.ipv4.ip_local_port_range = 32768 61000
[root@getoraclelnx01 ~]#

关于内核参数的一些设置建议,可以参考下面资料:
kernel.shmmax
关于内核参数 kernel.shmmax,oracle 建议,kernel.shmmax 的值不能少于物理内存的一半,而且要大于 Oracle 中 sga-max-size 的值,否则会造成 oracle 性能下降
一般 32bit 操作系统,直接设置为系统支持的最大内存即可,64bit 操作系统设置大于 sga-max-size 的值即可
如:当前内存为 2G 则 kernel.shmmax = 2*1024*1024=2097152
当前内存为 8G 则 kernel.shmmax = 7*1024*1024=7340032
Kernel.shmall
Shmall 指系统一次可以使用的共享内存段的最大数量,以页为单位。Oracle 默认设置为 kernel.shmall = 2097152
即最大 8G(2097152*4/1024/1024),(在调整 SGA 时需要注意,SGA 大小设置不可超过该值),根据系统内存大小和使用的不同可以参考如下:设置的一般规律
kernel.shmall = 8G/4k=8388608k/4k=2097152 — 内存 8G
kernel.shmall = 16G/4k=16777216k/4k=4194304 — 内存 16G
kernel.shmall = 32G/4k=33554432k/4k=8388608 — 内存 32G
(RedHat linux 系统中页大小为 4096 即 4K,实际环境以 getconf PAGE_SIZE 结果为准)
kernel.shmmni
shmmni ��系统共享内存段的最大数量
oracle 设置默认值为 4096,一般是足够用了,不需要调整
文件句柄数的相关内核参数设置
fs.file-max
fs.file-max 指系统能够打开最大的文件句柄数
oracle 建议设置为 65536,一般不用修改
信号的相关内核参数设置
kernel.sem
kernel.sem 是指 semmsl,semmns,semopm,semmni 这 4 个参数
semmsl 指每个线号集的最大信号数,Oracle 建议是设置为 oracle 的最大进程数 +10
semmni 指整个系统的信号集的最大数量
semmns 指整个系统的信号总数,也就是 semmni*semmsl 的结果
semopm 指每个 semop 系统调用可以执行的信号操作的最大数量
oracle 默认设置
semmsl=250
semmns=3200
semopm=100
semmni=128
即 kernel.sem= 250 3200 100 128
例:在 oracle ora.init 文件参数中设置 PROCESSES 参数为 5000
则 semmsl=5010,semmni=128,semmns=semmsl* semmni=641280
另外 semopm 建议设置等于 semmsl 值即 5010
那么 kernel.sem=5010 641280 5010 128
网络相关的内核参数设置
net.core.rmem_default
net.core.rmem_default 指网络套接字的默认接收缓冲区的大小,oracle 建议设置为 265K 即 262144
net.core.rmem_max
net.core.rmem_max 指网络套接字的最大接收缓冲区的大小,oracle10g 及以前版本建议设置为 256k 即 262144
oracle11g 建议设置为 4M 即 4194304
net.core.wmem_default
net.core.wmem_default 指网络套接字的默认发送缓冲区的大小,oracle 建议设置为 265K 即 262144
net.core.wmem_max
net.core.wmem_max 指网络套接字的最大发送缓冲区的大小,oracle10g 及以前版本建议设置为 256k 即 262144
oracle11g 建议设置为 1M 即 1048576
net.ipv4.ip_local_port_range
net.ipv4.ip_local_port_range,指本地的允许打开随机端口范围
oracle10g 前建议端口范围为 1024 65000,oracle11g 建议端口范围为:
65500 并忽略 oracle 安装程序任何关于这个参数的警告
Asynchronous I/ O 相关的内核参数设置
fs.aio-max-nr
fs.aio-max-nr 指系统允许的最大的异步 IO 请求大小
oracle 默认设置为 1M 即 1048576,一般不用更改
修改前最后先备份一下 /etc/sysctl.conf,以防万一。
[root@getoraclelnx01 ~]# cp /etc/sysctl.conf /etc/sysctl.conf.bak
[root@getoraclelnx01 ~]# vi /etc/sysctl.conf 添加或修改下面参数
kernel.shmmax = 68719476736
kernel.shmall = 6029312
kernel.shmmni = 4096
kernel.sem =250 32000 100 128
net.core.rmem_default = 262144
net.core.rmem_max = 4194304
net.core.wmem_default = 262144
net.core.wmem_max = 262144
net.ipv4.ip_local_port_range =9000 65500
fs.file-max=65536
fs.aio-max-nr=1048576
kernel.shmall =physical RAM size / pagesize (getconf PAGESIZE) — If the defaults are greater then leave it.
kernel.shmall = 内存大小 /4k=23G*1024*1024/4k = 6029312
kernel.shmmax = 20*1024*1024=20971520 而默认的为 68719476736,那么使用默认值
修改完成后保存,然后运行 sysctl -p 命令使之生效

4.5 设置用户限制
在/etc/security/limits.conf 中添加如下配置。
oracle soft nproc 2047
oracle hard nproc 16384
oracle soft nofile 1024
oracle hard nofile 65536
oracle soft stack 10240
oracle hard stack 10240
Add the following line to the “/etc/pam.d/login” file,
if it does not already exist.
session required /lib/security/pam_limits.so
session required pam_limits.so
Add the following to
/etc/profile if Oracle user will use the bash shell.
if [$USER = “oracle”]; then
ulimit -u 16384
ulimit -n 65536
fi
4.6 配置环境变量
首先切换到 oracle 账户,编辑修改主目录下 .bash_profile

TMP=/tmp; export TMP
TMPDIR=$TMP; export TMPDIR
ORACLE_BASE=/u01/app/oracle; export ORACLE_BASE
ORACLE_HOME=$ORACLE_BASE/product/12.1.0/db_1; export ORACLE_HOME
ORACLE_SID=epps; export ORACLE_SID
ORACLE_TERM=xterm; export ORACLE_TERM
PATH=/usr/sbin:$PATH; export PATH
PATH=$ORACLE_HOME/bin:$PATH; export PATH
LD_LIBRARY_PATH=$ORACLE_HOME/lib:/lib:/usr/lib; export LD_LIBRARY_PATH
CLASSPATH=$ORACLE_HOME/JRE:$ORACLE_HOME/jlib:$ORACLE_HOME/rdbms/jlib; export CLASSPATH
if [$USER = “oracle”]; then
if [$SHELL = “/bin/ksh”]; then
ulimit -p 16384
ulimit -n 65536
else
ulimit -u 16384 -n 65536
fi
fi
使配置生效
[oracle@getoraclelnx01 ~]$ source .bash_profile
[oracle@getoraclelnx01 ~]$
更多详情见请继续阅读下一页的精彩内容:http://www.linuxidc.com/Linux/2017-12/149043p2.htm
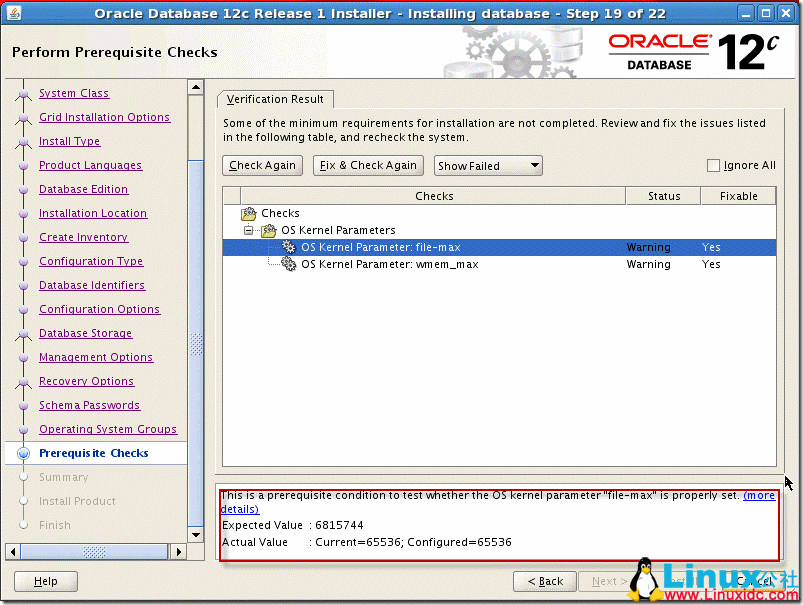
验证参数时,fs.file-max 设置为 65536,但是 Oracle 推荐使用 68157744,net.core.wmem_max 大小为 262144,oracle 推荐使用 1048576,修改内核参数,运行 sysctl - p 使之生效。然后重新验证通过
[root@getoraclelnx01 ~]# sysctl -p
net.ipv4.ip_forward = 0
net.ipv4.conf.default.rp_filter = 2
net.ipv4.conf.default.accept_source_route = 0
kernel.sysrq = 0
kernel.core_uses_pid = 1
net.ipv4.tcp_syncookies = 1
kernel.msgmnb = 65536
kernel.msgmax = 65536
kernel.shmmax = 68719476736
kernel.shmall = 6029312
kernel.shmmni = 4096
kernel.sem = 250 32000 100 128
net.core.rmem_default = 262144
net.core.rmem_max = 4194304
net.core.wmem_default = 262144
net.core.wmem_max = 1048576
net.ipv4.ip_local_port_range = 9000 65500
fs.file-max = 6815744
fs.aio-max-nr = 1048576
[root@getoraclelnx01 ~]#
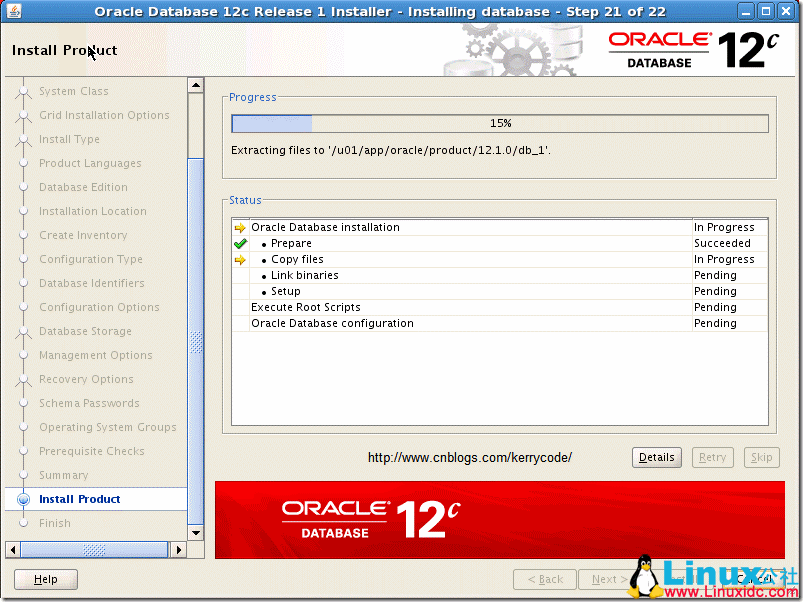
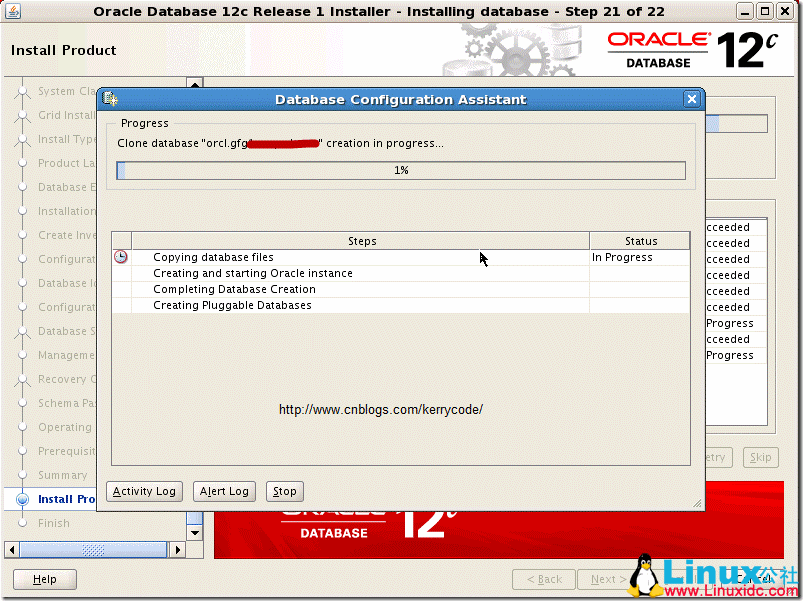
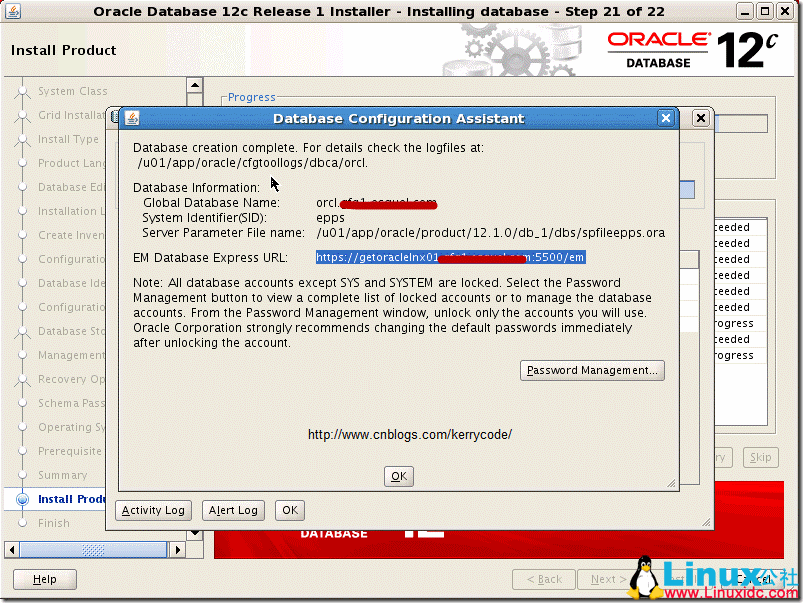
运行过程会提示让你用 root 账户执行 2 个脚本,你将脚本的文件拿下来,在 root 账户下执行即可。

更多 Oracle 相关信息见Oracle 专题页面 http://www.linuxidc.com/topicnews.aspx?tid=12
本文永久更新链接地址:http://www.linuxidc.com/Linux/2017-12/149043.htm


