共计 7682 个字符,预计需要花费 20 分钟才能阅读完成。
1. 配置网卡及 Ubuntu 仓库源
1)配置网卡 eth0,本地内网网卡无需指定网关和域名服务器
network:
    version: 2
    renderer: networkd
    ethernets:
        eth0:
            dhcp4: no
            addresses: [192.168.1.30/24]
2)配置网卡 eth1,要保持以下两个字节的严格缩进,否则会导致网卡起不来
root@ubuntu1804:~# vim /etc/netplan/02-netcfg.yaml
network:
         version: 2
         renderer: networkd
         ethernets:
                 eth1:
                        dhcp4: yes
                        addresses: [192.168.10.107/24]
                        gateway4: 192.168.10.1
                        nameservers:
                                 addresses: [223.6.6.6]
3)配置阿里云仓库源
root@ubuntu1804:~# vim /etc/apt/sources.list
deb http://mirrors.aliyun.com/ubuntu/ bionic main restricted universe multiverse
deb-src http://mirrors.aliyun.com/ubuntu/ bionic main restricted universe multiverse

deb http://mirrors.aliyun.com/ubuntu/ bionic-security main restricted universe multiverse
deb-src http://mirrors.aliyun.com/ubuntu/ bionic-security main restricted universe multiverse

deb http://mirrors.aliyun.com/ubuntu/ bionic-updates main restricted universe multiverse
deb-src http://mirrors.aliyun.com/ubuntu/ bionic-updates main restricted universe multiverse

deb http://mirrors.aliyun.com/ubuntu/ bionic-proposed main restricted universe multiverse
deb-src http://mirrors.aliyun.com/ubuntu/ bionic-proposed main restricted universe multiverse

deb http://mirrors.aliyun.com/ubuntu/ bionic-backports main restricted universe multiverse
deb-src http://mirrors.aliyun.com/ubuntu/ bionic-backports main restricted universe multiverse
4)更新仓库
root@ubuntu1804:~# apt update
root@ubuntu1804:~# apt update
Get:1 http://mirrors.aliyun.com/ubuntu bionic InRelease [242 kB]
Get:2 http://mirrors.aliyun.com/ubuntu bionic-security InRelease [88.7 kB]
Get:3 http://mirrors.aliyun.com/ubuntu bionic-updates InRelease [88.7 kB]
Get:4 http://mirrors.aliyun.com/ubuntu bionic-proposed InRelease [242 kB]
……
2. 安装 gitlab 包
1)下载 gitlab-ce 社区版包
root@ubuntu1804:~# ls /data/
gitlab-ce_11.11.5-ce.0_amd64.deb
2)安装 gitlab,要确定 gitlab 包适合此版本 ubuntu 系统
root@ubuntu1804:/data# dpkg -i gitlab-ce_11.11.5-ce.0_amd64.deb
root@ubuntu1804:/data# dpkg -i gitlab-ce_11.11.5-ce.0_amd64.deb
Selecting previously unselected package gitlab-ce.
(Reading database ... 69294 files and directories currently installed.)
Preparing to unpack gitlab-ce_11.11.5-ce.0_amd64.deb ...
Unpacking gitlab-ce (11.11.5-ce.0) …   #等待安装完成
3)此时无法识别主机,需修改 git 配置文件,指定主机
root@ubuntu1804:/data# vim /etc/gitlab/gitlab.rb
    external_url 'http://192.168.1.30'  #修改指定的 ip 主机
4)配置完进行 gitlab 初始化
root@ubuntu1804:/data# gitlab-ctl reconfigure3. 命令操作
1)进入数据库命令行
root@ubuntu1804:~# gitlab-psql
gitlabhq_production-# \db
                 List of tablespaces
        Name    |    Owner    | Location
------------+-------------+----------
 pg_default | gitlab-psql |
 pg_global  | gitlab-psql |
(2 rows)
2)查看 gitlab 的运行状态
root@ubuntu1804:~# gitlab-ctl status
run: alertmanager: (pid 4704) 1841s; run: log: (pid 4373) 1867s
run: gitaly: (pid 4475) 1844s; run: log: (pid 3483) 2026s
run: gitlab-monitor: (pid 4553) 1843s; run: log: (pid 4169) 1887s
run: gitlab-workhorse: (pid 4512) 1844s; run: log: (pid 4027) 1910s
run: logrotate: (pid 4073) 1900s; run: log: (pid 4089) 1899s
run: nginx: (pid 4040) 1906s; run: log: (pid 4060) 1905s
run: node-exporter: (pid 4537) 1843s; run: log: (pid 4146) 1892s
run: postgres-exporter: (pid 4727) 1840s; run: log: (pid 4409) 1863s
run: postgresql: (pid 3659) 2012s; run: log: (pid 3689) 2011s
run: prometheus: (pid 4578) 1842s; run: log: (pid 4245) 1875s
run: redis: (pid 3417) 2034s; run: log: (pid 3442) 2031s
run: redis-exporter: (pid 4561) 1842s; run: log: (pid 4202) 1881s
run: sidekiq: (pid 3967) 1920s; run: log: (pid 3983) 1916s
run: unicorn: (pid 3908) 1926s; run: log: (pid 3957) 1923s
3)gitlab 服务命令行的启动、停止、重启
gitlab-ctl start/stop/restart gitlab4) 查看 gitlab 的 nginx 服务组件的日志
root@ubuntu1804:~# gitlab-ctl tail nginx
==> /var/log/gitlab/nginx/current <==

==> /var/log/gitlab/nginx/access.log <==

==> /var/log/gitlab/nginx/error.log <==

==> /var/log/gitlab/nginx/gitlab_error.log <==

==> /var/log/gitlab/nginx/gitlab_access.log <==
192.168.1.1 - - [21/Jul/2019:10:36:00 +0800] "GET / HTTP/1.1" 302 99 """Mozilla/5.0 (Windows NT 10.0; WOW64) AppleWebKit/537.36 (KHTML, like Gecko) Chrome/74.0.3724.8 Safari/537.36"
……
4. 浏览器访问 gitlab
1)设置新的密码,默认登录的用户为 root

2)登录后默认的界面

3)点击 setting,在点击 sign-up 可以设置是否允许创建新用户

4)去掉对勾,禁止创建新账户

5)再点击保存修改生效

6)此时登出账号时,就没有注册用户的选项,只能用已有的账户登录

7)创建一个新用户时会受到邮件通知

8)创建不同的项目、组、账户,将特定用户放到特定的组,实现特定用户对某些项目有查看权限

9)返回到项目列表,并进入一个项目

10)点击 New file

11)输入一个索引测试页面,再点击提交

12)查看项目的 clone 地址

13)客户端 clone
root@ubuntu1804:/data/src# git clone http://192.168.1.30/root/web-page.git
Cloning into 'web-page'...
remote: Enumerating objects: 3, done.
remote: Counting objects: 100% (3/3), done.
remote: Total 3 (delta 0), reused 0 (delta 0)
Unpacking objects: 100% (3/3), done.
14)项目代码克隆成功
root@ubuntu1804:/data/src# ls
web-page
root@ubuntu1804:/data/src# cat web-page/index.html
<h>hello jie!</h1>
15)在客户端修改 index.html
root@ubuntu1804:/data/src/web-page# cat index.html
<h>hello jie!</h1>
<h>hello kobe!</h1>
<h>hello curry!</h1>
<h>hello rose!</h1>
16)先添加到本地暂存区(提交代码到 gitlab 服务器时,命令都必须在克隆下来的文件夹环境中执行)
root@ubuntu1804:/data/src/web-page# git add index.html17)在提到工作区
root@ubuntu1804:/data/src/web-page# git commit -m 'v6'
[master 1202723] v6
 1 file changed, 4 insertions(+), 1 deletion(-)
18)然后在直接提交到 gitlab 仓库 web 端
root@ubuntu1804:/data/src/web-page# git push     #其中 git pull 为获取代码到本地
Username for 'http://192.168.1.30': root     #要求输入登录 gitlab 的 web 端的用户名
Password for 'http://root@192.168.1.30':    #再输入登录 gitlab 的 web 端的用户密码
Counting objects: 3, done.
Delta compression using up to 4 threads.
Compressing objects: 100% (2/2), done.
Writing objects: 100% (3/3), 268 bytes | 268.00 KiB/s, done.
Total 3 (delta 0), reused 0 (delta 0)
To http://192.168.1.30/root/web-page.git
     ecc001d..1202723  master -> master     #提交完成
19)在 web 端 gitlab 仓库查看,项目 index.html 内容被更改,说明成功提交

20)再次修改 index.html 文件,然后在上传 v7 版本的 index.html 到 gitlab 的服务端

5.gitlab 的一些基本命令操作(以下命令操作命令都必须在克隆下来的文件夹环境中执行,否则无法执行令)
1)客户端查看当前版本号为 v7
root@ubuntu1804:/data/src/web-page# git reset --hard HEAD
HEAD is now at 952e66b v7
2)查看 v7 版索引
root@ubuntu1804:/data/src/web-page# cat index.html
<h>hello jie!</h1>
<h>hello kobe!</h1>
<h>hello curry!</h1>
<h>hello rose!</h1>
<h>hello jordan!</h1>
<h>hello jordan!</h1>
<h>hello howard!</h1>
3)若想回滚到 v6 版本,则操作如下命令进行回滚
root@ubuntu1804:/data/src/web-page# git reset --hard HEAD^
HEAD is now at 9cb6bf6 v6
4)再查看 v6 版本索引文件
root@ubuntu1804:/data/src/web-page# cat index.html
<h>hello jie!</h1>
<h>hello kobe!</h1>
<h>hello curry!</h1>
<h>hello rose!</h1>
<h>hello jordan!</h1>
<h>hello jordan!</h1>
5)查看每次提交的目标代码 id 号,
root@ubuntu1804:/data/src/web-page# git reflog
9cb6bf6 (HEAD -> master) HEAD@{0}: reset: moving to HEAD^
952e66b (origin/master, origin/HEAD) HEAD@{1}: reset: moving to HEAD
952e66b (origin/master, origin/HEAD) HEAD@{2}: commit: v7
9cb6bf6 (HEAD -> master) HEAD@{3}: commit: v6
03e27be (tag: v1.4) HEAD@{4}: commit: v7
1202723 HEAD@{5}: commit: v6
ecc001d HEAD@{6}: clone: from http://192.168.1.30/root/web-page.git
6)也可指定目标代码 id 号,实现回滚
root@ubuntu1804:/data/src/web-page# git reset --hard 9cb6bf67) 查看当前所属的分支,默认为 master 主分支
root@ubuntu1804:/data/src/web-page# git branch
* master
8)创建并切换到新分支
root@ubuntu1804:/data/src/web-page# git checkout -b operations
Switched to a new branch 'operations'
9)再次列出所有分支分支
root@ubuntu1804:/data/src/web-page# git branch
    master
* operations
10)切换回到主分支
root@ubuntu1804:/data/src/web-page# git checkout master
Switched to branch 'master'
Your branch is behind 'origin/master' by 1 commit, and can be fast-forwarded.
    (use "git pull" to update your local branch)
root@ubuntu1804:/data/src/web-page# git branch
* master
    operations
6. 数据备份
1)备份前先要暂停 gitlab 的两个数据服务,避免在备份时开发人员继续提交代码至 gitlab 中,导致数据不完整
root@ubuntu1804:~# gitlab-ctl stop sidekiq
ok: down: sidekiq: 0s, normally up
root@ubuntu1804:~# gitlab-ctl stop nunicorn
2)手动创建备份
root@ubuntu1804:~# gitlab-rake gitlab:backup:create
3)gitlab 默认备份数据名称及路径,为压缩文件
root@ubuntu1804:~# ll /var/opt/gitlab/backups/1563709800_2019_07_21_11.11.5_gitlab_backup.tar
-rw------- 1 git git 92160 Jul 21 19:50 /var/opt/gitlab/backups/1563709800_2019_07_21_11.11.5_gitlab_backup.tar
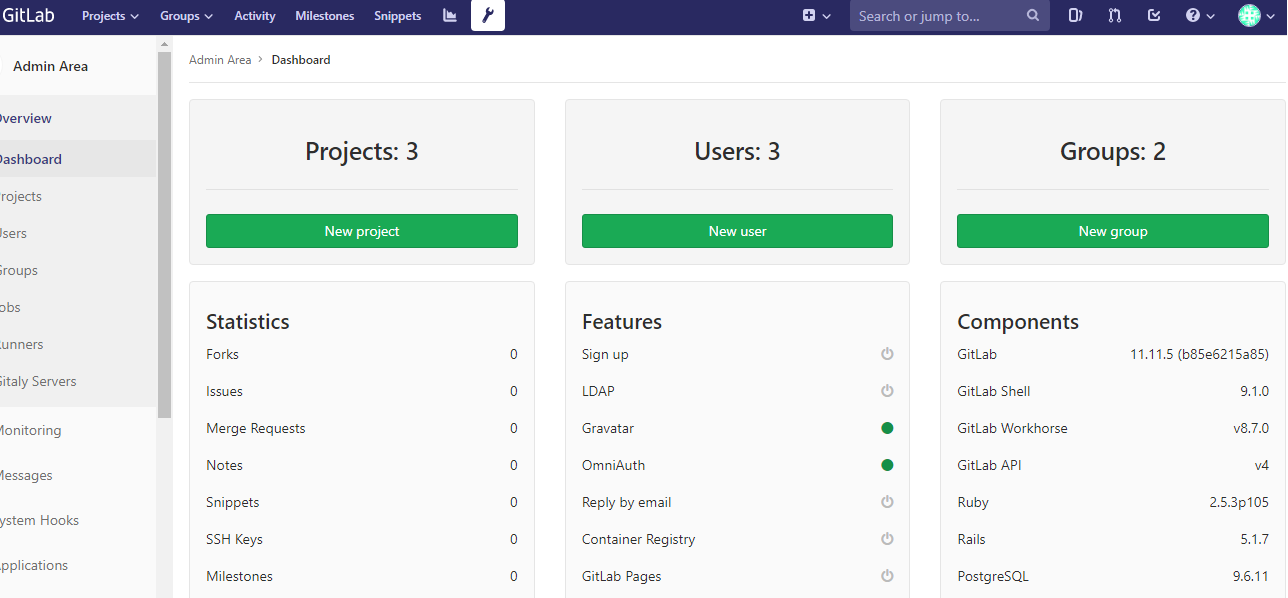
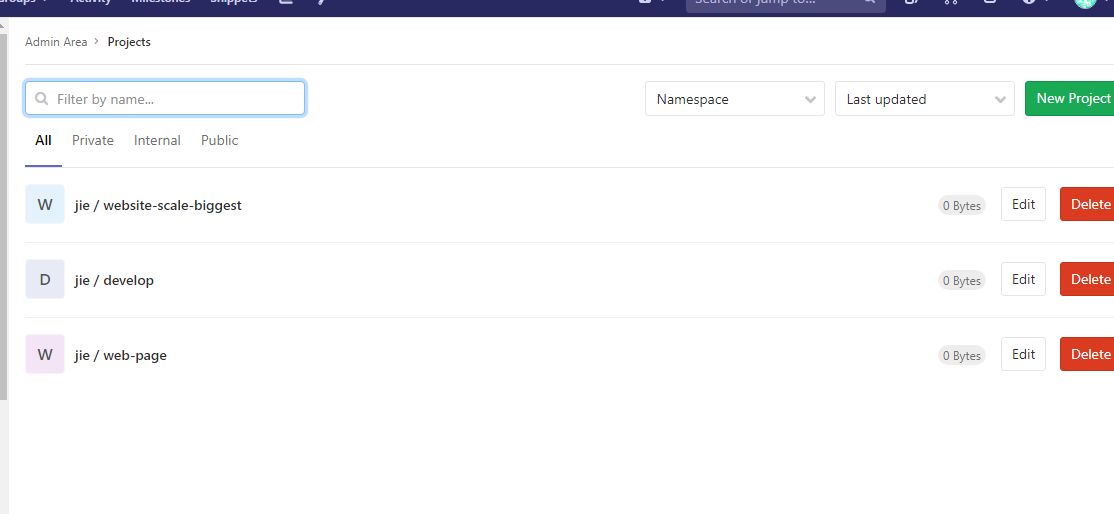
4)在 gitlab 的 web 端目前存在的项目、用户和组

5)先删除掉几个项目、用户或组

7. 客户端数据恢复
1)在恢复数据之前也要先关闭 gitlab 的两个数据服务
root@ubuntu1804:~# gitlab-ctl stop sidekiq
ok: down: sidekiq: 0s, normally up
root@ubuntu1804:~# gitlab-ctl stop unicorn
ok: down: unicorn: 0s, normally up
2)执行恢复备份数据命令
root@ubuntu1804:~# gitlab-rake gitlab:backup:restore /var/opt/gitlab/backups/1563709800_2019_07_21_11.11.5_gitlab_backup.tar3)在开启 gitlab 的两个数据服务
oot@ubuntu1804:~# gitlab-ctl start sidekiq
ok: run: sidekiq: (pid 80094) 1s
root@ubuntu1804:~# gitlab-ctl start  unicorn
ok: run: unicorn: (pid 80191) 0s
4)gitlab 的 web 端访问测试,可以看到删除的项目、用户、组全部恢复


正文完
星哥玩云-微信公众号


