")

共计 17325 个字符,预计需要花费 44 分钟才能阅读完成。
主机环境 RedHat Linux 6.5 64 位
实验环境 服务端 1 ip 172.25.25.1
服务端 2 ip 172.25.25.2
安装包 nagios-plugins-2.1.1.tar.gz
nagios-cn-3.2.3.tar.bz2
gd-devel-2.0.35-11.el6.x86_64.rpm
nrpe-2.15.tar.gz
防火墙状态:关闭
Selinux 状态:Disabled
1. 安装 nagios、监控本地及测试
A)配置安装 nagios 及插件
[root@sever1 mnt]# ls
nagios-plugins-2.1.1.tar.gz nagios-cn-3.2.3.tar.bz2
gd-devel-2.0.35-11.el6.x86_64.rpm
[root@sever1 mnt]# yum installgd-devel-2.0.35-11.el6.x86_64.rpm -y
[root@sever1 mnt]# useradd Nagios #创建系统用户 ngios
[root@sever1 mnt]# usermod -a -G nagcmd Nagios #将 nagios 添加到 nagcmd 附加组
[root@sever1 mnt]# usermod -a -G nagcmd apache #将 apache 也添加到 nagcnd 附加组
[root@sever1 mnt]# id Nagios #查看
uid=1001(nagios) gid=1001(nagios)groups=1001(nagios),1002(nagcmd)
[root@sever1 mnt]# id apache
uid=48(apache) gid=48(apache) groups=48(apache),1002(nagcmd)
[root@sever1 mnt]# tar jxf nagios-cn-3.2.3.tar.bz2 #解压
[root@sever1 mnt]# cd nagios-cn-3.2.3
[root@sever1 nagios-cn-3.2.3]# ./configure–with-command-group=nagcmd #配置
[root@sever1 nagios-cn-3.2.3]# make all
[root@sever1 nagios-cn-3.2.3]# make install #安装
[root@sever1 nagios-cn-3.2.3]# make install-init #安装脚本文件
[root@sever1 nagios-cn-3.2.3]# make install-config #安装配置文件
[root@sever1 nagios-cn-3.2.3]# make install-webconf
[root@sever1 nagios-cn-3.2.3]# cat /usr/local/nagios/etc/htpasswd.users #查看密码
nagiosadmin:gCWSDnqEHR45c
[root@sever1 nagios-cn-3.2.3]# htpasswd -c/usr/local/nagios/etc/htpasswd.users nagiosadmin #修改密码
New password:
Re-type new password:
Adding password for user nagiosadmin
[root@sever1 nagios-cn-3.2.3]# cat/usr/local/nagios/etc/htpasswd.usersnagiosadmin:QNeDXoEuaEVuI
[root@sever1 nagios-cn-3.2.3]# /etc/init.d/httpd start #开启 httpd
Stopping httpd: [OK]
[root@sever1 nagios-cn-3.2.3]# /usr/local/nagios/bin/nagios -v/usr/local/nagios/etc/nagios.cfg #校验 nagios 的语法
[root@sever1 nagios-cn-3.2.3]# /etc/init.d/nagios start #开启 nagios
Starting nagios: done.
# 安装 nagios 插件
[root@sever1 mnt]# tar zxf nagios-plugins-2.1.1.tar.gz #解压
[root@sever1 mnt]# cd nagios-plugins-2.1.1
[root@sever1 nagios-plugins-2.1.1]# ./config–with-nagios-user=nagios –with-nagios-group=nagios #配置
[root@sever1 nagios-plugins-2.1.1]# make #编译
[root@sever1 nagios-plugins-2.1.1]# make install #安装
B)添加本地服务
[root@server1 etc]# vimnagios.cfg
cfg_file=/usr/local/nagios/etc/objects/hosts.cfg #添加文件
cfg_file=/usr/local/nagios/etc/objects/services.cfg
# Definitions formonitoring the local (Linux) host
#cfg_file=/usr/local/nagios/etc/objects/localhost.cfg #标记 localhost 文件
[root@server1 etc]# cd objects/
[root@server1 objects]# cp -p localhost.cfg hosts.cfg
[root@server1 objects]# cp -p localhost.cfg services.cfg
[root@server1 objects]# vim hosts.cfg #主机配置文件
define host{#主机
use linux-server #使用的模板
host_name server1.example.com #主机名
alias Manager #别名
address 172.25.29.1 #ip
icon_image server.gif #下面几行是在拓扑图中的位置
statusmap_image server.gd2
2d_coords 500,200
3d_coords 500,200,100
}
define hostgroup{
hostgroup_name linux-servers ;The name of the hostgroup
alias Linux Servers ; Long name of the group
members * ; Comma separated list of hosts that belong to this group
}
[root@server1 objects]# vim service.cfg #服务配置文件
define servicegroup{#服务组
servicegroup_name 系统负荷检查
alias 负荷检查
membersserver1.example.com, 进程总数,server1.example.com, 登录用户数,server1.example.com, 根分区,server1.example.com, 交换空间利用率
}
define service{#服务
use local-service #使用的模板
host_name *
service_description PING
check_command check_ping!100.0,20%!500.0,60% #要传的参数
}
define service{
use local-service ; Name of service template to use
host_name server1.example.com
service_description 根分区
check_command check_local_disk!20%!10%!/
}
define service{
use local-service ; Name of service template to use
host_name server1.example.com
service_description 登录用户数
check_command check_local_users!20!50
}
define service{
use local-service ; Name of service template to use
host_name server1.example.com
service_description 进程总数
check_command check_local_procs!250!400!RSZDT
}
define service{
use local-service ; Name of service template to use
host_name server1.example.com
service_description 系统负荷
check_command check_local_load!5.0,4.0,3.0!10.0,6.0,4.0
}
define service{
use local-service ; Name of service template to use
host_name server1.example.com
service_description 交换空间利用率
check_command check_local_swap!20!10
}
define service{
use local-service ; Name of service template to use
host_name server1.example.com
service_description SSH
check_command check_tcp!22!1.0!10.0
notifications_enabled 0
}
define service{
use local-service ; Name of service template to use
host_name server1.example.com
service_description HTTP
check_command check_http
notifications_enabled 0
}
[root@server1 objects]# /etc/init.d/nagios reload #刷新
Running configuration check…done.
Reloading nagios configuration…done
C)测试 172.25.25.1/Nagios

更多详情见请继续阅读下一页的精彩内容 :http://www.linuxidc.com/Linux/2017-03/141600p2.htm
2. 远程监控服务端 2mysql 及测试
A)安装 mysql 及添加授权
服务端 2
[root@server2 ~]# yum install mysql-server -y #安装 mysql
[root@server2 ~]# /etc/init.d/mysqld start #开启 mysql
[root@server2 ~]# mysql_secure_installation #初始化,添加密码 RedHat
[root@server2 ~]# mysql -predhat #进入 mysql
mysql> create database nagdb; #添加 nagdb 库
Query OK, 1 row affected (0.00 sec)
mysql> grant select on nagdb.* to nagios@’172.25.25.1’identified by ‘redhat’;
Query OK, 0 rows affected (0.00 sec) #给 nagios 用户授予 nagdb 库的查看权限
mysql> Bye #退出
# 服务端 1,测试
[root@server1 objects]# ./check_mysql -H 172.25.25.2 -u nagios-p redhat -d nagdb
B)将 mysql 服务(服务端 2)添加到 nagios(服务端 1)
服务端 1
[root@server1 objects]# vim hosts.cfg #定义主机
define host{
use linux-server #调用的模版
host_name server2.example.com #主机名(command.cfg 中要调用的参数)
alias MYSQL #别名
address 172.25.25.2 #ip
icon_image server.gif
statusmap_image server.gd2 #坐标的定义
2d_coords 400,200
3d_coords 400,200,100
}
[root@server1 objects]# vim services.cfg #定义服务
####################check_mysql#######################
define service{
use local-service
host_name server2.example.com(调用 hosts.cfg 中的 host_name)
service_description MYSQL
check_command check_mysql!nagios!redhat!nagdb #command.cfg 中要调用的参数(命令名字!主机名!密码!数据库的名称)
}
[root@server1 objects]# vim commands.cfg #定义命令
# ‘check_mysql’ command definition
define command{
command_name check_mysql #命令的名字
command_line $USER1$/check_mysql -H $HOSTADDRESS$ -u$ARG1$ -p $ARG2$ -d $ARG3$ #调用的脚本绝对路径 -H 主机名(调用 hosts.cfg 中的 host_name)-u mysql 的用户名 -p 用户密码 -d 数据库的名称
}
[root@server1 objects]# /usr/local/nagios/bin/nagios -v/usr/local/nagios/etc/nagios.cfg #检查是否有语法错误
Total Warnings: 0
Total Errors: 0 #无语法错误
Things look okay – No serious problems were detected during thepre-flight check
[root@server1 objects]# /etc/init.d/nagios reload #刷新
Running configuration check…done.
Reloading nagios configuration…done
C)测试
点击拓扑图,添加 server2.example.com 成功

点击主机,查看两台主机

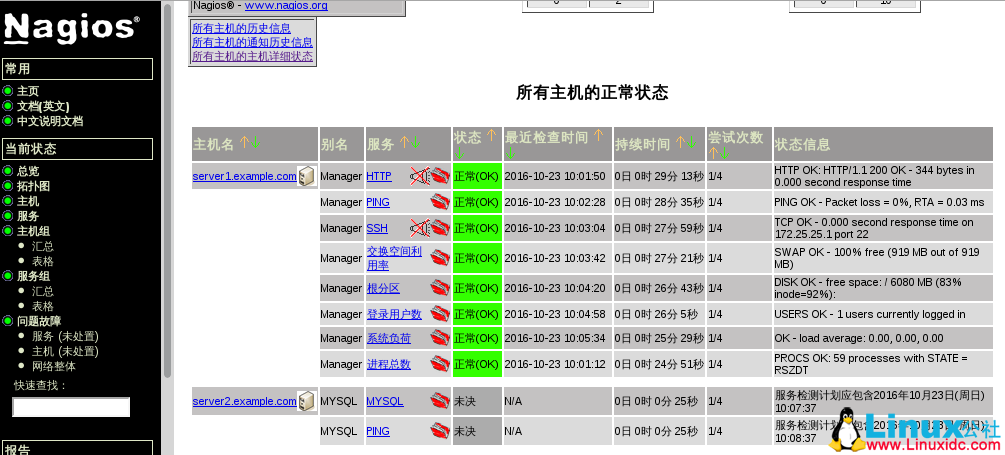
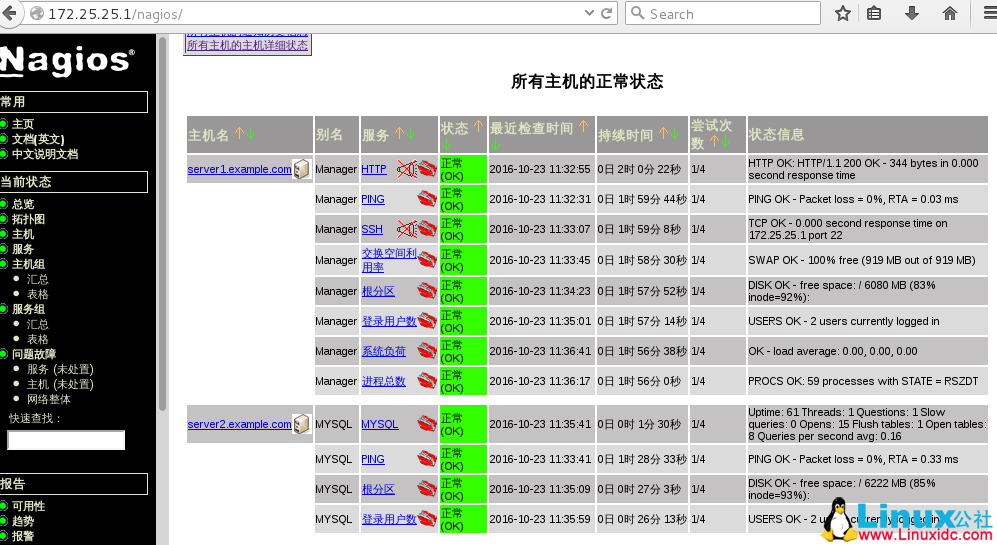
点击服务,如图
主机环境 RedHat Linux 6.5 64 位
实验环境 服务端 1 ip 172.25.25.1
服务端 2 ip 172.25.25.2
安装包 nagios-plugins-2.1.1.tar.gz
nagios-cn-3.2.3.tar.bz2
gd-devel-2.0.35-11.el6.x86_64.rpm
nrpe-2.15.tar.gz
防火墙状态:关闭
Selinux 状态:Disabled
1. 安装 nagios、监控本地及测试
A)配置安装 nagios 及插件
[root@sever1 mnt]# ls
nagios-plugins-2.1.1.tar.gz nagios-cn-3.2.3.tar.bz2
gd-devel-2.0.35-11.el6.x86_64.rpm
[root@sever1 mnt]# yum installgd-devel-2.0.35-11.el6.x86_64.rpm -y
[root@sever1 mnt]# useradd Nagios #创建系统用户 ngios
[root@sever1 mnt]# usermod -a -G nagcmd Nagios #将 nagios 添加到 nagcmd 附加组
[root@sever1 mnt]# usermod -a -G nagcmd apache #将 apache 也添加到 nagcnd 附加组
[root@sever1 mnt]# id Nagios #查看
uid=1001(nagios) gid=1001(nagios)groups=1001(nagios),1002(nagcmd)
[root@sever1 mnt]# id apache
uid=48(apache) gid=48(apache) groups=48(apache),1002(nagcmd)
[root@sever1 mnt]# tar jxf nagios-cn-3.2.3.tar.bz2 #解压
[root@sever1 mnt]# cd nagios-cn-3.2.3
[root@sever1 nagios-cn-3.2.3]# ./configure–with-command-group=nagcmd #配置
[root@sever1 nagios-cn-3.2.3]# make all
[root@sever1 nagios-cn-3.2.3]# make install #安装
[root@sever1 nagios-cn-3.2.3]# make install-init #安装脚本文件
[root@sever1 nagios-cn-3.2.3]# make install-config #安装配置文件
[root@sever1 nagios-cn-3.2.3]# make install-webconf
[root@sever1 nagios-cn-3.2.3]# cat /usr/local/nagios/etc/htpasswd.users #查看密码
nagiosadmin:gCWSDnqEHR45c
[root@sever1 nagios-cn-3.2.3]# htpasswd -c/usr/local/nagios/etc/htpasswd.users nagiosadmin #修改密码
New password:
Re-type new password:
Adding password for user nagiosadmin
[root@sever1 nagios-cn-3.2.3]# cat/usr/local/nagios/etc/htpasswd.usersnagiosadmin:QNeDXoEuaEVuI
[root@sever1 nagios-cn-3.2.3]# /etc/init.d/httpd start #开启 httpd
Stopping httpd: [OK]
[root@sever1 nagios-cn-3.2.3]# /usr/local/nagios/bin/nagios -v/usr/local/nagios/etc/nagios.cfg #校验 nagios 的语法
[root@sever1 nagios-cn-3.2.3]# /etc/init.d/nagios start #开启 nagios
Starting nagios: done.
# 安装 nagios 插件
[root@sever1 mnt]# tar zxf nagios-plugins-2.1.1.tar.gz #解压
[root@sever1 mnt]# cd nagios-plugins-2.1.1
[root@sever1 nagios-plugins-2.1.1]# ./config–with-nagios-user=nagios –with-nagios-group=nagios #配置
[root@sever1 nagios-plugins-2.1.1]# make #编译
[root@sever1 nagios-plugins-2.1.1]# make install #安装
B)添加本地服务
[root@server1 etc]# vimnagios.cfg
cfg_file=/usr/local/nagios/etc/objects/hosts.cfg #添加文件
cfg_file=/usr/local/nagios/etc/objects/services.cfg
# Definitions formonitoring the local (Linux) host
#cfg_file=/usr/local/nagios/etc/objects/localhost.cfg #标记 localhost 文件
[root@server1 etc]# cd objects/
[root@server1 objects]# cp -p localhost.cfg hosts.cfg
[root@server1 objects]# cp -p localhost.cfg services.cfg
[root@server1 objects]# vim hosts.cfg #主机配置文件
define host{#主机
use linux-server #使用的模板
host_name server1.example.com #主机名
alias Manager #别名
address 172.25.29.1 #ip
icon_image server.gif #下面几行是在拓扑图中的位置
statusmap_image server.gd2
2d_coords 500,200
3d_coords 500,200,100
}
define hostgroup{
hostgroup_name linux-servers ;The name of the hostgroup
alias Linux Servers ; Long name of the group
members * ; Comma separated list of hosts that belong to this group
}
[root@server1 objects]# vim service.cfg #服务配置文件
define servicegroup{#服务组
servicegroup_name 系统负荷检查
alias 负荷检查
membersserver1.example.com, 进程总数,server1.example.com, 登录用户数,server1.example.com, 根分区,server1.example.com, 交换空间利用率
}
define service{#服务
use local-service #使用的模板
host_name *
service_description PING
check_command check_ping!100.0,20%!500.0,60% #要传的参数
}
define service{
use local-service ; Name of service template to use
host_name server1.example.com
service_description 根分区
check_command check_local_disk!20%!10%!/
}
define service{
use local-service ; Name of service template to use
host_name server1.example.com
service_description 登录用户数
check_command check_local_users!20!50
}
define service{
use local-service ; Name of service template to use
host_name server1.example.com
service_description 进程总数
check_command check_local_procs!250!400!RSZDT
}
define service{
use local-service ; Name of service template to use
host_name server1.example.com
service_description 系统负荷
check_command check_local_load!5.0,4.0,3.0!10.0,6.0,4.0
}
define service{
use local-service ; Name of service template to use
host_name server1.example.com
service_description 交换空间利用率
check_command check_local_swap!20!10
}
define service{
use local-service ; Name of service template to use
host_name server1.example.com
service_description SSH
check_command check_tcp!22!1.0!10.0
notifications_enabled 0
}
define service{
use local-service ; Name of service template to use
host_name server1.example.com
service_description HTTP
check_command check_http
notifications_enabled 0
}
[root@server1 objects]# /etc/init.d/nagios reload #刷新
Running configuration check…done.
Reloading nagios configuration…done
C)测试 172.25.25.1/Nagios
更多详情见请继续阅读下一页的精彩内容 :http://www.linuxidc.com/Linux/2017-03/141600p2.htm
3. 远程监控服务端 2 的根分区和用户数
A)安装 nagios 插件及 nrpe
服务端 2
[root@server2 mnt]# ls
nagios-plugins-2.1.1.tar.gz nrpe-2.15.tar.gz
[root@server2 mnt]# tar zxf nagios-plugins-2.1.1.tar.gz #解压 plugins 插件
[root@server2 mnt]# cd nagios-plugins-2.1.1
[root@server2 nagios-plugins-2.1.1]# ./configure
[root@server2 nagios-plugins-2.1.1]# make
[root@server2 nagios-plugins-2.1.1]# make install
[root@server2 mnt]# cd /usr/local/nagios/
[root@server2 nagios]# ls
include libexec share
[root@server2 nagios]# useradd -u 1001 nagios #创建 nagios 用户
[root@server2 nagios]# chown nagios.nagios * -R #修改文件权限
[root@server2 nagios]# ll #查看
total 12
drwxr-xr-x 2 nagios nagios 4096 Oct 23 10:50 include
drwxr-xr-x 2 nagios nagios 4096 Oct 23 10:50 libexec
drwxr-xr-x 3 nagios nagios 4096 Oct 23 10:50 share
[root@server2 libexec]# cd /mnt/
[root@server2 mnt]# tar zxf nrpe-2.15.tar.gz #解压 nrpe
[root@server2 mnt]# cd nrpe-2.15
[root@server2 nrpe-2.15]# ./configure #配置
[root@server2 nrpe-2.15]# make all
[root@server2 nrpe-2.15]# make install-plugin
[root@server2 nrpe-2.15]# make install-daemon
[root@server2 nrpe-2.15]# make install-daemon-config
[root@server2 nrpe-2.15]# yum install -y xinetd
[root@server2 nrpe-2.15]# make install-xinetd
[root@server2 nrpe-2.15]# vim /etc/services #添加 nrpe 的端口
nrpe 5666/tcp
[root@server2 nrpe-2.15]# cd /etc/xinetd.d/
[root@server2 xinetd.d]# vim nrpe #进入配置文件
15 only_from = 172.25.25.1 #允许 172.25.25.1 监听
[root@server2 etc]# cd /usr/local/nagios/etc/
[root@server2 etc]# ls
nrpe.cfg
[root@server2 etc]# vim nrpe.cfg #修改命令
221 command[check_disk]=/usr/local/nagios/libexec/check_disk -w20% -c 10% -p /
[root@server2 etc]# cd ..
[root@server2 nagios]# ls
bin etc include libexec share
[root@server2 nagios]# cd libexec/
[root@server2 libexec]# ./check_disk -w 20% -c 10% -p / #测试
DISK OK – free space: / 6222 MB (85% inode=93%);|/=1057MB;6135;6902;0;7669
[root@server2 libexec]# /etc/init.d/xinetd start #开启 xinetd
Starting xinetd: [OK]
[root@server2 libexec]# netstat -antple |grep 5666 #查看端口,开启
tcp 0 0 :::5666 :::* LISTEN 0 23552 23120/xinetd
[root@server2 libexec]# scp check_nrpe172.25.25.1:/usr/local/nagios/libexec/
root@172.25.25.1’s password: #将 nrpe 传给服务端 1
check_nrpe 100% 75KB 75.0KB/s 00:00
B) 将根分区和用户数(服务端 2)添加到 nagios(服务端 1)
服务端 1
[root@server1 libexec]# pwd
/usr/local/nagios/libexec
[root@server1 libexec]# chown nagios.nagios check_nrpe #修改权限
[root@server1 libexec]# ./check_nrpe -H 172.25.25.2 #测试
NRPE v2.15
[root@server1 libexec]# cd ..
[root@server1 nagios]# cd etc/objects/
[root@server1 objects]# vim services.cfg #添加服务
####################check_nrpe#######################
define service{
use local-service
host_name server2.example.com
service_description 根分区
check_command check_nrpe!check_disk
}
define service{
use local-service
host_name server2.example.com
service_description 登录用户数
check_command check_nrpe!check_users
}
[root@server1 objects]# vim commands.cfg #添加命令
# ‘check_nrpe’ command definition
define command{
command_name check_nrpe
command_line $USER1$/check_nrpe -H $HOSTADDRESS$ -c$ARG1$
}
[root@server1 objects]# /usr/local/nagios/bin/nagios -v/usr/local/nagios/etc/nagios.cfg
Total Warnings: 0
Total Errors: 0
Things look okay – No serious problems were detected during thepre-flight check
[root@server1 objects]# /etc/init.d/nagios reload #刷新
C)测试
4.nagios 警报的配置及测试(邮件联系人)
[root@server1 objects]# vim contacts.cfg #修改邮件地址
35 email xxxxxxxxxx@qq.com
[root@server1 objects]# /etc/init.d/nagios reload #刷新
[root@server1 ~]$ cd /mnt/
[root@server1 mnt]$ ls
alert-agent-4.1.3.1-linux-x64.tar.gz
[root@server1 mnt]$ tar zxfalert-agent-4.1.3.1-linux-x64.tar.gz -C /usr/local/nagios/libexec/
[root@server1 mnt]$ cd /usr/local/nagios/libexec/
[root@server1 libexec]$ cpalert-agent/plugin/nagios-plugin/nagios .
[root@server1 libexec]$ cpalert-agent/plugin/nagios-plugin/110monitor.cfg ../etc/objects/
[root@server1 libexec]$ chmod +x nagios
[root@server1 libexec]$ chmod nagios.nagios * -R
[root@server1 libexec]$ cd ..
[root@server1 nagios]# cd etc/
[root@server1 etc]# vim nagios.cfg
cfg_file=/usr/local/nagios/etc/objects/110monitor.cfg #添加
[root@server1 etc]# cd objects/
[root@server1 objects]# vim 110monitor.cfg
18 pager 379cd8ca-5700-e2ef-10a2-c72a9158b55a #改成自己生成的 key
[root@server1 objects]# /usr/local/nagios/bin/nagios -v/usr/local/nagios/etc/nagios.cfg
Total Warnings: 0
Total Errors: 0
Things look okay – No serious problems were detected during thepre-flight check
[root@server1 objects]# /etc/init.d/nagios reload
B)测试 当把服务端 2 的 mysql 停掉之后,如图:

邮件也发过来了,如图

本文永久更新链接地址 :http://www.linuxidc.com/Linux/2017-03/141600.htm