共计 7185 个字符,预计需要花费 18 分钟才能阅读完成。
FastDFS 是一个开源的轻量级分布式文件系统,它对文件进行管理,功能包括:文件存储、文件同步、文件访问(文件上传、文件下载)等,解决了大容量存储和负载均衡的问题。特别适合以文件为载体的在线服务。
本文详细介绍了 FastDFS 在 CentOS 系统上的详细安装过程,在从机上使用了 nginx 实现了 http 的访问请求,我们开始吧。。(转载请标明,谢谢)
FastDFS 工具包 可以到 Linux 公社资源站下载:
—————————————— 分割线 ——————————————
免费下载地址在 http://linux.linuxidc.com/
用户名与密码都是www.linuxidc.com
具体下载目录在 /2017 年资料 / 2 月 / 7 日 /CentOS 上 FastDFS 安装配置与使用 /
下载方法见 http://www.linuxidc.com/Linux/2013-07/87684.htm
—————————————— 分割线 ——————————————
使用 winscp 将工具包复制到服务器中

1、节点和关闭服务(关闭防火墙)
sudo service iptables stop
sudo chkconfig iptables off
sudo vi /etc/selinux/config 修改 selinux=disable
2、开始安装 fastdfs,主机 Tracker、从机storage 安装方法一样
3、检查 gcc 编译器系统中是否安装
sudo yum install -y gcc gcc-c++
4、FastDFS_v5.05依赖libfastcommon,不再依赖libevent。
5、安装libfastcommon
(1)安装 unzip 包,将 libfastcommon 解压到 /usr/local 下
sudo yum install -y unzip zip
sudo unzip libfastcommon-1.0.7.zip -d /usr/local
(2)编译并运行
cd /usr/local/libfastcommon-1.0.7
sudo ./make.sh
sudo ./make.sh install
由于 FastDFS 主程序设置的 lib 目录是 /usr/local/lib,所以需要创建软链接.
sudo ln -s /usr/lib64/libfastcommon.so /usr/local/lib/libfastcommon.so
sudo ln -s /usr/lib64/libfastcommon.so /usr/lib/libfastcommon.so
sudo ln -s /usr/lib64/libfdfsclient.so /usr/local/lib/libfdfsclient.so
sudo ln -s /usr/lib64/libfdfsclient.so /usr/lib/libfdfsclient.so
6、安装FastDFS
(1)解压 FastDFS 至 /usr/local
sudo tar -zxvf FastDFS_v5.05.tar.gz -C /usr/local
(2)编译并安装
cd /usr/local/FastDFS
sudo ./make.sh
sudo ./make.sh install
安装完成,如果安装失败,检查一下软连接,主机从机都必须这样配置
7、配置 Tracker 和Storage
(1)Tracker,创建 tracker.conf
cd /etc/fdfs/
sudo cp tracker.conf.sample tracker.conf
创建数据存储目录
mkdir /mnt/fastdfs_tracker
修改 tracker.conf 配置文件
base_path=/mnt/fastdfs_tracker
启动该配置文件
fdfs_trackerd /etc/fdfs/tracker.conf
(2)Storage,创建 storage.conf
cd /etc/fdfs/
sudo cp storage.conf.sample storage.conf
创建数据存储目录
sudo mkdir /mnt/fastdfs_storage_info
sudo mkdir /mnt/fastdfs_storage_data
修改 storage.conf 配置文件
base_path=/mnt/fastdfs_storage_info
store_path0=/mnt/fastdfs_storage_data
tracker_server= 主机 IP: 端口(默认 22122)
第一次启动该配置文件(该动作有点慢耐心等待)
fdfs_storaged /etc/fdfs/storage.conf
注:出错请查看日志:
cat /mnt/fastdfs_tracker/logs/tracker.log
cat /mnt/fastdfs_storage_info/logs/storage.log
Telnet 检查主从是否通信
http://www.linuxidc.com/Linux/2016-01/127983.htm
http://www.linuxidc.com/Linux/2017-02/140349.htm
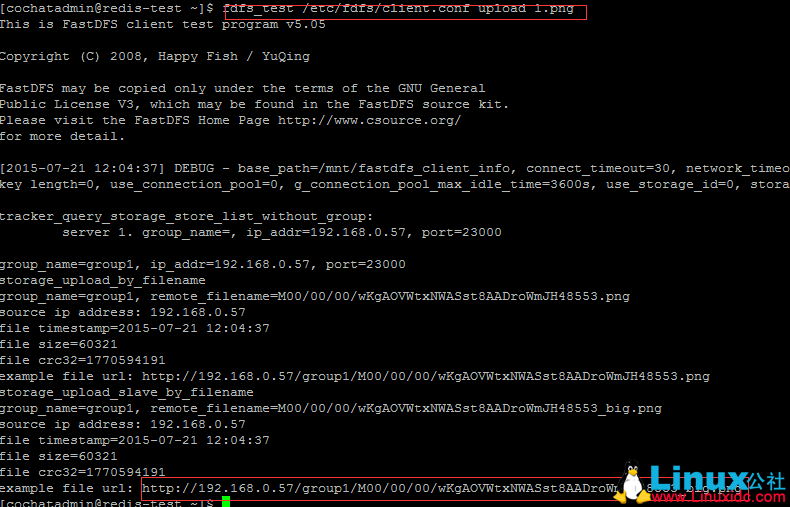
使用 fdfs_test /etc/fdfs/client.conf upload 1.png 测试 fastdf 有没有正常工作, 正确显示如下图:

8、在 storage 上安装的 nginx 主要为了提供 http 的访问服务,同时解决 group 中storage服务器的同步延迟问题
(1)解压 nginx 插件 fastdfs-nginx-module, 以及依赖包 pcre、zlib
sudo tar -zxvf FastDFS_v5.05.tar.gz -C /usr/local
sudo tar -zxvf pcre-8.34.tar.gz -C /usr/local
sudo tar -zxvf zlib-1.2.8.tar.gz -C /usr/local
(2)解压安装 nginx
sudo tar -zxvf nginx-1.7.8.tar.gz -C /usr/local
sudo ./configure
–prefix=/usr/local/nginx –add-module=/usr/local/fastdfs-nginx-module/src –with-pcre=/usr/local/src/pcre-8.34/ –with-zlib=/usr/local/src/zlib-1.2.8
(如果提示错误,可能缺少依赖的软件包,需先安装依赖包,再次运行./configure)
sudo make
sudo make install
9、将 FastDFS 的nginx插件模块的配置文件 copy 到FastDFS配置文件目录。
(1)cp/usr/local/fastdfs-nginx-module/src/mod_fastdfs.conf /etc/fdfs/
(2)将 fastdfs 安装包中的 http.conf、mime.types 两个文件拷贝到 /etc/fdfs 中
sudo cp /usr/local/FastDFS/conf/http.conf /etc/fdfs/
sudo cp /usr/local/FastDFS/conf/mime.types /etc/fdfs/
(3)编辑 /usr/local/nginx/conf 配置文件目录下的 nginx.conf,设置添加 storage 信息并保存。
sudo vi /usr/local/nginx/conf/nginx.conf
将 server 段中的 listen 端口号改为 8080:
listen 8080;
在 server 段中添加:
location ~/group1/M00 {
root /mnt/fastdfs_storage_data;
ngx_fastdfs_module;
}
可以设置多个组,上面只设置了一个组‘group1’根据具体情况而定
location ~/group[1-3]/M00 {
root /mnt/fastdfs_storage_data;
ngx_fastdfs_module;
}
(4)编辑 /etc/fdfs 配置文件目录下的 mod_fastdfs.conf,设置 storage 信息并保存。
sudo vi /etc/fdfs/mod_fastdfs.conf
一般只需改动以下几个参数即可:
base_path=/fdfs/storage #保存日志目录
tracker_server= 主机 IP:22122 #tracker 服务器的 IP 地址以及端口号
storage_server_port=23000 #storage 服务器的端口号
group_name=group1 #当前服务器的 group 名
url_have_group_name = true #文件 url 中是否有 group 名
store_path_count=1 #存储路径个数,需要和 store_path 个数匹配
store_path0=/fdfs/storage #存储路径
http.need_find_content_type=true #从文件扩展名查找文件类型(nginx 时为 true)
有的版本没有该选项不要管它
根据你上面设置的组个数设置
group_count = 1 #设置组的个数
在末尾增加 1 个组的具体信息:(设置几组就添加几组)
[group1]
group_name=group1
storage_server_port=23000
store_path_count=1
store_path0=/mnt/fastdfs_storage_data
/*[group2]
group_name=group2
storage_server_port=23000
store_path_count=1
store_path0=/mnt/fastdfs_storage_data
[group3]
group_name=group3
storage_server_port=23000
store_path_count=1
store_path0=/mnt/fastdfs_storage_data*/
(5)建立 M00 至存储目录的软连接
sudo ln -s /mnt/fastdfs_storage_data /mnt/fastdfs_storage_data/M00
测试软连接有没有设置成功
ll /fdfs/storage/data/M00
lrwxrwxrwx. 1 root root 19 3 月 26 03:44 /fdfs/storage/data/M00 -> /fdfs/storage/data/
10、运行nginx
(1)运行 nginx 之前,先要把防火墙中对应的端口打开(本例中为 8080)。
不是 root 用户都要 sudo
[root@storage1 nginx-1.4.7]# iptables -I INPUT -p tcp -m state –state NEW -m tcp –dport 8080 -j ACCEPT
[root@storage1 nginx-1.4.7]# /etc/init.d/iptables save
(2)启动 nginx,确认启动是否成功。(查看是否对应端口 8080 是否开始监听)
[root@storage1 nginx-1.4.7]# /usr/local/nginx/sbin/nginx
ngx_http_fastdfs_set pid=40638
[root@storage1 nginx-1.4.7]# netstat -unltp | grep nginx
tcp 0 0.0.0.0:8080 0.0.0.0:* LISTEN 40639/nginx
也可查看 nginx 的日志是否启动成功或是否有错误。
[root@storage1 nginx-1.4.7]# cat /usr/local/nginx/logs/error.log
ngx_http_fastdfs_process_init pid=40640
[2014-03-26 03:47:17] INFO – local_host_ip_count: 2, 127.0.0.1 从机 IP
[2014-03-26 03:47:17] INFO – fastdfs apache / nginx module v1.15, response_mode=proxy, base_path=/tmp, url_have_group_name=1, group_count=3, connect_timeout=2, network_timeout=30, tracker_server_count=1, if_alias_prefix=, local_host_ip_count=2, need_find_content_type=1, default_content_type=application/octet-stream, anti_steal_token=0, token_ttl=0s, anti_steal_secret_key length=0, token_check_fail content_type=, token_check_fail buff length=0, load_fdfs_parameters_from_tracker=1, storage_sync_file_max_delay=86400s, use_storage_id=0, storage server id count=0, flv_support=1, flv_extension=flv
[2014-03-26 03:47:17] (设置几组显示几组)
INFO – group 1. group_name=group1, storage_server_port=23000, path_count=1, store_path0=/mnt/fastdfs_storage_data
[2014-03-26 03:47:17]
INFO – group 2. group_name=group2, storage_server_port=23000, path_count=1, store_path0=/mnt/fastdfs_storage_data
[2014-03-26 03:47:17]
INFO – group 3. group_name=group3, storage_server_port=23000, path_count=1, store_path0=/mnt/fastdfs_storage_data
在 error.log 中没有错误,既启动成功。可以打开浏览器,直接访问 http:// 从机:8080,查看是否弹出 nginx 欢迎页面。
查看从机上传的文件:
http://10.120.20.191:8080/group1/M00/00/00/wKgAOVWsnq-AOMfVAADroWmJH48190_big.png
CentOS6 环境单服务器 FastDFS+Nginx+fastdfs-nginx-module 安装配置 http://www.linuxidc.com/Linux/2015-01/111889.htm
Ubuntu 14.04 下部署 FastDFS 5.08+Nginx 1.9.14 http://www.linuxidc.com/Linux/2016-07/133485.htm
CentOS 6.2 下 fastDFS 的完整安装和配置步骤 http://www.linuxidc.com/Linux/2012-12/75989.htm
FastDFS 在 Ubuntu 下的安装,PHP 客户端 http://www.linuxidc.com/Linux/2012-09/71459.htm
FastDFS 分布式文件服务器安装,及配置,测试 http://www.linuxidc.com/Linux/2012-09/71458.htm
CentOS 7 安装配置分布式文件系统 FastDFS 5.0.5 http://www.linuxidc.com/Linux/2016-09/135537.htm
FastDFS 分布式存储服务器安装过程详解 http://www.linuxidc.com/Linux/2016-10/136544.htm
FastDFS 之文件服务器集群部署详解 http://www.linuxidc.com/Linux/2017-01/139891.htm
FastDFS 的详细介绍:请点这里
FastDFS 的下载地址:请点这里
本文永久更新链接地址:http://www.linuxidc.com/Linux/2017-02/140348.htm


