共计 3024 个字符,预计需要花费 8 分钟才能阅读完成。
Spring 是什么
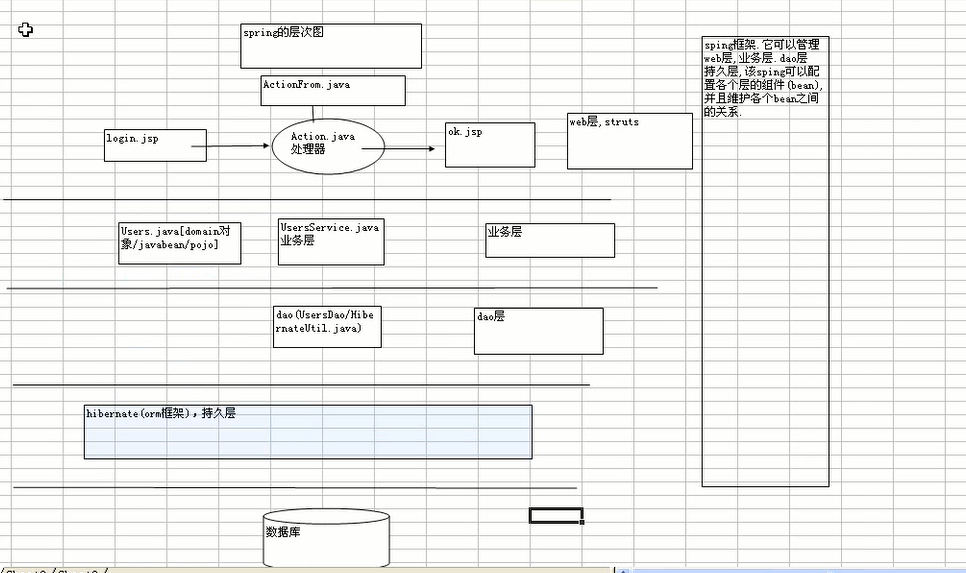
Spring 是一个容器框架,用于配置 bean 并且维护 bean 之间关系的框架。
Spring 的结构图:

搭建 Spring 框架步骤
- 下载 Spring 开发包,Spring-4.3.4 完整开发包下载。
- 在 JavaProject 下面建立一个 lib 目录,将开发包下面的 libs 目录里的所有以 spring 开头的 jar 文件,和 commons-logging 文件都拷贝到新建的 lib 里面。
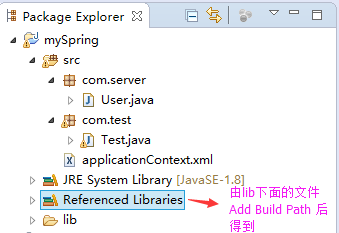
- 将拷贝的文件全部选中,然后添加到 Build path 里。
Spring-4.3.4 完整开发包下载地址 :
到 Linux 公社 1 号 FTP 服务器下载
—————————————— 分割线 ——————————————
FTP 地址:ftp://ftp1.linuxidc.com
用户名:ftp1.linuxidc.com
密码:www.linuxidc.com
在 2016 年 LinuxIDC.com\12 月 \ 浅析 Spring 框架的搭建 \
下载方法见 http://www.linuxidc.com/Linux/2013-10/91140.htm
—————————————— 分割线 ——————————————
简单 Demo
我的结构目录:

-
建立一个 User 类
package com.server; public class User {private String name; public void getName() {System.out.println("Hello"+name); } public void setName(String name) {this.name = name; } } -
建立一个 Test 类
package com.test;

/*
 * 引入 ApplicationContext 和 ClassPathXmlApplication
 */
import org.springframework.context.ApplicationContext;
import org.springframework.context.support.ClassPathXmlApplicationContext;

import com.server.User;

public class Test {public static void main(String[] args) {ApplicationContext ac=new ClassPathXmlApplicationContext("applicationContext.xml");
        User user = (User)ac.getBean("user");// 根据 Bean 的 id 来识别
        user.getName();}

}
ApplicationContext 是一个接口,由 ClassPathXmlApplicationContext 寻找 applicationContext 这个文件,在开发包里一个 index.html 的网页文件,读者可以在里面查找相应 Spring 版本的 API 文档。
ApplicationContext ac=new ClassPathXmlApplicationContext("applicationContext.xml"); -
建立 applicationContext 文件
<?xml version="1.0" encoding="UTF-8"?>
<beans xmlns="http://www.springframework.org/schema/beans" xmlns:context="http://www.springframework.org/schema/context" xmlns:xsi="http://www.w3.org/2001/XMLSchema-instance" xmlns:aop="http://www.springframework.org/schema/aop"
    xmlns:tx="http://www.springframework.org/schema/tx" xmlns:p="http://www.springframework.org/schema/p" xmlns:util="http://www.springframework.org/schema/util" xmlns:jdbc="http://www.springframework.org/schema/jdbc"
    xmlns:cache="http://www.springframework.org/schema/cache"
    xsi:schemaLocation="http://www.springframework.org/schema/context
    http://www.springframework.org/schema/context/spring-context.xsd
    http://www.springframework.org/schema/beans
    http://www.springframework.org/schema/beans/spring-beans.xsd
    http://www.springframework.org/schema/tx
    http://www.springframework.org/schema/tx/spring-tx.xsd
    http://www.springframework.org/schema/jdbc
    http://www.springframework.org/schema/jdbc/spring-jdbc-3.1.xsd
    http://www.springframework.org/schema/cache
    http://www.springframework.org/schema/cache/spring-cache-3.1.xsd
    http://www.springframework.org/schema/aop
    http://www.springframework.org/schema/aop/spring-aop.xsd
    http://www.springframework.org/schema/util
    http://www.springframework.org/schema/util/spring-util.xsd">

    <!-- 在容器文件中配置 bean(service/dao.domain/action/ 数据原); -->

    <!-- bean 的作用是,当我们的 Spring 框架加载的时候,spring 就会自动创建一个 bean 对象,并且放入内存。id 是标识符,class 指定路径
          本例相当于:User user=new User();
             user.setName(""chauncy);
     -->
    <bean id="user" class="com.server.User">
      <property name="name">
        <value>chauncy</value>
      </property>
    </bean>

</beans>
本文永久更新链接地址 :http://www.linuxidc.com/Linux/2016-12/138821.htm
正文完
星哥玩云-微信公众号


