共计 4069 个字符,预计需要花费 11 分钟才能阅读完成。
Apache 编译安装篇
安装 Apache 需安装以下的几个包,apr apr-util,pcre 等,当然这几个包也可以使用由系统本身自带的包,但是这里我们编译安装这几个包。
2. 下载安装 apr,
把文件放到 /usr/local/src 目录下,
tar -zxvf apr-1.5.2.tar.gz
cd apr-1.5.2
./configure –prefix=/usr/local/apr/
make
make install
3. 下载安装
apr-utils
tar -zxvf apr-util-1.5.4.tar.gz
cd apr-util-1.5.4
./configure –prefix=/usr/local/apr-util/ –with-apr=/usr/local/apr/# 这里配置的时候要制定 apr 的安装路径。
make
make install
4. 安装 pcre
tar -zxvf pcre
cd pcre
./configure –prefix=/usr/local/pcre
make && make install
5. 安装 apache 这里安装的版本是 2.4.18,比较新的版本
tar -zxvf httpd-2.4.18.tar.gz
cd httpd-2.4.18
./configure –with-apr=/usr/local/apr/ –with-apr-util=/usr/local/apr-util/ –with-pcre=/usr/local/pcre/
make
make install
6. 安装完成一般会有以下的几个目录
bin build cgi-bin conf error htdocs icons include logs man manual modules
7. 修改配置文件
vim /usr/local/apache2/conf/httpd.conf
找到下面的该行,把监听端口改成本地的 80
#ServerName www.example.com:80
ServerName localhost:80
8. 启动 apache
/usr/local/apache2/bin/apachectl -k start
9. 查看进程
ps -ef|grep httpd
root 28310 1 0 10:11 ? 00:00:00 /usr/local/apache2/bin/httpd -k start
daemon 28311 28310 0 10:11 ? 00:00:00 /usr/local/apache2/bin/httpd -k start
daemon 28312 28310 0 10:11 ? 00:00:00 /usr/local/apache2/bin/httpd -k start
daemon 28313 28310 0 10:11 ? 00:00:00 /usr/local/apache2/bin/httpd -k start
root 28420 4860 0 10:11 pts/1 00:00:00 grep httpd
10. 查看端口
[root@localhost bin]# netstat -tunlp|grep httpd
tcp 0 0 :::80 :::* LISTEN 28310/httpd
编译安装 php
这里我们安装的版本是 5.6.11,
tar -jxvf php-5.6.11.tar.bz2
cd php-5.6.11
./configure –prefix=/usr/local/php –with-apxs2=/usr/local/apache2/bin/apxs
make && make install
做 Nagios 前端展示篇
配置 apache 支持 nagios,修改 /usr/local/apache2/conf/httpd.conf 的文件
把 User deamon
Group deamon
改为
User nagios
Group nagios
然后找到
<IfModule dir_module>
DirectoryIndex index.html
</IfModule>
修改为
<IfModule dir_module>
DirectoryIndex index.html index.php
AddType application/x-httpd-php .php
</IfModule>
再找到模块项,把下面的几个模块选项注释去掉。
LoadModule cgid_module modules/mod_cgid.so
LoadModule actions_module modules/mod_actions.so
为了安全起见,一般情况下要让 nagios 的 web 监控页面必须经过授权才能访问,这需要增加验证配置,即在 httpd.conf 文件最后添加如下信息:
ScriptAlias /nagios/cgi-bin “/usr/local/nagios/sbin”#nagiosCGI 脚本位置
<Directory “/usr/local/nagios/sbin”>
# SSLRequireSSL
Options ExecCGI
AllowOverride None
Require all granted
# Order deny,allow
# Allow from all
# Allow from 127.0.0.1
AuthName “Nagios Access”
AuthType Basic
AuthUserFile /usr/local/nagios/etc/htpasswd.users#nagios 用户认证文件
Require valid-user
</Directory>
Alias /nagios “/usr/local/nagios/share”# 访问网页文件路径别名
<Directory “/usr/local/nagios/share”>
# SSLRequireSSL
Options None
AllowOverride None
Require all granted
# Order allow,deny
# Allow from all
# Order deny,allow
# Deny from all
# Allow from 127.0.0.1
AuthName “Nagios Access”
AuthType Basic
AuthUserFile /usr/local/nagios/etc/htpasswd.users
Require valid-user
</Directory>
2. 创建 apache 目录验证文件
在上面的配置中,指定了目录验证文件 htpasswd,下面要创建这个文件:
/usr/local/apache2/bin/htpasswd -c /usr/local/nagios/etc/htpasswd.users nagiosadmin
New password:
Re-type new password:
Adding password for user nagiosadmin
3. 关闭并重启 apache
pkill httpd
/usr/local/apache2/bin/apachectl -k start
启动 apache, 报 403 拒绝访问,这里是 2.4* 的版本
要在 httpd.conf 里改配置文件
把
<Directory />
AllowOverride none
Require all denied
</Directory>
改为
<Directory />
AllowOverride none
Require all granted
</Directory>
并重启 apache
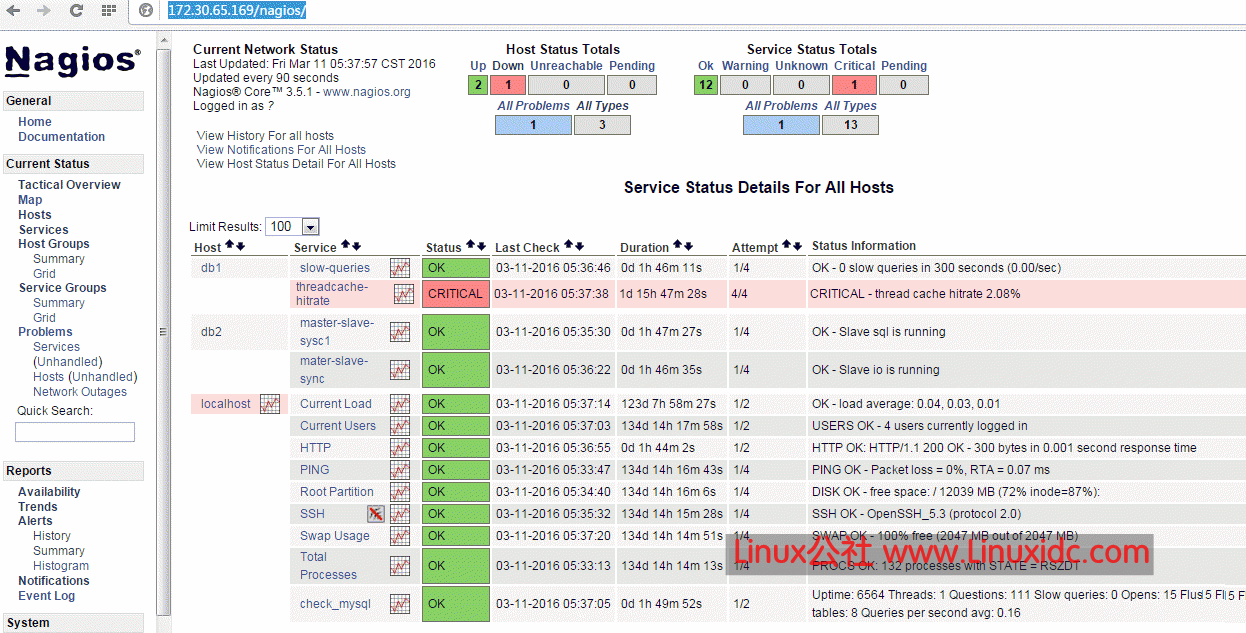
nagios 展示效果:
打开
http://172.30.65.169/nagios/ 的页面,输入 nagios 认证用户名 nagiosadmin, 和刚设置的密码
页面会显示如下图所示

————————————– 分割线 ————————————–
在 Ubuntu 下配置 Mrtg 监控 Nginx 和服务器系统资源 http://www.linuxidc.com/Linux/2013-08/88417.htm
使用 snmp+Mrtg 监控 Linux 系统 http://www.linuxidc.com/Linux/2012-11/73561.htm
Mrtg 服务器搭建(监控网络流量)http://www.linuxidc.com/Linux/2012-07/64315.htm
网络监控器 Nagios 全攻略 http://www.linuxidc.com/Linux/2013-07/87067.htm
Nagios 搭建与配置详解 http://www.linuxidc.com/Linux/2013-05/84848.htm
Nginx 环境下构建 Nagios 监控平台 http://www.linuxidc.com/Linux/2011-07/38112.htm
在 RHEL5.3 上配置基本的 Nagios 系统(使用 Nagios-3.1.2) http://www.linuxidc.com/Linux/2011-07/38129.htm
CentOS 5.5+Nginx+Nagios 监控端和被控端安装配置指南 http://www.linuxidc.com/Linux/2011-09/44018.htm
Ubuntu 13.10 Server 安装 Nagios Core 网络监控运用 http://www.linuxidc.com/Linux/2013-11/93047.htm
————————————– 分割线 ————————————–
Nagios 的详细介绍:请点这里
Nagios 的下载地址:请点这里
本文永久更新链接地址:http://www.linuxidc.com/Linux/2016-03/129125.htm


